I was reading an old thread on here about reloading for the 7 mm Remington Mag, and one of the comments was emphatically made that it's important to set your dues up properly. I'm interested to hear what that means exactly as I'm concerned I'm doing it wrong or not properly.
You are using an out of date browser. It may not display this or other websites correctly.
You should upgrade or use an alternative browser.
You should upgrade or use an alternative browser.
Proper die set up
- Thread starter thaught
- Start date
Get a hornady headspace comparator. Measure your fired brass. Set your die to only bump the shoulder back 2-3 thou. If you just follow the die instructions depending on your chamber you can be pushing the shoulders back 10-12 thou. With any case but especially a belted case this will lead to a case head separation very quickly. By just bumping the shoulders slightly you force the brass to headspace off the shoulder and not the belt.
aushunter1
Well-Known Member
I have never had a belted cartridge but have read some info on it but it still confused me on how they get their headspacing.
Some say headspace off the belt & some say headspace just like a rimless bottleneck case??
So I cant really comment but it interests me on what you need to measure headspace & how a belted cartridge die set up differs?
Some say headspace off the belt & some say headspace just like a rimless bottleneck case??
So I cant really comment but it interests me on what you need to measure headspace & how a belted cartridge die set up differs?
MagnumManiac
Well-Known Member
- Joined
- Feb 25, 2008
- Messages
- 5,588
The simplest method, without measuring tools, is to screw the FL die in until it touches the shellholder, then screw it out half a turn. Size a case, clean it and try to chamber it. In all but the longest chambers this will result in a no go situation. Using a different case each time, screw the die in 1/12 of a turn and try again. Keep doing this until a case can close the bolt on with some resistance, then screw the die in an additional 1/24 turn, if this gives slight resistance, do another. You want a little clearance.
This method has always given me close to .003" bump, which I have confirmed with the Hornady bump gauge set.
Cheers.
This method has always given me close to .003" bump, which I have confirmed with the Hornady bump gauge set.
Cheers.
I do it very much like MagnumManiac in Post #4. I found I got a very slight crush fit with the dies set 0.004" above the shell-holder. To really feel the fit, you remove the striker assembly so that you're not fighting the firing spring to get the feel as the lugs rotate in and lock. I'd start with sizing a case at something like 0.0025" above and work up in 0.0005 increments until you can just feel the friction of the parts coming together. Mine was easy at a consistent 0.004 inches for three forming dies and a resizing die to cold-form from .375 Ruger Basic cases to loaded mildcat cases ready to prime; yours may be different. Do not let too much resistance creep into the rotation because you'll just be galling your lugs. Once you know the setting above the shell-holder, you can set the dies in just a few seconds.
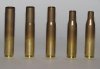
The image below shows how my cases were formed from .375 Ruger Basic brass (no longer to be had from Hornady). The one to the far left is a raw case. Second to left is through the F1 forming die. Middle is through the F2 forming die. Second from right is through the F3 forming die. It had to be trimmed to its 2.494" final length because a lip in the forming die would crush the shoulder when the mouth impacted the lip. The case to the far right is the completed .300 Nevada Desert Magnum case, ready for the final steps of prep before it can be loaded. The blobs of reflected light on the shoulders are where the forming dies placed the ripples when the dies were set 0.004" above the shell-holder.
It's been so long since I've formed any cases that I cannot remember the relationship between die height and the location of the shoulder. I believe it's the higher the die is above the shell-holder, the higher the shoulder will be toward the mouth of the case. I'll have to think on that a bit, or have someone who can better explain it than me make it more understandable.
The .300 Nevada Desert Magnum is exactly what the .30-06 Springfield would be if the Springfield was built on a .532" head. You could call it the ".30-06 Springfield Magnum." I also made a .35 Whelen on a .532" head; it's so named the .358 Sierra Stomper.
Attachments
Last edited:
birdiemc
Well-Known Member
I dont want to insult anybody's intelligence but I think the average human might just read the instructions, setup accordingly and never really think through what all is happening in the process. I know that's what I did when I got started. But I think it's important to really think through and understand what is going on with every aspect. For example, if the shell holder is contacting the base of a sizing die, then the distance from the base of the case to the die shoulder is a fixed distance, the only way to change that distance would be to change a component in the setup, (different die, different shell holder, add shim under the case head) or to back out the die.
Really understanding what is happening inside the die and how all the components effect the end result really helps to make decisions on what to adjust in order to achieve your desired result.
And if somebody offers advice and you cant wrap your head around what that would accomplish dont hesitate to ask WHY before just trying it...saves lots of components
Remove your firing pin if you have a tool to do this and you will notice total free fall of your bolt. Start sizing case a little long and keep sizing a little at a time until your bolt free falls about 3/4 of the way down and you will have a slight crush fit. Your brass will last longer by not over working it. This is very easy to do
For years myself and a lot of folks did the size by feel. It works but it is very subjective. To actually do it right you should probably remove the firing pin and your ejector depending on your bolt. i find the tool cheap abd quick and easy to use. And it gives you an actual number you can reference. The reason I bought mine. I was loading for a single shot encore. Unlike a bolt action you dont get that feel of bolt closing. Combine a long chamber with a minimum spec sizing die and you get 12 thou reszing and a case head separation on the second firing.
entoptics
Well-Known Member
- Joined
- Jan 16, 2018
- Messages
- 846
I don't think this was explicitly answered above, so here it goes...I have never had a belted cartridge but have read some info on it but it still confused me on how they get their headspacing.
Some say headspace off the belt & some say headspace just like a rimless bottleneck case??
So I cant really comment but it interests me on what you need to measure headspace & how a belted cartridge die set up differs?
Headspace can be a "fluid" term, but essentially it is the distance between the bolt face and the case head, when the cartridge is stopped in the chamber. In other words, how much the case has room to move rearwards. On a belted mag, this can be either the belt or the shoulder, whichever is shortest.
Factory ammo and new brass usually have the shoulder pretty far back, and thus the cartridge will stop against the belt, leaving as much as 0.010" between the case shoulder and the chamber shoulder. Upon firing, this will drive the case head backwards whatever the belt headspace allows, and will blow the case body and shoulder forward whatever the shoulder space allows.
Once it's fired, the case shoulder will likely now be very close to the chamber shoulder, and if you were to neck size only, the case would likely stop against the shoulder and not the belt, thus becoming a "shoulder headspace" cartridge like a rimless design.
The problem inherent to belted cartridges, and particularly when using the "standard die instructions", is that when you full size the case, you can push the shoulder all the way back to that factory new distance (or even further).
As described above, you're allowing the front part of the case to blow forward a long ways, and the rest to blow backwards. This stretches the case, thus thinning it. This usually occurs right in front of the belt. After a few firings, the wall thins excessively, and a head separation occurs.
If instead, you bump the shoulder back only a couple of thousandths from it's fired state, just like you'd do for a rimless/beltless cartridge, the case moves far less.
In summary, unless you need extreme chambering reliability to hunt dangerous game, and don't want to reuse your brass more than a couple times, you actually measure case dimensions and set up a belted die exactly the same as you would a rimless/beltless cartridge. Measure base to shoulder on a fired case with a comparator, then adjust your die to push the shoulder down only 0.001" - 0.003", so there's enough space to chamber easily, but not enough for excessive stretching during firing.
Get a hornady headspace comparator. Measure your fired brass. Set your die to only bump the shoulder back 2-3 thou. If you just follow the die instructions depending on your chamber you can be pushing the shoulders back 10-12 thou. With any case but especially a belted case this will lead to a case head separation very quickly. By just bumping the shoulders slightly you force the brass to headspace off the shoulder and not the belt.
Follow this advice and you will have no trouble. I've got 5 belted mags and get great case life doing the die adjustment this way.
I like a very light crush fit as well. Chances of a case head separation are almost non-existent this way. And it seems that I get more consistency day in day out doing it that way.Remove your firing pin if you have a tool to do this and you will notice total free fall of your bolt. Start sizing case a little long and keep sizing a little at a time until your bolt free falls about 3/4 of the way down and you will have a slight crush fit. Your brass will last longer by not over working it. This is very easy to do
Or you can bump you shoulder using the Smoked Shoulder method, Screw you die out, take a fired case and light a match, hold the flame over the shoulder and "smoke it" take that case and and start sizing screwing your die in until you see a faint ring on your shoulder this will give you the .002 to .003 that you need,
Have you ever tried it if not you should before before saying you can't feel it because you can with firing pin outIf you can feel 1-2 thou difference with a firing pin giving resistance and possibly a plunger style ejector I would be shocked.