Making a custom stock

JPaul17

Active Member
Joined
Jan 2, 2012
Messages
33
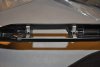
Last fall I bought a Ruger American to use as a cheap varmint rifle and chose it over the Savage Axis due to the two piece stock design from savage. I was hoping that Boyds or some other company would come out with a laminate stock for the Ruger but I guessed wrong as they now have one for the Axis. I don't see anyone offering a wood stock for the Ruger anytime soon so I got to thinking about inletting a stock for the Ruger action but have a few concerns I hope to have answered before I start anything.

First I know its going to be no easy task but I plan on taking my time and doing as clean of a job as I can. And second I know many will probably respond its not worth the time money and effort but I hate to leave the flimsy stock on it and would rather not sell it and buy an axis or other gun just because it has more aftermarket support.

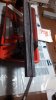
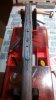
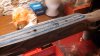
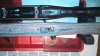
So now to the problem, I'm not sure how many are familiar with the American action and stock but it's and interesting one. Ruger has a metal bedding block that acts as a pillar bedding and fits into slots on the action as opposed to a traditional recoil lug. My fear isn't so much as in the inletting as it is with how to make the stock work with the action. My thought would be to pillar bed the stock and use glass bedding to fill in the slots on the action. Would this suffice to support the action and handle the recoil without adding a recoil lug? I'm guessing this would be why there aren't and aftermarket options. Really I'm just looking for some advice from anyone who has experience with stock making to tell me whether or not I can make a wood stock to work with the action or if it is simply impossible without using a bedding block like Ruger has designed. Any other ideas for how make it work would be greatly appreciated as well.
 
Can you post detailed pictures of the bottom of the action, and the factory stock inlet.

I'll be happy to give you my .02 after I see what you have to work with.
 
The first picture is just the stock by itself showing the beddimg blocks. The second is both the stock and action next to each other to show how they fit together and the third is a close up of the slot that rests on the block. Unfortunately I'm at college away from my gun so the pictures were just what I could find online. Hopefully the are detailed enough for you to make a judgement.
 

Attachments

  • pwrblksystem.jpg
    pwrblksystem.jpg
    24.9 KB · Views: 49
  • DSC09430.jpg
    DSC09430.jpg
    23.9 KB · Views: 54
  • DSC_0565.jpg
    DSC_0565.jpg
    70.9 KB · Views: 48
If I were making a stock for that barreled action, I would forego the aluminum bedding block. I would inlet the stock for the action, and pillar bed it. The bedding would fill the voids in the action and act in the same manner as the aluminum on the factory stock. The bedding on the new stock will give you a stress free 1:1 100% contact in all areas, unlike the bedding block in the factory Tupperware piece.
The pillars will remove the "crush effect" on the wood.

The action is very similar in concept as the P1000 action.
 
That's what I was hoping I could do, just wanted to make sure that the bedding and pillars could take the place of it. Now comes the hard part of doing the work. Thank you for the help.
 
Take your time and think it through. If you have access to a milling machine, the process will go much quicker and easier.

One of the reasons I'm not a big fan of the bedding blocks is evident in the top picture. Look closely at the left rear aluminum lug, and you will see contact marks transferred from the action. There is no possible way they can get 100% contact as all action and lug dimensions are different. Compound that by mounting it all in an injection moulded stock, and you have a less than optimum set up. Good concept, poor execution.
Keep us posted on your progress.
 
Good stuff, Joel, it's nice to see an experienced stock builder, well known to just comment on how these blocks are less than optimal and the value of using bedding compound and pillars. I always wondered with respect to wood how to improve the "stress free" bedding.

Merry Christmas and God Bless all.
 
I do believe the aluminum bedding blocks have a place and a purpose, but not for these applications. If I were sharing a "duty rifle", and that rifle needed to be placed in a multitude of different stocks for short to mid range work, then the aluminum blocks...if properly installed, would be fine.
When I stock a "long range or situational rifle" I never utilize the "V" block. When I bed the stocks that come from the factory with the aluminum bedding block, they immediately find their way to the mill, which removes most of the aluminum to make way for conventional bedding material.
Just my experience, but others opinions may vary...
 
First; Joel is the man !!! If anyone can build a stock it's him and he would not steer you wrong.

My experience has been similar with V Blocks.

They are better than nothing but not as good as a 100% bedded action.

It looks like they did a good job of using the V blocks and some thought went into it also.

When Remington came out with the Sendero they had a good system (Better than nothing) but
problems arrived with torque, if applied wrong it would ruin the accuracy. then the only way to
fix it was to do a full action bed.

I have found that bedding "ALL" actions with inserts, V Blocks, Bedding Blocks and pillars works out better and is more consistent.

Just My Opinion

J E CUSTOM
 
Sounds great guys now I've just got to wait for my blank to arrive and start. Thank you all for the advice.
For bedding compounds I was planning on using Devcon plastic steel what are your guys thoughts on it? Any better options or ones to steer clear of?
 
Well I've been working on the stock for about the past week but having had my wisdom teeth out today I'm going to have to take a break. Figured I give progress report and post some pictures just to show where I'm at.

Started out with and un-inletted Boyd's Thumbhole. While it has a few pros and a few cons it looks like it should turn out fine. I choose it because 1. It was cheap so if i screwed up I didn't feel bad for ruining a fine piece of wood. And 2. because the outside is already shaped I thought it would save me some time from doing a full blank. The only two faults are all because of me being a dumby. The laminate is really hard to work with because its so tough and since I'm only using files and chisels I have to watch for splitting and cracking. The second part being the most annoying was the color choice because the pepper laminate makes using a pencil to mark the wood nearly invisible. Other than that everything seems to be going good have the action and barrel completely inletted. Just need to add the pillars and glass then float the barrel. Right now I'm in the midst of inletting the trigger and pondering what to do with the magazine. Initial thoughts were to just use the stock one but now im wondering if I can make a five round AR mag work without bottom metal.

After that is all said and done I plan on reshaping the for end to a round bottom, add a flute for easier operation of the safety, inlet the trigger gaurd, and add my swivel studs.

Now to the pictures.
 

Attachments

  • IMG_20131225_133832_268.jpg
    IMG_20131225_133832_268.jpg
    52.8 KB · Views: 43
  • IMG_20131223_184355_671.jpg
    IMG_20131223_184355_671.jpg
    62.2 KB · Views: 50
  • IMG_20131223_184344_548.jpg
    IMG_20131223_184344_548.jpg
    154.9 KB · Views: 50
  • IMG_20131220_151936_562.jpg
    IMG_20131220_151936_562.jpg
    141.1 KB · Views: 46
  • IMG_20131220_150844_795.jpg
    IMG_20131220_150844_795.jpg
    61.1 KB · Views: 53
  • IMG_20131220_150836_528.jpg
    IMG_20131220_150836_528.jpg
    181.2 KB · Views: 43
Here's a few more pictures closer to the finishing stage. Have been using a drill press and a dremel with some sanding bits to help in the round areas and smooth out the chisel markings.
 

Attachments

  • IMG_20131225_133839_685.jpg
    IMG_20131225_133839_685.jpg
    163.6 KB · Views: 49
  • IMG_20131226_211332_255.jpg
    IMG_20131226_211332_255.jpg
    145.8 KB · Views: 53
  • IMG_20131226_211300_350.jpg
    IMG_20131226_211300_350.jpg
    141.2 KB · Views: 42
  • IMG_20131225_142122_171.jpg
    IMG_20131225_142122_171.jpg
    167.7 KB · Views: 45
The bottom edge of the ejection/loading port and the 'relief' hole in the front ring are probably the 'middle' of the action. The metal should be inletted with half the metal above the wood line and half bellow the wood line It looks to me like it needs to be inletted deeper. I could be wrong as it's not in my hands. Pics don't tell the whole story.
 
Warning! This thread is more than 11 years ago old.
It's likely that no further discussion is required, in which case we recommend starting a new thread. If however you feel your response is required you can still do so.
Top