I vaguely remember, many years ago, taking some rifle brass with loose primer pockets to a friend and having him run them up and out through a pistol die. This "squeezed" the casehead and primer pocket back to where the primer fit like it was new brass. 300 RUM brass is hard to find and very expensive when you do find some. I bought some once-fired brass off Gunbroker.com a while ago and they wouldn't chamber in my .338 Edge. By all appearances the brass was as advertised by the seller. I tried to size them in my dies but they wouldn't size the base down to under .549. If I screwed my dies down until they touched the shell holder my headspace was WAY too much. If my bases are over .549 they chamber hard and a couple that were over .550 stuck in my chamber. Apparently the gun these cases were shot in has an oversized chamber or over pressured(?). So now I'm into 100 brass for $150 and I can't shoot them.
Larry Willis makes a collet-style base resizing die for 300H&H based belted cases. For $98, if it works, it should pay for itself the first time I use it. I contacted him and he said his dies wouldn't work on 300RUM cases. Dang! After many emails we came up with a plan. I would make a pass-through style die that I could force a case up through the bottom and out of the top. Larry's only caution was to watch out for "plowing". I guess when you resize down to the bottom of the base, the bottom of the die will sometimes push brass down to the base. Even though mine aren't belted, he wondered if that might happen and I would end up with a seized case.
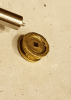
Sooooo, I thought I'd try to make my own. I took a 1" stainless bolt, and a lot of time, and made a pass-through die. This obviously wouldn't work with belted cases.
I used a 300WSM chamber reamer to get a tapered bore. It was tricky getting the exit exactly .548. I alternated running a telescoping bore gauge and lightly reaming until I finally got it.
I know the bore inside the top of the die looks pretty rough but there's a shoulder about halfway down that I polished while it spun in my lathe with 500grit, steel wool and lapping compound on a cloth. It came out mirror smooth. It's not carbide but I'm hoping stainless will hold up if I use a liberal slathering of Imperial Sizing Wax.
Well, by dang, it worked!! All my cases came out at .547 - .548", had tight primer pockets and all of them chambered nicely too.
")