Now that's an explanation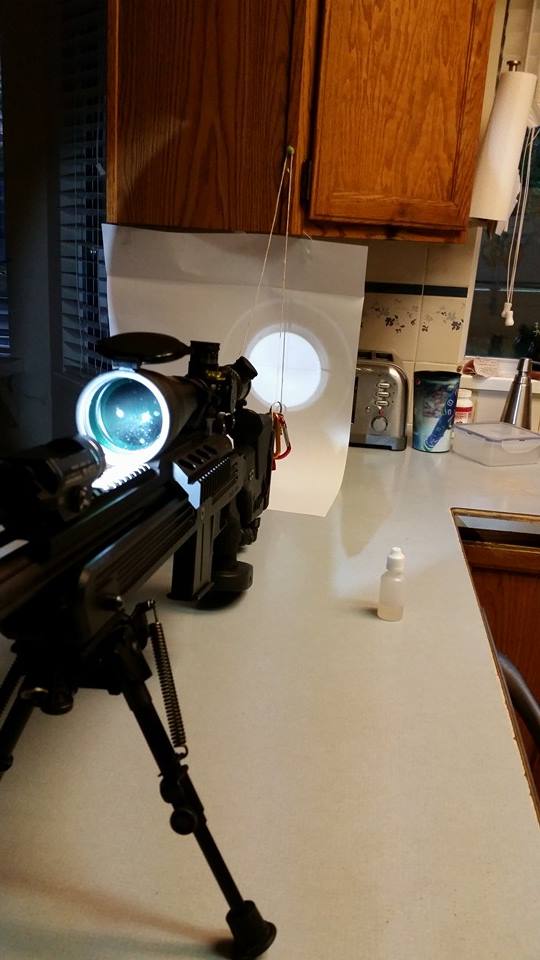
Make sure your action is level first.
Thanks
Now that's an explanation
Make sure your action is level first.
So I done this for the first time tonight and I didn't bother to attempt to level out my action, when I got done with the scope it was perfectly aligned to the plumb bob and the bore was dead on but the was a noticeable can't between the scope and gun when I stood back and looked then shoulderd the rifle. About that time my OCD kicked in and I measured all kinds of points including the dang integral recoil lug, bedding area and recoil lug groove depth. After that I started back over and decided to utilize the guns raceways and pic rail (they are true to one another), then I proceeded to get the bore and reticled aligned. After that learning experience it shoulders well and reticle looks and is level to me and the bore. Long story but yes get the gun level first or you will be really annoyed with your time spent lol.
Make sure your action is level first.
It appears that quite a few posters don't seem to understand that making the vertical crosshair line up with the center of the bore is the critical part. Trusting the scope base or any other part of the action to be perfectly square is leaving a LOT to chance. I suspect that people that manufacture actions don't consider that to be a critical part of a perfect action.
That is why the plumb bob is the only perfect way that I've read here or ever heard of to ensure that you have it perfectly aligned. The flashlight method seems to be flawed and for that

Yeah, they spend hours talking about and using their gadgets to supposedly get the scope on straight and then do not do the tall target test. Maybe they don't know how to do it. It is simple, and eliminates the need for any gadget other then a plumb-bob:
1. Set your target frame up at 50 yards. Staple 6 sheets of target dots up, all touching precisely so as to be straight. I use one like this:
Make the pages 3 high by 2 wide, portrait orientation. Since the pages are 11" tall, the top row of dots will be about 30" above the bottom row of dots. Note that that will be about 60 moa at 50 yards.
2. Hang your plumb-bob (a mere weight on a heavy string) on your target frame and adjust the frame until the dots on the top row are exactly vertical over the dots on the bottom row.
3. Leave the plumb-bob hanging.
4. Twist your scope in your loose rings until the reticle points at the center of the bore. I eyeball it, but you can us your gadget if you want. Tighten screws back down.
5. Sight in your rifle so that your are hitting one of the dots on the lowest row. See your plumb-bob in your scope and make sure you keep your reticle perfectly parallel to the plumb string during all shooting.
6. Crank your elevation turret up 60 moa (or 40 or 50, whatever your have) and shoot at the dot on the top row that is exactly vertical over your lower target.
7. If you do not hit to the left or right on the upper dot, you are good to go. If you hit to the left, rotate your scope to the right however much you think you need to and shoot another pair of dots (lower and upper), and vice versa. Rotate the scope until you get no error left or right when you crank up. THIS MAY TAKE A FEW TRIES.
If your gadget helped you get closer than my eye-balling method when making the reticle point at the center of the bore, great! Use it. For me a gadget is a waste of time because they are almost always going to be at least 1/2" off when I shoot the upper dot -- so I'm going to be loosening my rings and guessing at how much to rotate my scope anyway. Eye-balling it I get within an inch or two, so I don't see how a leveling gadget contributes anything, but if you like using one, great.
Just don't skip the tall target test when you are done, or if you do, don't be telling me how great your gadget works, because if you didn't do the test you have no clue how how close your gadget got you.
I have bought many different tools and still had a slanted reticle on a couple of scopes.
I have the Level Level tool from Wheeler,the Professional level system also from Wheeler I believe and have used the plum bob system and still have a couple slightly slanted reticles.
I just bought a new tool that fixed all my slightly off reticles and was only 19.95.
So far I have fixed all my slightly off reticles and a couple of friends with the same problem.
Has anyone used this before?
https://www.amazon.com/dp/B07MC71PC4/?tag=lrhmag19-20
I hope all scopes I mount will be as easy as my new mounted Athlon Ares BTR 2.5-15x50.
Let me know if there are better tools out there.
Old Rooster
Me to, I bought the whole Wheeler 25mm/30mm scope mounting & lapping kit which the level level is part of.
While it may not be the best thing on the market It does the job for me.
Aron, that is a good point but I am not aware of any scope mounting level tool that uses the bore as it leveling point??
I have to ask how does a plum bob level a rifle and a scope? The rifle can be laying sideways on a table and you can level the scope to the plum bob but that does not make the scope and rifle level.
Sorry. Post 185go back and read list 185.
