TIGHTEN PRIMER POCKETS, here's how.

You could restore the small primer pockets on the 223 Rem casings, but probably not on a .20 caliber cartridge, because the case neck ID is so small that the Grade 8 bolt small enough in diameter to fit down into your 20 cal case neck will be too small to overlap the small primer pocket diameter. And when you hammer on the bolt, it will likely punch down into the primer pocket, rather than overlap the primer pocket and be supported by solid brass in the case head surrounding the primer pocket.

I have restored .223 Rem small primer pockets by keeping the grade 8 bolt diameter as large as possible, so that it just enters the fired case necks before resizing the case neck in the resizing die. The idea is to keep the bolt diameter as large as possible so that it overlaps the primer pocket and impacts the solid brass case head surrounding the primer pocket. I think I reduced the diameter of a 1/4" diameter Grade 8 bolt for my 223 cases. I buy a bolt long enough so that I can saw off the threads and still end up with the remaining solid shank long enough to reach down into the case and bottom out around the flash hole. I cut the hex head off the bolt also.

I mounted the solid 1/4" diameter bolt in a drill press and while it was rotating in the drill press, I carefully ground down the diameter of the bolt with a 4 1/2" grinding blade, until it would just barely clear the fired case necks. I also use a dremel tool to cup the end of the bolt concave, so the end of the bolt contacts on its outer edges first, rather than on it's center. You don't want to the bolt to hit inside the diameter of the primer pocket. It needs to contact the inner case head outside the primer pocket void, where it's striking against the solid brass case head surrounding the primer pocket. I had no issues restoring primer pockets on my .223 Rem casings, in this manner. If a guy owned a lathe, he could turn down the bolts to the perfect (just clears the case neck) diameter.

Restoring 22 caliber cartridge case primer pockets is more difficult than restoring larger caliber casings. With larger caliber case necks, a larger diameter bolt can be used which helps ensure the bolt doesn't blow down into the primer pocket itself.

I shoot a 22 Creedmoor with large rifle primer pockets. There's no way to restore those primer pockets using this method, because the primer pocket is .210" in diameter, and the fired case neck ID is only .226-.229" diameter. A bolt only 0.020" larger than the primer pocket will be driven down from the inside into the primer pocket, because it's not large enough in diameter to overlap the primer pocket. A 0.010" bolt overlap of the primer pocket isn't enough overlap to support the hammer blows.

Hope this is understandable. It's much easier to restore .284, .308, and .338 cartridge primer pockets. Keep the bolt diameter as large as possible to maximize the overlap of the primer pockets. That's the trick to successful primer pocket restoration. Practice on some cheapo junk cartridge cases. Some field pickups. Then when proficient, tighten up the primer pockets on your "good" cases.
For .20 cal you can get 3/16 oil rod or long dowels both would be harder than grade 8 bolts. Just something you might want to try. Can usually get from McMaster Carr, Grainger Supply or MSC.
 
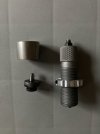
RCBS Primer Pocket Swager-2 works great after I had a friend make a new swager head that swages the pocket as tight as you want by adjusting the die up or down.
IMG_0190.jpg
 
RCBS Primer Pocket Swager-2 works great after I had a friend make a new swager head that swages the pocket as tight as you want by adjusting the die up or down.
View attachment 326271
I've used that type of tool also. A friend manufactured the tool on his lathe for me.
It didn't take long to flare out the impinging steel edges / surfaces. Was OK for a few cases. But not very many primer pockets were restored until the edges of the impinging contact surfaces flared out and were no longer useful. Those impinging surfaces would have to be hardened after they were manufactured on a lathe, for longer life.

Again, the ball bearing and hammer method is way simpler and worked better for me than the two lathe manufactured tools I own and have used. Just my opinion. Also, the ball bearing hammer method is far less costly. The ball bearing never distorts. The grade 8 bolt is way tougher than any lathe manufactured tool. And if the grade 8 bolt eventually needs replaced, cost is less than $3 at the local hardware store.

Even if I owned my own machine shop with lathe and mill, so that I could manufacture a tool without incurring labor costs, I would still opt for the ball bearing, grade 8 bolt, and hammer.
 
Last edited:
For .20 cal you can get 3/16 oil rod or long dowels both would be harder than grade 8 bolts. Just something you might want to try. Can usually get from McMaster Carr, Grainger Supply or MSC.
The problem with .20 caliber case necks, is the bolt, or a rod or dowel, can't be any larger in diameter than ~ .205", or it won't pass down the ID of the .20 caliber case neck.

A .200" bolt is barely larger in diameter than the small rifle primer pocket. So when you hammer on it against the inner flash hole side of the casing, it will blow right down into the primer pocket and flare out and destroy the primer pocket.
The diameter of any bolt hammered against the inner base of the casing has to be sufficiently large, in comparison to the diameter of the flash hole, so that the bolt won't blow down into the flash hole. The perimeter of the bolt has to contact solid brass case head surrounding the hollow primer pocket. Or the primer pocket will be flared out, distorted, ruined. The flash hole will end up being driven all the back to the case head surface.

The ball bearing, grade 8 bolt, hammer method cannot be employed with success unless the case neck ID is large enough to pass a bolt much larger than the primer pocket diameter. Enough larger than the primer pocket diameter so that the bolt won't get driven and blown down into the primer pocket.
 
First of all, this won't work on extremely over pressured brass! If your primer pockets are getting loose from multiple firings (general wear and tear) this will work.
I have a 4H ( HARDENED ) hex head bolt of the appropriate length wrapped with tape at the cartrige neck area length, and insert it into the case.
Place the bolt and case on top of a 3/4" chrome ball bearing that is cradled in a vice.
Firmly tap the hex head ONCE with a hammer.
Take a measurement.
For large rifle primers, my pockets get fairly loose at about .210". After only 2 or 3 strikes my pockets are at .207".
That's where I stop. You will see a small perfectly concentric ring around the inside diameter of the primer pocket.

I sincerely hope everyone utilizes this technique because even if your brass lasts one or two more firings I hope (maybe) new brass prices will become slightly more affordable.
I've been doing this on some winchester 300wm brass that has had two additional firings with no gas blow by on the case head.
My intent of this post is to help. I work very hard on my brass prep. So an additional firing or two is a blessing.
Again, this won't work on crazy over pressured brass.
Well done, we'll explained...easy....SEE OLD DOGS CAN LEARN NEW TRICKS..( when needed). Thanks vm!
 
Drill rod is easy to come by. I never throw away my dull, burnt or broken drill bits. There's always one more use for a piece of steel or carbide. Might take a little re-work, but that's why I have an ammo can half fill of "possibles."
 
I work and stay in north Illinois but my HOME and property is Savannah. S.W. TN.
My favorite saying is " you can't beat the hill-rod out of me":cool::cool:

But seriously, if we decrease the demand on new brass it will be better for all of us.

And also, I should have added that I don't lock the ball bearing in the vice but actually cradle it. The vice is opened slightly less than the major outside diameter of the bearing.
Howdy neighbor,Cypress inn here !
 
You ran a light load first, then 2 more at full
power and they expanded?
300 SS. No, I first ran all brass at Rich's recommended fireforming load, then again at .3 grain higher, and at this point the barrel had fully sped up. I then donated 10 cases to find the rifle's max, working up in .4 grain increments until first signs of pressure, which showed up @ 62.5 gains of dehydrated RL16 under 200gr Berger Hybrid @ 3015 fps. Backed off .5 grain and set this as my working max. Started load development at 60.7, node @ 61.1 - 61.8gr. OCW came in at 61.6gr @ 2.240" BTO. Pockets were considerably loose after the third firings.
 
First of all, this won't work on extremely over pressured brass! If your primer pockets are getting loose from multiple firings (general wear and tear) this will work.
I have a 4H ( HARDENED ) hex head bolt of the appropriate length wrapped with tape at the cartrige neck area length, and insert it into the case.
Place the bolt and case on top of a 3/4" chrome ball bearing that is cradled in a vice.
Firmly tap the hex head ONCE with a hammer.
Take a measurement.
For large rifle primers, my pockets get fairly loose at about .210". After only 2 or 3 strikes my pockets are at .207".
That's where I stop. You will see a small perfectly concentric ring around the inside diameter of the primer pocket.

I sincerely hope everyone utilizes this technique because even if your brass lasts one or two more firings I hope (maybe) new brass prices will become slightly more affordable.
I've been doing this on some winchester 300wm brass that has had two additional firings with no gas blow by on the case head.
My intent of this post is to help. I work very hard on my brass prep. So an additional firing or two is a blessing.
Again, this won't work on crazy over pressured brass.
Did you happen to see the cracks and out of round flash hole on that case? It's impossible to have consistent ignition when brass gets like that. Unless you have no other choice, or you don't care much about accuracy, I'd scrap those cases. Secondly, if you deform the inside of the case, you have changed the internal volume. Again, not good for accuracy. Just my 2¢s.
 
Last edited:
Top