TIGHTEN PRIMER POCKETS, here's how.

I customized a 1/4" Grade 8 bolt to the diameter that barely passes down the neck of .223 Rem cases. OD of the bolt section that enters the case neck is 0.223"

223 Cases & 0.25 bolt.jpg


I then processed about 50 Lake City .223 casings, tightening up their loose primer pockets. Success. The Grade 8 bolt didn't bend, and the 0.223" diameter end of the bolt was large enough in diameter that it didn't punch out the small primer pockets towards the case heads. Nice!

223 Lake CIty Cases.jpg

I doubt that 204 Ruger cases could be salvaged, because taking the bolt OD down to the smaller neck ID size, .200", will not leave enough bolt overlap around the small primer pockets to prevent blowing them out toward the case heads. But the process works well on .223 Rem cases, and should also work on other .224 caliber cases using a small sized rifle primer.

Whatever anybody does, please do not let Forum member 'bigedp51' know of my success. He's prone to temper tantrums when others salvage cases with loose primer pockets, and extend usable case life. And he has a thousand experts from the Snipers Hide forum that he relies on to explain why this feat isn't possible. Big Ed... more SKILZ on display here. :eek::):D
 
Last edited:
Just seated he primers in 43 .223 Rem cases. Sweeeeet!

I don't know why the clear difference between these restored small rifle primer pockets versus the large rifle primer pockets. But my small rifle primers seated as if they were going into brand new cases. I use a K&M Services hand priming tool, so it's pretty easy to feel the primer resistance as the primer is seated.

There's a nice steady continuous force, all the way down until the small rifle primer is fuller seated. Just the same as when primers are seated in a new case.

With large rifle primer pockets restored using this ball bearing and hammer method, the force to seat the primer is greater as the primer first enters the pocket, and then as the primer is seated in deeper, there's less force/resistance. That's because the primer pocket ID at the case head is reduced more so than it is deeper down into the primer pocket.

I don't know why the big difference. Small rifle primers are a little shorter than large rifle primers. And of course, a smaller diameter also. Perhaps with the shallower primer pockets, sidewalls are reduced in ID down deeper into the pockets? Or when the bolt head is hammered down on the top of the flash hole, maybe the smaller perimeter distance around the small rifle primer pocket lends itself to sizing down more fully or easily.

Whatever. These tightened .223 Rem primer pockets seem to be restored to 'as new' condition. I was very pleasantly surprised.
 
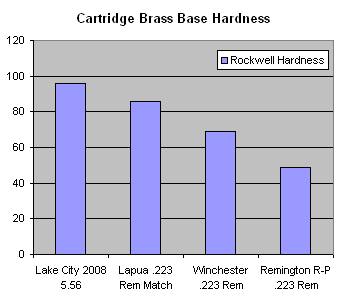
What kind of SKILZ does it take to load so hot you stretch out the primer pockets on Lake City 5.56 cases that use the hardest brass of any cartridge case. And then deform the primer pocket with a ball bearing that leaves more of the primer unsupported.

brasstest03.png


On top of that you can get bulk once fired Lake City cases for .08 cents each with tight primer pockets.

And it doesn't take any SKILZ to get ejector marks on the base of the case and stretched out primer pockets. If you had any reloading SKILZ you would realize your pushing your cases beyond their elastic limits.

You poor, poor, poor soul. Go find a hanky and bury your face in it. Anything other than destroying a class-act Thread with useless opinion.
You could ruin an anvil with your drivel.

Keep following my posts and one day you may become proficient at something. Maybe develop skilz.
 
I customized a 1/4" Grade 8 bolt to the diameter that barely passes down the neck of .223 Rem cases. OD of the bolt section that enters the case neck is 0.223"

View attachment 110750

I then processed about 50 Lake City .223 casings, tightening up their loose primer pockets. Success. The Grade 8 bolt didn't bend, and the 0.223" diameter end of the bolt was large enough in diameter that it didn't punch out the small primer pockets towards the case heads. Nice!

View attachment 110751
I doubt that 204 Ruger cases could be salvaged, because taking the bolt OD down to the smaller neck ID size, .200", will not leave enough bolt overlap around the small primer pockets to prevent blowing them out toward the case heads. But the process works well on .223 Rem cases, and should also work on other .224 caliber cases using a small sized rifle primer.

Whatever anybody does, please do not let Forum member 'bigedp51' know of my success. He's prone to temper tantrums when others salvage cases with loose primer pockets, and extend usable case life. And he has a thousand experts from the Snipers Hide forum that he relies on to explain why this feat isn't possible. Big Ed... more SKILZ on display here. :eek::):D
Had some free time at work and scraped together some SS plates and a SS Acorn nut.
I'll see if it works as good as a ball bearing.
20181119_102229.jpg
20181119_102229.jpg
20181119_103947.jpg
 
Let us know on the acorn nut toughness. Nice weld, by the way.

Any weld that holds is a 'good' weld for me. I'd like them pretty also, but pretty is the exception for me.

Here's a photo of of the 223 tightened primer pockets and Rem 7 1/2 primers seated. Also known as (AKA) "Mr. Ed Irritant" :)

There's also 9 Lapua 30-06 and 2 Lapua 300 Win Mag cases with restored primer pockets. The Lapua 300 Win Mag cases cost more than $0.08 a piece. They're collector's items. They haven't been manufactured for many years, so are unavailable at any cost.

Mr. Ed Irritant.jpg
 
This is a great Idea. I have followed and read this thread since it was started or shortly after.

I cant help but wonder if the bigger the ball bearing (to a point that is) used the better the reforming of the pockets will be. Just a thought.

I plan to use this idea if and when my primer pockets get loose in my 300bsm.
 
Maybe the slope/ arc angle would dictate the amount vs depth of material moved into the primer pocket. ??

It will make a difference. That's why I purchased 3/4" ball bearings instead of starting out with 5/8". A 1" may be a better choice on large primer pockets. My 3/4" seemed like a happy middle ground choice on these small primer pockets, but a 1" diameter ball bearing used on the large primer pockets would flare less deeply into the primer pocket, in my professional engineer's opinion.

I've got a 10 pack of 3/4" ball bearings. Will trade some out to anyone that purchases a pack of 1" ball bearings. Hah!

2 - 3/4" bearings for a single 1" bearing... ;)
 
Last edited:
It will make a difference. That's why I purchased 3/4" ball bearings instead of starting out with 5/8". A 1" may be a better choice on large primer pockets. My 3/4" seemed like a happy middle ground choice on these small primer pockets, but a 1" diameter ball bearing used on the large primer pockets would flare less deeply into the primer pocket, in my professional engineer's opinion.

I've got a 10 pack of 3/4" ball bearings. Will trade some out to anyone that purchases a pack of 1" ball bearings. Hah!

2 - 5/8" bearings for a single 1" bearing... ;)
I'll see what l can do.

The Acorn nut is a NoGo!I must have annealed the **** out of it while welding.
Back to the bearing. Oh well, it was a rare day when I had some idle time.
 
The Acorn nut is a NoGo!I must have annealed the **** out of it while welding.
Back to the bearing.

:) I had serious doubts about that acorn nut. But didn't want to be the spoiler... There's enough of them already.

My 3/4" ball bearing welded to the 3/8" steel plate easily enough. I pinched them tight between the jaws of my bench vice. Welded the exposed top, and then rotated it 3 times to complete the weld. The lower part of the ball bearing discolored due to the heat so I might have boogered up the hardening on the lower 1/2, but the top 1/2 of the bearing remained shiny. Might be a good idea to let it cool a little between rotations so as to not mess with the temper of the upper 1/2 of the bearing.

I had previously created a mating depression for the 3/4" ball bearing in the surface of the steel plate using a carbide burr on my Dremel tool. Hoped that would keep the bearing from departing my bench top without welding it. But the blasted ball kept lifting off and getting away from me. Welding is the way to go - no more Mexican jumping bean...
 
Last edited:
Top