adk hunter
Well-Known Member
Black walnut. Ruger .308 UL
Stock work by Bob's Custom Guns


Stock work by Bob's Custom Guns
Last edited:
Lol, and many are providing advice on finishes to make it harder. HmmWell just in case you haven't noticed no one is looking at your rifle, but everyone is looking at your wood
Good advice, thank you!Don't cut the stock to close or over cut it. Brownell has tools to remove wood in the barrel area and you'll need files, and some wood chisels to do some cutting with. Black oil artist paint in a tube. Some engine oil to mix with the paint. A small brush to brush the mix on the barrel and action. Set the action into the stock and see where the black marks shows up. remove that material a little at a time. It will take sometime to get it done. You'll need to do that with the trigger housing also. The oil and paint marks where the action and barrel are hitting. I have built several stocks for my rifles over the years, being lefthand. Make sure you action going in correctly and not off center or titled.
Bottom line is I find it a lot easier to get a prefitted stock somewhere else. Then bed it.
if you know somebody else that Checker stocks. Talk to him or her first. I hope that will help. I was lucky I had somebody to show me how to do it. Being a carpenter help too.
The blank was cut in 2018. It should be readyKeep in mind, for every inch of thickness. It will take about a year of air drying.

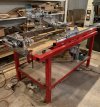
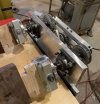
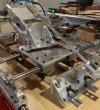
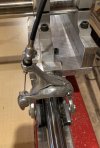
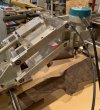
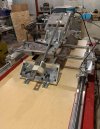
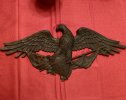
Here are some pictures of my duplicator. It was a challenging project in itself. I can use it for other fun projects besides stocks. An eagle wall art piece was my first.I want to see pics of the router duplicator. I have lots of wood working skills, about 5 routers already, and several black walnut logs, one with a crotch that might yield some fantastic pattern. Gearing up to mill it. What thickness is your blank? All my friends give opinions. Some want slab tables. Some want lumber. I just want the logs to be out of the forest and into my shed on stickers.

I noticed right off that,. the Bolt's on the RIGHT side of,.. the Action for, us Lefty's !Well just in case you haven't noticed no one is looking at your rifle, but everyone is looking at your wood
Thanks for the information, especially on bedding! I would say I'm an experienced woodworker and more of a hobby machinist, but this is my first gunstock. With this thread, I have gotten some good information along the way and appreciate everyone's feedback. I went with Alumbond epoxy for bedding, with plain old Johnson Paste wax for release agent. I've seen pictures and information regarding various amounts of surface contact for the bedding and am still a little unsure. Some are full contact along the action and a little way up the barrel and others are more like my attempt. The rear of the action is bedded similarly in the area of the pillar. This is something I guess I can redo even after the shock is basically finished, since the pillars are in and the action and barrel position in the stock is fixed. I'll work on shaping the stock and getting the lines nice and crisp before final sanding and post more pictures along the way.Remember your last statement in your opening post was you wanted "Tips and Tricks" so don't beat me up for what i have to say. This is not criticism just well intended suggestions. Also there are many ways to do things and many people on this site that are far better than me at doing stocks.
I'm curious as to your history in building stocks as your questions were more basic but your duplicator is not a junker. If stock guys know your history and you are fairly inexperienced you will probably get more suggestions. If you are very experienced and just seeing what people thought on that wood. you wont get as much. Your duplicator is kind of making me think you have done more and just aren't saying unless you just decided to do it right and get a nice one to start.
One thing I would say is that wood looks great so I would try to keep my edges of my inletting very neat, yours are a little rounded and inconsistent. You have already set your pillars and bedded with a grey epoxy whether it is Marine-tex or Jb but you didn't bring it up to the edges of the inletting to fill the gaps around the receiver. Its easier to use a bedding material you can die to match and do this or if you are doing just black it will blend in with most receivers and barrels much better. I think the best was is to grind most of that back out below the pillars then re bed with plenty of material to bring out over the stock, mask the tops and sides of the stock to keep the overflow off the outside wood. Reason I say to do this is if you try to just add epoxy it may build up higher on the previous bedding and pillars which will not be optimum. Bed the receiver and first 1 1/2-2" of the barrel in one step is what Im saying. Now is the time to do it right.
I love a nice wood stock and yours will be an eye catcher at any level.