He is truly missedDang Butterbean, I just realized from your post quoting JE Custom that it appears we have lost him. I was absent from here for quite a while. I didn't know him, but I've benefited from his advice on this forum.
You are using an out of date browser. It may not display this or other websites correctly.
You should upgrade or use an alternative browser.
You should upgrade or use an alternative browser.
Neck turning: Trying to turn full neck but seeing cutting high on shoulder (280 AI)
- Thread starter 1Moose
- Start date
-
- Tags
- neck turning sinclair
I turn almost all of my brass and your pic in post #1 looks fine you should turn into the shoulder just like you did in the pic. From now on turn your brand new brass before you load it. Just use your Expander mandrel to straighten up your brass and turn. once you fire your brass it will look really good. The cutter touching the shoulder is not a problem.
nksmfamjp
Well-Known Member
- Joined
- Jan 5, 2004
- Messages
- 3,201
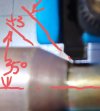
That cutter looks like angles are wrong. Why is the neck part not parallel to the neck?Here's an up close photo that I think shows it. It's as though there's a very slight bulge at where the shoulder and sidewall meet and the cutter is taking that down a bit. Maybe the brass simply didn't spring back there as much after the sizing operation?View attachment 320189
or did is it just locked in the tool crooked somehow?
Bob Wright
Well-Known Member
It's called "cutter relief" so that you're not dragging the entire cutter length over the surface. Just a pin point at the leading edge of the cutter. It eliminates chatter, smearing....That cutter looks like angles are wrong. Why is the neck part not parallel to the neck?
or did is it just locked in the tool crooked somehow?
^^^^^^^^^^^^^^ ShoNuff ^^^^^^^^^^^^^^^^It's called "cutter relief" so that you're not dragging the entire cutter length over the surface. Just a pin point at the leading edge of the cutter. It eliminates chatter, smearing....
nksmfamjp
Well-Known Member
- Joined
- Jan 5, 2004
- Messages
- 3,201
Huh. I'll have to look at the K&M again. I don't remember that. But I never had this issue either.It's called "cutter relief" so that you're not dragging the entire cutter length over the surface. Just a pin point at the leading edge of the cutter. It eliminates chatter, smearing....
Bob Wright
Well-Known Member
My K&M is just like this. Matter of fact, all cutters including drill bits, end mills, inserts all have some appropriate amount of relief ground into them to reduce friction, poor finish and failure.Huh. I'll have to look at the K&M again. I don't remember that. But I never had this issue either.
Bob Wright
Well-Known Member
My K&M 35° cutter for 7RM for example is actually 38°. Therefore when using this cutter the only thing you'll be setting up for is the radius at the neck shoulder junction. If you're getting into the shoulder the cut would be a bit too deep. Just blend to the existing radius. Controlling the variation is your "trim to length" measured as over all length of brass. It needs to be consistent.
My AI cutter is 43°, cutting the same way by just blending to the radius.
Excuse my chicken scratches,
My AI cutter is 43°, cutting the same way by just blending to the radius.
Excuse my chicken scratches,
Attachments
Rflshootr
Well-Known Member
deleted
Last edited:
nksmfamjp
Well-Known Member
- Joined
- Jan 5, 2004
- Messages
- 3,201
Yea, but see how the neck cutter is parallel to the neck on your K&M?My K&M 35° cutter for 7RM for example is actually 38°. Therefore when using this cutter the only thing you'll be setting up for is the radius at the neck shoulder junction. If you're getting into the shoulder the cut would be a bit too deep. Just blend to the existing radius. Controlling the variation is your "trim to length" measured as over all length of brass. It needs to be consistent.
My AI cutter is 43°, cutting the same way by just blending to the radius.
Excuse my chicken scratches,
I understand that K&M uses 3 deg of relief to ensure the neck is cut into the tip of the shoulder, but I'm talking about cutter alignment to the neck.
Bob Wright
Well-Known Member
It's difficult to see but there is clearance behind the cutter radius. I just slipped in a .0025 shim stock at the very back of the cutter.Yea, but see how the neck cutter is parallel to the neck on your K&M?
I understand that K&M uses 3 deg of relief to ensure the neck is cut into the tip of the shoulder, but I'm talking about cutter alignment to the neck.
Mike Matteson
Well-Known Member
The one thing for sure is you have to cut the COAL to the exact length to set to cut thickness of your necks. Otherwise you will never get it right. OR, You'll have to set each time to cut the necks or risk cutting to long or to short. The other is new brass, the ID will vary some from case to case. So my thinking is you need to expand the ID of the neck to fit the cutting mandrel you are using. You spring back involved in this too. I find it interesting and somewhat complex to overcome the problems in this set up. The other is I will have to see what disagreement come from this I stated here. So I don't have the equipment to cut the mandrels to thickness, so off to the Smith twice now. I have a 21st Ctry neck cutting, and a Gen 3 case length cutter systems, I feel I can achieve both. Starting age 14 to reload, I fell in love with it. It's been a learning in progress from then on.
1Moose
Well-Known Member
- Joined
- Nov 25, 2013
- Messages
- 168
Thanks Mike, in my "pre-reading" before starting on the neck-turning adventure I also saw that the relative sizing between expanding mandrel and turning mandrel was critical, so I got both of them when I ordered the Sinclair 4000 turning kit. The fit on the turning mandrel wasn't as tight as I thought it might be based on reading people describe that it should be "tight," but the expander mandrel does measure only .001 larger than my turning mandrel. The case spins freely for me, but I thought it might be more snug. I get the tiniest amount of play in the case when it's on the turning mandrel. Perhaps it'd be even tighter if I annealed the cases before expanding them (I just got an Annealeez annealer and have yet to set that up to use).I agree with ButterBean on where to stop the cut. In setting up my 6mm-280AI. I have found these problem so far. I have found that the ID in the neck area from case to case varies some. So I had the mandrel cut to allow the necks to fit the mandrel. COAL of the case varies some too. The 10 cases I checked varies .0065 from short to long in length. What I have read over the time that case COAL matter too. So I am going to set up and cut the case to length before doing anything else. These cases (500) are brand new and never been fired. I have the equipment to do the work, but didn't have the case until last week. So I have been held up for quite sometime wasn't able to explore and adjust the items I need until now. That alright, because the equipment has taken some time to acquire. Now getting into the finer parts of this operation. I think there will be other mandrels work that will need to be done.
I get this same minimal movement on new brass that I expanded with the expander mandrel, and I'd think that brand new brass wouldn't need to get annealed before expanding, but I'm just learning all this from scratch. I'm going to look to see if more precise case trimmers are in my price range given all my current expenses.