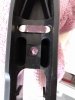
I decided to keep the stock and just drill out the pillars since they're aluminum.
I understand now. So you're talking about having metal to metal contact between the lug and action on the top of the lug and the bolt side of the lug. I have two questions then:
1 - Don't we want the lug and action to have metal to metal contact on the muzzle side of the gun, since that side gets the recoil force? Or are you preferring to use the epoxy "wedge" as the recoil force surface since with would be perfectly square with the action?
2 - When bedding the lug/epoxy wedge/action into the stock, I think your method has the roughed up epoxy wedge coming off the action and bonding to the epoxy bedding in the stock, correct? And that is why the epoxy wedge is temporarily on the action/lug?
Trying to remove the lug from the stock makes me nervous! What about just leaving the lug in place and bedding right over the top of it?
I can hardly believe I made that mistake so many times...... I think I am just programmed to think of lugs that are part of the action whether integral or between the barrel and action. Yours is different of course and I am totally thrilled (despite the embarrassment) that you caught it. It also gives me great hope that you will end up with a terrific result. You are thinking and your thoughts are the product of a sharp mind.
1. Yes, the wedge or bead or whatever you want to call it should go on the backside, not the front, of the temporary action & lug assembly!
2. Yes, my suggestion has the wedge separating from the action and staying in the bedding after the final bedding job. The reason for using a release agent and roughing it up is to ensure that this happens. Your call as to whether you want the lug itself to be removable afterward.
3. I understand your nervousness. I can only tell you that I don't like the idea of double bedding for something as critical as a recoil lug. My guts tell me that the lug and action contact should be perfect metal to metal contact and should not be squared using what will end up being a very thin coat of epoxy that could crack and flake off. If it were up to me, it would come out and be bedded back in properly with the objective of try to achieve full square metal to metal contact between the lug and action.
4. I see no downside to drilling out the pillars and putting new ones in. That will allow you to use thicker pillars with outside contours that will adher to and hold the epoxy better. Don't forget to remove the old epoxy too. It will likely be damaged in the process and could also change chemically due to the heat generated by drilling the aluminium pillars out.
Let me just state one more time that I have never bedded an action like yours. I am only offering the opinion, not first hand experience, of an engineer and precision smith. When the dust settles, you are the one who needs to make the call and be comfy with what you are doing. That said, I am quite willing (and happy) to provide a decent sounding venue for you to debate and explore your options. I particularly enjoy doing so with someone with an independent sharp mind.
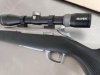
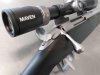
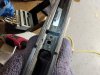
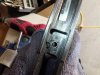
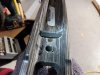
Do me a favor and take a nice photo of the bottom of your action so I have a better idea of what you are dealing with.