Fluted Barrel full length bedding

Bedded the bottom metal tonight. I noticed that when tightening the action screws, the opposite end of the bottom metal would start lifting out; there must be low spots on both ends. I didn't want to remove wood to solve the problem, because then the bottom metal would be sitting slightly recessed and I'd have the action sitting too high in the stock. Also, I figured filling the gaps between the metal and wood might make it look nicer.

So, I taped off the stock, inside and outside, and plugs a few key areas with modeling clay. Hopefully it turns out well!

My bedding compound should be here sometime this week, so hopefully I'll be able to get the action bedded this week and start testing before attempting a barrel bed.
 

Attachments

  • IMG_20200421_011309519.jpg
    IMG_20200421_011309519.jpg
    709.8 KB · Views: 283
Bedding my bottom metal turned out well! It created a completely flat stable surface for my bottom metal to sit in when tightening the action screws, hopefully preventing any stress on the action when tightening the screws. I unfortunately didn't get a picture of it before bedding my action.

My probed 2000 came in, so I spent one evening prepping my recoil lug, taping the stock and action guide screws, and modeling clay on all the openings. I also used high spot blue on my action and sat it down on the pillars in the stock so that I could remove any stock material that was in contact with the action before bedding. I used a dremel and probably took about 1/16" of stock material off the entire bedding area.

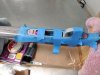
I decided to go with the method of temporarily attaching my recoil lug to the action by doing the following:
1. Put a layer of electrical tape on the action side of the lug and the rear side of the lug. I trimmed the tape on the top side to make sure there was no overhang on the muzzle side corner of the lug that fits in the action to ensure I could get a 100% square seating of the lug on recoil interface between action and lug. I also put kiwi polish on the action lug slot and tape.
2. I put a very small bit of 5 min JB weld on the tape on the top (action) side of the lug. Then I put the lug into the action and held it for several minutes while the epoxy hardened.
3. I then trimmed the exposed excess tape off the back side of the recoil lug so that there was no longer any visible tape with the lug attached.

The reason I used this method, rather than going with Susquatchs suggested method, is the following:
1. I'm using the pillars as my height reference in the bedding and I didn't want to potentially have the top of the lug be in contact with the action after bedding, creating any binding or stress after recoil. After bedding the action and removing it, I'll remove the tape from the lug, leaving a couple thousandths of relief between the top of the lug and the action. This is similar to how people tape the bottom and sides of the recoil lug on actions like the 700 that have a permanently attached lug to the action, to prevent any binding and stress under recoil. Except, it is the opposite since the lug will permanently be in my stock.
2. This is Nathan Foster's recommended method. He does a huge amount of Tikka action bedding and research with great results.


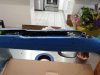
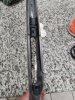
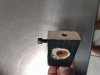
I bedded the action last night, and included a couple of pictures. I don't have the special pillars kit that attaches the pillars to the action before bedding, so I left them slightly protruding from the bedding so that I could get metal to metal contact with the pillars and action when laying it down into the bedding. There was enough clearance in the screw holes that I could push the pillars down as I payed the action down.

I also painted some of the bedding compound onto all the parts of the action that would be bedded to prevent any air bubbles from being at the bedding surface, even though it doesn't show that in the picture.

When setting my action down into the bedding, my guide screw for a bit bound up on the bottom metal screw hole, causing the bottom metal to be pushed out for a moment. I'm sure I probably got some compound between the bottom metal and stock when it came out, but hopefully I got it pushed completely back in before securing the action. This was a pretty stressful moment!

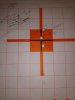
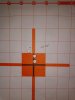
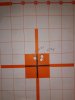
After getting the action layed down and squeezed out the excess compound, I held it securely and used electrical tape around the stock and action to hold it firmly in place. I really didn't want to have to re-level my scope, so I left it attached and just put the electrical tape over the scope rings when fixing the action to the stock.

My barrel wasn't completely centered in the barrel channel, so I wedged a small piece of tape in one side to center it. As an afterthought, this could potentially cause stress in the action during the compound curing, and I wish I wouldn't have done it. It would have been better to just sand off excess barrel channel material afterwards.

For anyone wondering about the probed 2000 compound, I followed their instructions for mixing up the correct ratio with a scale. They say you can mix it by eye in a 1:1 ratio, but if you'd rather use a scale it's a 100:77 resin:hardener ratio. I used a scale and it was surprisingly thick! They include a bag of fumed silica to thicken the compound for areas where you might want to prevent it from running, but I didn't have to use it because it was plenty thick already.
 

Attachments

  • IMG_20200423_193101195.jpg
    IMG_20200423_193101195.jpg
    501.7 KB · Views: 295
  • IMG_20200423_193050536.jpg
    IMG_20200423_193050536.jpg
    484.5 KB · Views: 283
  • IMG_20200423_193044377.jpg
    IMG_20200423_193044377.jpg
    679.7 KB · Views: 270
Last edited:
Here it is! Broken out and cleaned up. Unfortunately when my bottom metal popped out I wasn't able to get it all the way back in. It was slightly lower than flush, so now it's really close to flush. This caused a thin layer of compound over the top of my pillars, but it will work out ok. A few chip outs, but after cleaning up and relieving a couple areas of compound that could cause binding, I think it will work well.
 

Attachments

  • IMG_20200424_211340343.jpg
    IMG_20200424_211340343.jpg
    1.2 MB · Views: 287
  • IMG_20200424_211334388.jpg
    IMG_20200424_211334388.jpg
    1.3 MB · Views: 296
  • IMG_20200424_211329170.jpg
    IMG_20200424_211329170.jpg
    1.4 MB · Views: 299
I haven't been able to get out to shoot it yet, but I did pick up a Forster coax case and cartridge inspector yesterday. I decided to use the dial indicator and mounting rod to check my bedding job. I quickly made up a simple barrel mounting block that has a couple of set screws, one for the barrel and one for the dial indicator mounting rod.

I checked it by attaching it to my barrel and in various positions on my stock to be able to check movement in each axis when loosening each action screw. I had the screws torqued to about 42in/lbs and got a max of about 0.0013 deflection when loosening the front screw. About 0.0005 for the rear. I did this test holding the muzzle up at the 1oclock position as well as horizontal and achieved the same results. It should be good to go!!
 

Attachments

  • IMG_20200429_204018164.jpg
    IMG_20200429_204018164.jpg
    410.9 KB · Views: 281
  • IMG_20200429_204008228.jpg
    IMG_20200429_204008228.jpg
    697.7 KB · Views: 283
  • IMG_20200429_202750372.jpg
    IMG_20200429_202750372.jpg
    301 KB · Views: 275
  • IMG_20200429_202708442.jpg
    IMG_20200429_202708442.jpg
    781.9 KB · Views: 303
First round of load testing done yesterday!

Sierra 150gr sp
Staball 6.5
Cci 200
Win1x brass
Seated about 0.010 off lands

The center bull is mostly foulers
-Top right group is 60.4gr, about a 0.25" group but looks bigger because of how the paper is torn
- bottom right is 60.8gr (5 shot group as opposed to 4 because I had one extra of those loaded)
- bottom left is 62.0gr (double group is shooter error)
- top left is 62.4gr (double group is shooter error)

I skipped 61.2gr and 61.6gr loads because I already shot those and they were terrible.
 

Attachments

  • IMG_20200503_182219643.jpg
    IMG_20200503_182219643.jpg
    662.3 KB · Views: 279
2nd round of testing done. The green and white target is after cleaning to steel and giving my throat a polish. They are mainly foulers and fireforming rounds, but I wanted to see how long it takes my bore to settle in and then lose accuracy. The middle group might not have been executed well. The double grouping is just due to my error in amount of stock pressure and sling tension.

The orange and white targets are secondary load testing after my first 13 shots on a clean bore/polished throat. The 60.4gr group was very last as a control group for whether the barrel was holding accuracy through the test loads. Shots 4 & 5 there have different POI due to changing my sandbag setup I was resting on.

I think 62.4 is good... Shot #3 was definitely yanked .. the trigger broke unexpectedly and I jumped quite a bit.
 

Attachments

  • IMG_20200509_132247166.jpg
    IMG_20200509_132247166.jpg
    702.7 KB · Views: 289
  • IMG_20200509_132429325.jpg
    IMG_20200509_132429325.jpg
    451.2 KB · Views: 272
  • IMG_20200509_132438858.jpg
    IMG_20200509_132438858.jpg
    506.1 KB · Views: 274
  • IMG_20200509_132434089.jpg
    IMG_20200509_132434089.jpg
    590.9 KB · Views: 291
  • IMG_20200509_132443920.jpg
    IMG_20200509_132443920.jpg
    468.9 KB · Views: 288
That three shot cluster at 60.4 grains looks like it would be an awesome load for hunting. Looks like the heat threw rounds four and five out a bit. If that initial three shot group can be repeated again and again, that would be a wonderful load for chasing game.

Great job on taking the plunge and doing your own pillars and bedding. Hopefully you are pleased with the results, too. I appreciate the pictures and updates as you went. Great post for anyone interested in this topic.

Thank you very much! I'm more than happy with the results! I'm going to keep testing with that load to see what types of conditions might cause a poi shift. Hopefully it's consistently great, so I get bored of the accuracy and continue with the experiment. If I draw a rifle tag this year , I may have to just practice and put the experiment on hold.
 
Thanks for the info! I looked all over their website before buying it and didn't see anywhere that they're 95% inlet and need finished. Not sure how I missed that! I guess I can see why they would cut material out of the fore end to make it lighter, but I guess I figured everyone just accepts that laminate stocks are heavy.

If I end up deciding to fill that void later so that I can test out fully bedding the barrel, do you have any suggestions on what to fill it with that will be as light and cheap as possible? I was thinking maybe the lightest cheap epoxy I can find along with remnants of broken carbon arrows for filler. Or, maybe I could embed a couple of aluminum tubes in there with epoxy and make it even stiffer, which would be good if I bed the barrel
How about just cut a piece of balsa wood and epoxy it in the void, then put your bedding compound. That way you wont add a pound of epoxy or other filler to the stock.
 
Last edited:
How about just cut a piece of balsa wood and epoxy it in the void, then put your bedding compound. That way you wont add a pound of epoxy or other filler to the stock.
For filling the void Balsa wood or Styrofoam packaging material are both good choices. The forend doesn't need to be stiffer, which is typically why you drill carbon arrow shafts into the Tupperware stocks, all you need is something to fill the void while adding as little weight as possible.

Nice to see the gun shooting so well. Will be interested to hear what the first shot POI is compared to 2 and 3 and to see where a heavier bullet at close to the same velocity hits prior to putting the full length bedding in place. Nice job on the bedding so far.
 
I actually do want the fore end stiffer. As stuff as it can possibly get. That way there is less likely to be a poi shift when resting the foreend on something or putting tension on the sling. That's part of the reason the fieldcraft and nulas work; the stock is super stiff.

But, I definitely don't want to add a pound of anything to it. I'd like to keep it lightweight and low cost. So, I was thinking possibly shredding up some old carbon arrows into a mess of fibers. Balsa would work great too. Even if I did just use styrofoam, I think the surrounding bedding would stiffen it up quite a bit. I may have to go styrofoam!

I'm almost out of this box of 150gr Sierra's, so I'll have to try some 180gr speers next that I already have.
 
Last edited:
Warning! This thread is more than 4 years ago old.
It's likely that no further discussion is required, in which case we recommend starting a new thread. If however you feel your response is required you can still do so.
Top