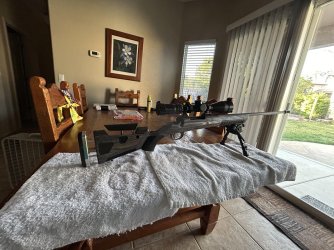
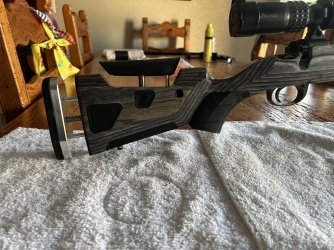
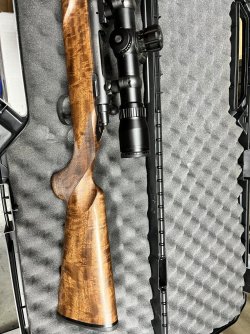
So I bought this stock unfinished and got shaped the way I want, bottom metal and action have been bedded by me. I've sanded to 400 grit and applied a heavy coat of Arrow oil and these marks became visible and arose a few questions for those with a lot more experience than me.
1. Are the vertical marks (a couple in the butt area and the ones by my hand in the second picture) tooling marks left by who cut the stock? If so, do I just sand that area more and try to remove them?
2. The black areas on the cheek piece; is that just a characteristic of walnut (stock is claro walnut)?
3. The small black spots and lines all over the stock; are these wood pores? When I sanded, I didn't wipe off any of the dust and oiled over it, thinking it would fill in the pores with the dust (was told this by an experienced stock builder/finisher). Well, obviously they're still there and I'd like them to go away to create a better surface.
So what would my next steps be?
thanks,
View attachment 500973View attachment 500974View attachment 500975
Hello CJC73,
I am seeing this thread for the first time, so if you have finished your project I hope it came out well. If you are looking for a vintage finish, posted below is the procedure by John Kay for a true oil finish. Mr. Kay has long since passed but his stock work was some of the best. I have finished several stocks using this procedure with boiled linseed oil with a bit or dye or stain infused to give it the desired color.
STEP BY STEP INSTRUCTIONS FOR
OIL FINISHING WOOD WITH PRE-64 RED-BROWN STOCK OIL
By John Kay.
Pre 64 Red-Brown Stock Oil highlights the natural Red-Brown color of American Black Walnut.
The stain is in the oil, giving a deep penetrating non-fading color. This Oil comes uncut, AND HAS TO BE
THINNED, 1 part 100% Mineral Spirits to1 part Oil. We use an empty and cleaned shampoo bottle or dish
detergent bottle to thin and store the oil. Pour the 4 ounce bottle of oil into this bigger bottle, and then fill
the empty Oil bottle with 100% mineral spirits, and pour on top of the Oil. Shake and you have 8 OZ. of
ready to use shop oil. Its been said a beautiful hand rubbed oil finish is not on the wood, its in the wood.
This is true, and the oil can penetrate the wood a lot easier if its thinned.
But logic tells us if we don't thin the oil, put on a heavier thicker coat of oil, we can get a faster
build up, and finish the job a lot quicker. But a coat of thinned oil will dry faster, and allow another coat to
be put on faster. In fact so much faster, that by the time the thicker coat of oil has dried, we have put on
enough thinned coats to more than equal the thickness of that one thicker coat ? ? ?.
Oil dries on the surface first, and the hard thin surface shell can fool you into thinking the oil is dry,
so we put on another coat. After about three of these thick coats have been put on, because the surface felt
dry, the wet oil under the surface starts coming up to the surface, and the surface now feels wet and waxy.
It will take a good three months for this mess to completely dry, if it in fact ever dries. And it will be
embedded with dust, lint, pet hair, homo sapiens hair, and any other fine particles it has come in contact
with. A finish with all this embedded material in it looks horrible.
But with thinned oil you are applying a microscopic thin coat, and particles in the air will not stick to
it. Put the thinned oil on this morning, forget about particles in the air. Next morning easily brush off any particles clinging to the stock with your hand, because non of them will be embedded in the finish. If you
are thick skulled, maybe you should read the above again. I had to experience it again and again a few times
myself, before I got it through my thick skull.
Many of our regular customers, some custom builders, thin the oil 2 parts thinner to 1 part oil. We
personally like this double thinning better, because the thinner the oil, the faster it will dry, especially in the
high humidity we have here in Wisconsin. We would thin it for you and ship it ready to use, EXCEPT
mineral spirits are flammable and could only be shipped as hazardous material. And this really complicates
shipping, as to difficulty, expense, and slower ground service only.
To prepare your stock for refinish, use paint stripper, such as Zip Strip or Strip-Eze to remove the
old finish. If you sand off the old finish, you usually cut too much wood, and if the stock is a two piece like
a Model 12, or a lever rifle, the wood will not still stand a little proud over the metal, when you put it back
on. If the metal stands proud over the wood, any idiot knows its a refinish, and it looks like manure.
We put the stripper on with a small throw away paint brush, we buy at our local hardware for 25
cents. Let the stripper set about 30 minutes, wipe off with 0000 steel wool. If you have one of the newer
epoxy based finishes, the old finish can be really difficult to remove. Next we give the stock a bath with Mineral spirits or warm soapy water. We use a tooth brush to scrub out old finish from checkering and Inletting. This wet bath causes the wood to swell. Small nicks and dents can miraculously disappear from this swelling. Larger ones are easier to sand off after this bath. BE CAREFUL SANDING, don't do the whole stock, just lightly wet sand the nicks and dings. And a stock some fifty years old or better, will look more real with a few small nicks and dings left in it. This gives the stock character. Let the stock dry 24 hrs before starting to finish.
Now that the stock is prepared for finish, you will need an oil dish. We like those plastic bowls that butter or margarine comes in. They have a snap on lid. And these bowls have a big flat base, not as easy to accidentally tip over on the table. Next get some 320 and 400 WET/DRY sand paper. This is black paper. Cut it into approximately one inch squares with scissors. Pour some THINNED shop oil in your bowl.
I use my fingers to apply a sloppy wet coat of oil. Then dip one of your 320 sand paper squares into the oil, and start to sand lightly with finger tip pressure. The wet oil will act as a lubricant, and you will not be cutting much wood with this wet sanding. You will be making wood flour from your stocks wood, and using that wood flour to fill the pores. The wet sanding will force wood flour into the pores. This wet sanding will cause a black paste to form, from the sanding dust, the oil, and oxidation. By the time the paste forms, you will feel the paper wear out, quit making sanding dust. Get a fresh square of sand paper and continue. Apply a wet coat of oil over the black paste, let set 20 to 30 minutes, wipe off with a paper towel. Don't be too particular about the wipe off, if you leave the stock a little dirty, it will do you more good than harm. LET SET TWO DAYS TO DRY. Then repeat another coat of wet sanding in, and LET DRY TWO DAYS BETWEEN EACH COAT. Put on three coats of this wet sanding in with 320, then switch to 400 sand paper and wet sand in two more coats. Your stock will now be silky smooth, and the PORES WILL BE FILLED. The better the job you do filling the pores, the faster and easier the job will be to finish. Now the job gets a lot easier, there is no more sanding. Put the stock aside for a few days or even a week, to make sure the oil has completely dried deep down in the pores.
For the finish coats use only a very small minute amount of oil, apply with your finger tips, and rub in with the heal of your hand. There should be no oil left to wipe off from finishing coats, because its all rubbed in. Again, let set two days between coats.
Your wood may not look like much for the first few finishing coats, but the beauty will soon start to show. And your stock will get more beautiful with each coat. You will know when you are done, you will have a beautiful, soft, smooth as silk satin sheen. It takes us about 30 days, here in our shop to start and completely finish a stock .Some wood can take a little longer to finish, and I don't know why. But if you run into a piece of this stubborn wood, just keep going, and it will eventually finish.
Oil is $21.85 a bottle, and the $21.85 includes the shipping. Four ounce bottle thins to 12 ounces, enough for a couple full stocks. We take major credit cards, money orders, personal checks. If you had rather we do it for you, we charge $250 to finish a butt and forearm, or a one piece rifle stock. If you decide to do it yourself, you will find out why we charge $250 to do it, but there's nothing all that difficult about it. If we can do it, you can do it, but it does take some practice to get the hang of it, and it does take some time. John Kay
WINCHESTER RESTORATIONS
608-248-2965 FAX 612-605-0024
WWW.WINREST.COM
256 W. 19TH ST., BUFFALO CITY, WI 54622
THIS OIL IS JUST AS BEAUTIFUL, AND JUST AS DURABLE, ON ANTIQUE FURNITURE, AS IT IS ON GUN STOCKS, AND INSTRUCTIONS ARE THE SAME. JOHN KAY