264MHC
Well-Known Member
Hello All,
I've been a long time reader of this forum and have found it to be a great source of interesting and valuable information, so I finally joined. This will be my first post so I apologize for the length. I just finished putting together my first custom bolt rifle and enjoyed the entire process. Because I work overseas and don't get home more than a week every couple of months, the project took about a year and 3 months from start to finish. I would like to explain the whole process and the different issues I ran into along the way as well as discuss all of the components of the build to hopefully help others looking to start a similar project.
The Rifle


When I started this project, I was originally going to just rebarrel my Savage 114 that has an aftermarket 6.5x55 1:9 Twist barrel. While this rifle shoots great, the 9 twist (ordered an 8, got a 9, long story) limited my bullet selection, and the heavily tapered swede case required trimming after every firing. I designed an improved version of the 6.5x55 called the .264 MHC (more on this later) and had Manson build a reamer. I sent the reamer to Northland Shooters Supply and had them spin up a Savage pre-fit 6.5 1:7.5 Twist Heavy Sporter barrel. I then started a new job and had a lot more disposable income so I started thinking I might want a whole new gun instead. One night I started researching custom actions with Savage small shank threads and the whole thing started from there.
While researching I found it very helpful to see both price and weight of individual components, so that is what I will list here:
Shilen DGR Left Hand Long Action - 30oz - $950
Shilen 20 MOA Pinned Rail - 2.1oz - $60
Criterion Heavy Sporter 6.5 1:7.5 25"- 52oz - $380 ($50 Upcharge for custom chamber)
Bighorn 12 Point Barrel Nut - 1.5oz - $40
Mesa Altitude Stock LA 3B Inlet - 26oz Bedded and Finished - $575
Grovtec QD Cups - Included in Stock weight - $6
Spartan Gunsmith Adapter - Included in Stock Weight - $34
Triggertech Special Trigger LH - 2.5oz - $200
HS Precision LA Standard DBM - 9.7oz - $315
Wyatts T27 Torx Stainless Action Screws - .7oz - $7
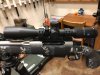
Zeiss V4 4-16x44 ZMoa2 - 21.4oz - $820
Seekins 30mm .82 Low Rings - 4.1oz - $100
Flatline Ops Sniper Articulating Level - 2oz - $140
Total Weight - 9Lbs 8oz
So here are some issues I had to deal with. Putting these rifles together is certainly more involved then bolting together an AR. So I originally planned to use Hawkins Hybrid Low rings that are 3.7oz, and would have saved 4.5 oz over current rings/rail/level set up. Unfortunately my scope would not work with these rings. The magnification dial is too large to fit above the base section of the rings, forcing the whole scope back, which in turn had the front edge of the front ring about .2" farther forward of the mounting length and into the taper up to the objective. It was either higher rings or the rail set up and I didn't want the higher rings. I'm kinda glad it happened because the Flatline flip out level is much more functional, and its much easier to remove and re-attach the scope if necessary. Next thing is I started out with a Hawkins BDL on this rifle. I have never had a BDL rifle and decided I just did not like how that setup functioned. The HS DBM fit the bill perfectly and I absolutely love everything about it aside from the weight (BDL with box, spring and follower weighed 5.2 oz). If they came out with an Aluminum version, it would be perfect. One hiccup I had with it was that the front of the housing on the Triggertech contacted the front of the cutout on the bottom metal. A little Dremel work fixed that without issue and out of sight.
And on to where most of the problems arised: The Stock. I will start by saying that I love the stock. The fit and finish is superb and it fits me quite well. I love the thick vertical grip and the textured gripping surfaces. The light weight is the obvious perk. Anyway, the bottom metal inlet was too thin and required about 1/16" of material be removed for the bottom metal to fit. Once I fit the bottom metal I found out that the mag was sitting too low, allowing the bolt to slide over a round in the mag. After grinding and checking the front and rear pillar areas multiple times, I finally got the bottom metal sitting high enough to properly feed. The bottom metal is now perfectly flush with the bottom of the stock so better than it was anyway. The barrel channel fit really well except around the shank area, which was expected with the barrel nut. I certainly do not hold these issues against Mesa/AG, as I know there are so many parts with so many tolerances out there, but it was more work than I thought I would have to do.
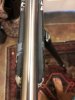
My next issue has more to do with my skill level and tool choice than the parts. I installed the flush cups in place of the swivel studs in the butt and farthest forward stud locations, and the Spartan tripod adapter in the rear fore end stud location. I used a 1/2 Forstner Bit for the Flush cups and a 3/4 for the Spartan, to start and finish the holes, and a regular 1/2 and 3/4 bit for drilling through the embedded 1/4" aluminum bar in all three locations. I wish I could have found slightly smaller bits locally because the holes ended up slightly oversized as shown above. Also I should have waited to use my buddy's drill press, but I was eager to get this thing together so I used my regular 20V Dewalt. Turned out fine but not gunsmith quality.
This Post is getting long so I will continue in a new one.
I've been a long time reader of this forum and have found it to be a great source of interesting and valuable information, so I finally joined. This will be my first post so I apologize for the length. I just finished putting together my first custom bolt rifle and enjoyed the entire process. Because I work overseas and don't get home more than a week every couple of months, the project took about a year and 3 months from start to finish. I would like to explain the whole process and the different issues I ran into along the way as well as discuss all of the components of the build to hopefully help others looking to start a similar project.
The Rifle
When I started this project, I was originally going to just rebarrel my Savage 114 that has an aftermarket 6.5x55 1:9 Twist barrel. While this rifle shoots great, the 9 twist (ordered an 8, got a 9, long story) limited my bullet selection, and the heavily tapered swede case required trimming after every firing. I designed an improved version of the 6.5x55 called the .264 MHC (more on this later) and had Manson build a reamer. I sent the reamer to Northland Shooters Supply and had them spin up a Savage pre-fit 6.5 1:7.5 Twist Heavy Sporter barrel. I then started a new job and had a lot more disposable income so I started thinking I might want a whole new gun instead. One night I started researching custom actions with Savage small shank threads and the whole thing started from there.
While researching I found it very helpful to see both price and weight of individual components, so that is what I will list here:
Shilen DGR Left Hand Long Action - 30oz - $950
Shilen 20 MOA Pinned Rail - 2.1oz - $60
Criterion Heavy Sporter 6.5 1:7.5 25"- 52oz - $380 ($50 Upcharge for custom chamber)
Bighorn 12 Point Barrel Nut - 1.5oz - $40
Mesa Altitude Stock LA 3B Inlet - 26oz Bedded and Finished - $575
Grovtec QD Cups - Included in Stock weight - $6
Spartan Gunsmith Adapter - Included in Stock Weight - $34
Triggertech Special Trigger LH - 2.5oz - $200
HS Precision LA Standard DBM - 9.7oz - $315
Wyatts T27 Torx Stainless Action Screws - .7oz - $7
Zeiss V4 4-16x44 ZMoa2 - 21.4oz - $820
Seekins 30mm .82 Low Rings - 4.1oz - $100
Flatline Ops Sniper Articulating Level - 2oz - $140
Total Weight - 9Lbs 8oz
So here are some issues I had to deal with. Putting these rifles together is certainly more involved then bolting together an AR. So I originally planned to use Hawkins Hybrid Low rings that are 3.7oz, and would have saved 4.5 oz over current rings/rail/level set up. Unfortunately my scope would not work with these rings. The magnification dial is too large to fit above the base section of the rings, forcing the whole scope back, which in turn had the front edge of the front ring about .2" farther forward of the mounting length and into the taper up to the objective. It was either higher rings or the rail set up and I didn't want the higher rings. I'm kinda glad it happened because the Flatline flip out level is much more functional, and its much easier to remove and re-attach the scope if necessary. Next thing is I started out with a Hawkins BDL on this rifle. I have never had a BDL rifle and decided I just did not like how that setup functioned. The HS DBM fit the bill perfectly and I absolutely love everything about it aside from the weight (BDL with box, spring and follower weighed 5.2 oz). If they came out with an Aluminum version, it would be perfect. One hiccup I had with it was that the front of the housing on the Triggertech contacted the front of the cutout on the bottom metal. A little Dremel work fixed that without issue and out of sight.
And on to where most of the problems arised: The Stock. I will start by saying that I love the stock. The fit and finish is superb and it fits me quite well. I love the thick vertical grip and the textured gripping surfaces. The light weight is the obvious perk. Anyway, the bottom metal inlet was too thin and required about 1/16" of material be removed for the bottom metal to fit. Once I fit the bottom metal I found out that the mag was sitting too low, allowing the bolt to slide over a round in the mag. After grinding and checking the front and rear pillar areas multiple times, I finally got the bottom metal sitting high enough to properly feed. The bottom metal is now perfectly flush with the bottom of the stock so better than it was anyway. The barrel channel fit really well except around the shank area, which was expected with the barrel nut. I certainly do not hold these issues against Mesa/AG, as I know there are so many parts with so many tolerances out there, but it was more work than I thought I would have to do.
My next issue has more to do with my skill level and tool choice than the parts. I installed the flush cups in place of the swivel studs in the butt and farthest forward stud locations, and the Spartan tripod adapter in the rear fore end stud location. I used a 1/2 Forstner Bit for the Flush cups and a 3/4 for the Spartan, to start and finish the holes, and a regular 1/2 and 3/4 bit for drilling through the embedded 1/4" aluminum bar in all three locations. I wish I could have found slightly smaller bits locally because the holes ended up slightly oversized as shown above. Also I should have waited to use my buddy's drill press, but I was eager to get this thing together so I used my regular 20V Dewalt. Turned out fine but not gunsmith quality.
This Post is getting long so I will continue in a new one.
Attachments

Last edited:
")