victor3ranger
Well-Known Member
Well hang around I definitely might be picking your brain soon
If I only had the materials lab at my disposal when I was still working. I could get answers to every single question that pops up here, time and again.So, you bought same second hand cases, no info of the number firings nor how stiff were the loadings.
20% of the acquired cases had expanded primer pocket. In my mind the expansion of the primer pocket is an obvious sign of excessive pressure.
This bit is incoherent and difficult to understand.
The donut could be removed by reaming but I think it could not be pushed outside by any mandrel. When neck turning, it is good idea to come a bit up the shoulder to create a small undercut in to which the donut could be pushed out (firing).
In my mind the kaboom happened because the projectile was held tight
in the case's neck, held with no clearance (for the donut) in the neck portion of the chamber.
The cracks in the case would be perfectly visible if you could polish the
milled surface.
If I only had the materials lab at my disposal when I was still working. I could get answers to every single question that pops up here, time and again.
If I have time, I'll see if I can polish this case up. Problem is, it needs to be etched to get the smeared material out of the surface and laying on the alledged crack. I cannot penetrant inspect it either. It still will be left to other eyes to imagine if a crack exists after its polished. Ain't so easy...
Well, I gave your advice a shot. This piece of brass with an enlarged primer pocket, milled, then sanded with 400 grit paper.Lack of facilities and time could be a problem indeed, I do not think a high polish or etching would be necessary, just nice fine scratch marks going in one direction could do.
A smear of any ammonia base copper cleaning solvent would reveal a crack.
Could be the last draw punch if off, or during the pocket forming or stamping step. Seems like one tool was +0.0002" over and did an oopsie.A= a bottom forming punch tool of the head with the large corner radius
B= possibly a different punch tool diameter, a bit bigger than the bottom punch
I have REM UMC and Remington in 308. Is that what you are referring to as a control sample?Bob, did you do a control comparison to piece of brass not related to this incident to verify the observations are not consistent in other pieces of brass? It would be worthwhile to confirm the observation is unique to this brass and not a possible "normal" progression of brass. I know this is a lot of work and appreciate your diligence.
Wow Bob you can see that plain as dayWell, I gave your advice a shot. This piece of brass with an enlarged primer pocket, milled, then sanded with 400 grit paper.
I ultrasonic cleaned in 50/50 vinegar and distilled water with a small amount of Spic-N-Span. Next was Wipeout foam to leach out any copper that may be hiding something like a crack.
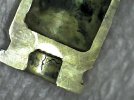
So what I found was a crack initiating from a sharp fillet radius in a step from the various punch tools used to draw the brass into the die. Once I got the parts out of ultrasonic this sharp radius exposed itself and could be felt slightly with a pointed tool. The spent powder layer was hiding this in 2x fired brass.
This one was next to go. Another firing might have done it in.
Here are the photos:
The circled area is the crack all around the case wall.
A= a bottom forming punch tool of the head with the large corner radius
B= possibly a different punch tool diameter, a bit bigger than the bottom punch
View attachment 496602
The following images show the crack in various photos from this microscope where I did my best to capture it without reflections, etc.
View attachment 496603
View attachment 496604View attachment 496605View attachment 496606
So, do we have a bad lot of cases where punch tools were not matching creating a place to initiate a crack? This condition in a pressure vessel is a bad thing to have.
The other question I guess would be; did the case pressure just get out of hand and regardless of the step, it would have never held together?
I might consider sending this set of pictures to Lapua.
Credit goes to @charlie 7 for pushing me a step farther.

Don't worry, I'm out of gas.Now we need some volunteers to separate some more case heads from various brass manufacturers in their donor rifle chambers. By stepping on the gas pedal hard.
See where the case heads let free. Count me out of that group.
My pockets always get loose before my case heads separate.Now we need some volunteers to separate some more case heads from various brass manufacturers in their donor rifle chambers. By stepping on the gas pedal hard.
See where the case heads let free. Count me out of that group.