NW Hunter
Well-Known Member
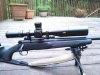
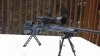
I thought I would give painting the rifle a try this week. I ordered an Easy Way camo kit from DuraCoat. The camo pattern is called Advanced Tiger Stripe.
It normally comes in green, brown and tan. I thought I would change it up and used the colors of the US Navy (black, dark grey, navy blue & light blue).
The kit comes with a throw-away sprayer, four paint colors and a stencil kit. I ordered an extra stencil kit and I am glad I did. Every stencil was used on the job.
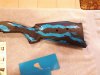
While the EasyWay kit does a good job, I did learn that I made a few mistakes. After painting the rifle with the base color of black, I applied the other colors too heavy. When I pulled off the stencils, it left slightly raised edges between the paint colors.I guess time will tell if these edges will chip off.
I also found when spraying the smallest stencils, the paint would pool up inside the stencil quickly and would "blob up" when removing the stencil. I found that using a small detail paint brush with most of the paint wiped off worked best.
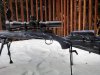
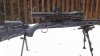
Good or bad, here is the result of cabin fever. I must say it was a fun project and I would do it again.
It normally comes in green, brown and tan. I thought I would change it up and used the colors of the US Navy (black, dark grey, navy blue & light blue).
The kit comes with a throw-away sprayer, four paint colors and a stencil kit. I ordered an extra stencil kit and I am glad I did. Every stencil was used on the job.
While the EasyWay kit does a good job, I did learn that I made a few mistakes. After painting the rifle with the base color of black, I applied the other colors too heavy. When I pulled off the stencils, it left slightly raised edges between the paint colors.I guess time will tell if these edges will chip off.
I also found when spraying the smallest stencils, the paint would pool up inside the stencil quickly and would "blob up" when removing the stencil. I found that using a small detail paint brush with most of the paint wiped off worked best.
Good or bad, here is the result of cabin fever. I must say it was a fun project and I would do it again.