Fitting The Long Range Rifle
By Shawn Carlock
While it is easy for most people to understand the importance of proper fitting of shotguns, there is a common misconception that scoped rifles do not require the same attention to detail concerning fitting the rifle to the shooter. Proper fitting of the precision rifle is every bit as important to the long range guy as fitting the shotgun is to the sporting clays or field shooter.
Every aspect of precision rifle shooting, and in particular long range, is about repeatability. A lot of people don't realize they have a fitting or repeatability issue. Let us take my favorite guy Andy the Average Shooter (or Andy for short). Now, Andy has acquired a 338 WC (way cool) and the appropriate target knobbed optic. Andy goes to the range all summer long working on loads, shoots lots of groups, develops spot on drop figures out to 1000 yards and is quite confident in his abilities and his rifle's abilities. Hunting season rolls around, and our hero (Andy) is set up in a great long range ambush position. He has it all laid out: a great prone position, rear bag, all tools laid out for close access, and all atmospheric data is entered into the PDA. Life is good. The conditions are nearly perfect. Andy is quite confident that anything within his range limit of 1000 yards is good to go. Shortly after daylight Andy spots a really nice whitetail buck feeding at 992 yards. Andy calmly dials the elevation knob up 24.25 MOA and leaves the windage where it is because there is no wind. The buck is in a nearly perfect feeding position, ever so slightly quartering away. Andy centers the crosshairs on the off shoulder and the centerline of the body for elevation. This is absolutely perfect. Andy savors the moment for a few seconds and applies pressure until the 1 lb trigger cleanly breaks. Andy's rifle barely moves because of the muzzlebrake and he picks up the tail end of the trace dropping in on the buck. The trace is perfect for windage and appears to be dropping right into the X-ring. The bullet impacts, much to Andy's horror, 4-5 inches under the buck's belly, just barely missing the offside leg, and showers the buck with dirt, rocks and grass. Well, even a buck in full rut understands that now is the time to be in a different zip code as disappears.
What happened to Andy is a mystery to him and everyone he tells the story to. What has happened is quite simple and unfortunately quite common. Andy has suffered from "*** glued to the benchrest syndrome." Andy has had some rifle fitting issues and never even knew it. Here is what happened to Andy: he spent all of his time on a benchrest shooting. He shot well from the bench, producing consistent groups and drops. Now it never occurred to Andy that his rifle lacked the proper length of pull and cheek weld. Shooting off the bench Andy had gotten in the habit of shooting with a certain feel to the rifle and was able to produce some good shooting, even though the rifle lacked proper fit. Now, when Andy went to the field and went prone instead of shooting from a bench as he was used to, it changed his line of sight placement through the scope. Even though the scope showed no "shadowing" and was clear, he was now looking through a lower portion of the scope than when he shot on the bench. Most people shooting a rifle with lack of cheek weld will tilt the head forward when going prone, causing them to look through a lower line in the scope. This causes the impact to be lower. In Andy's case at 1000 yards or so this is a big deal.
Look at the two groups below both shot with the same rifle. The one on the left is a regular group shot with proper rifle fit. The group on the right is shot with no cheek weld, shooting one shot each with the line of sight through the top, bottom, left and right of the scope but still with a full, clear, no shadow sight picture.
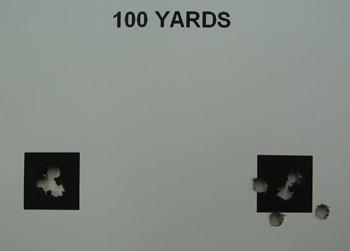
You can see in the groups simply having a clear, no shadow sight picture is not good enough for the long range hunter. Shooting field positions and especially odd field positions will really amplify the effects of poor rifle fit.
By Shawn Carlock
While it is easy for most people to understand the importance of proper fitting of shotguns, there is a common misconception that scoped rifles do not require the same attention to detail concerning fitting the rifle to the shooter. Proper fitting of the precision rifle is every bit as important to the long range guy as fitting the shotgun is to the sporting clays or field shooter.
Every aspect of precision rifle shooting, and in particular long range, is about repeatability. A lot of people don't realize they have a fitting or repeatability issue. Let us take my favorite guy Andy the Average Shooter (or Andy for short). Now, Andy has acquired a 338 WC (way cool) and the appropriate target knobbed optic. Andy goes to the range all summer long working on loads, shoots lots of groups, develops spot on drop figures out to 1000 yards and is quite confident in his abilities and his rifle's abilities. Hunting season rolls around, and our hero (Andy) is set up in a great long range ambush position. He has it all laid out: a great prone position, rear bag, all tools laid out for close access, and all atmospheric data is entered into the PDA. Life is good. The conditions are nearly perfect. Andy is quite confident that anything within his range limit of 1000 yards is good to go. Shortly after daylight Andy spots a really nice whitetail buck feeding at 992 yards. Andy calmly dials the elevation knob up 24.25 MOA and leaves the windage where it is because there is no wind. The buck is in a nearly perfect feeding position, ever so slightly quartering away. Andy centers the crosshairs on the off shoulder and the centerline of the body for elevation. This is absolutely perfect. Andy savors the moment for a few seconds and applies pressure until the 1 lb trigger cleanly breaks. Andy's rifle barely moves because of the muzzlebrake and he picks up the tail end of the trace dropping in on the buck. The trace is perfect for windage and appears to be dropping right into the X-ring. The bullet impacts, much to Andy's horror, 4-5 inches under the buck's belly, just barely missing the offside leg, and showers the buck with dirt, rocks and grass. Well, even a buck in full rut understands that now is the time to be in a different zip code as disappears.
What happened to Andy is a mystery to him and everyone he tells the story to. What has happened is quite simple and unfortunately quite common. Andy has suffered from "*** glued to the benchrest syndrome." Andy has had some rifle fitting issues and never even knew it. Here is what happened to Andy: he spent all of his time on a benchrest shooting. He shot well from the bench, producing consistent groups and drops. Now it never occurred to Andy that his rifle lacked the proper length of pull and cheek weld. Shooting off the bench Andy had gotten in the habit of shooting with a certain feel to the rifle and was able to produce some good shooting, even though the rifle lacked proper fit. Now, when Andy went to the field and went prone instead of shooting from a bench as he was used to, it changed his line of sight placement through the scope. Even though the scope showed no "shadowing" and was clear, he was now looking through a lower portion of the scope than when he shot on the bench. Most people shooting a rifle with lack of cheek weld will tilt the head forward when going prone, causing them to look through a lower line in the scope. This causes the impact to be lower. In Andy's case at 1000 yards or so this is a big deal.
Look at the two groups below both shot with the same rifle. The one on the left is a regular group shot with proper rifle fit. The group on the right is shot with no cheek weld, shooting one shot each with the line of sight through the top, bottom, left and right of the scope but still with a full, clear, no shadow sight picture.
You can see in the groups simply having a clear, no shadow sight picture is not good enough for the long range hunter. Shooting field positions and especially odd field positions will really amplify the effects of poor rifle fit.
Fitting The Long Range Rifle
There are 4 major areas I look at in precision rifle fitting:
Length of Pull
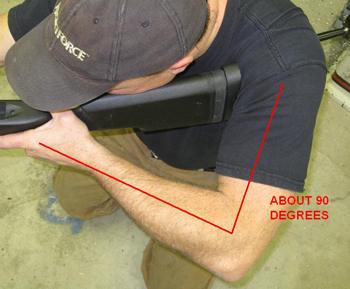
Length of pull is the distance from the trigger to the rear of the stock where it contacts the shoulder. Most stocks can be corrected by adding a spacer or shortening the stock. Keep in mind the amount of clothing worn effects the LOP. A removable spacer or adjustable system is a nice way to correct for clothing changes that effect the LOP. How do you know if you have the correct LOP? Well since you asked, I'll tell you. There is no perfect way to determine for every single person what constitutes perfect LOP. Chest depth, arm length, and neck length make for unlimited combinations. When I mount the rifle I want my strong arm bent at roughly 90 degrees.
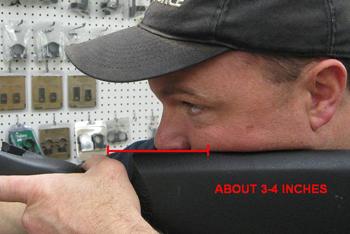
I also want my thumb to be 3-4 inches in front of my face.
I have had a few people say they cannot mount the scope if their rifle fits correctly. If that is the case, figure out a different way to mount the scope. You don't compromise stock fit to the location of the scope. You locate the scope where the stock fits. When I am determining how I mount the rifle, I simply close my eyes and mount the rifle, then take note of where I am at when I open my eyes. I do this in fitting all aspects of the rifle.
Web To Trigger Distance
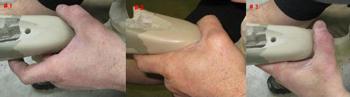
I want the center of the web to be in the grip. If it is not, you are reaching around the grip or holding it loose. Either of these conditions can affect the LOP and the placement of your eye in relation to the scope. Picture #1 is a loose grip, picture #2 is correct grip and picture #3 is a broken, reaching around too far grip.
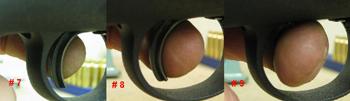
Next, with the web in the proper location, I want the center of the pad of my index finger to contact the center of the trigger every time, from any position. If you don't have this kind of fit, the grip can be modified or there are some adjustable triggers that move fore and aft to correct this. In picture #7 the trigger finger is too far out with the very tip contacting the trigger. In picture #8, there is perfect center of the finger pad placement. In picture #9, there is too much finger through the trigger. The trigger is resting in the first crease of the finger right at the joint.
Grip
I simply want the grip to be long enough and shaped so I can get the exact same grip every time and again from any position. Some people like slight palm swells, some like none, and some like huge swells. To each their own, as long as it makes you grab the rifle the same way every time, and correctly positions the hand and trigger finger.
Cheek Weld
This is a key issue for field shooting. Some benchrest shooters would argue about cheek weld because they shoot insane groups with no cheek contact at all. That is fine on the bench but field positions are a huge difference from the bench.
The cheek rest portion of the stock should be parallel to the bore of the scope.

If it is not, if it drops in the front or rear, it is nearly impossible to get the same height to the scope by virtue of the fact that any given point on the cheek rest is a different height in relation to the scope. All it takes in conjunction with an angled cheekpiece to ruin a shot is a field condition or fitting issue that places the face in a slightly fore or aft location, thus changing the eye's position with the scope.
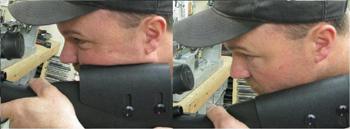
If you keep these axes parallel, it helps to minimize some differences in shooting positions. I adjust cheek height by mounting the rifle with eyes closed, then opening them to see where I am at. When it is properly adjusted, I can close my eyes, mount the rifle from or in almost any position, and see the same sight picture when opening them. It is important to note that if you have to move your position or head even the slightest bit, that you are not properly adjusted. Ultimately, when properly fitted, you should be able to be in position for long periods of time without getting neck fatigue or being uncomfortable.
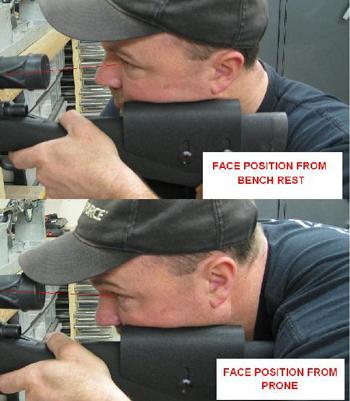
In the above photos you will see the difference in the angle from the eye to the scope. Even though there was a clear sight picture in both photos, quite clearly you're not looking through the scope the same. All that is needed to correct this is to raise the cheekpiece for prone slightly and change our bench technique slightly so it is the same. Once you feel you have it correctly adjusted, go to the range and shoot from the bench, and follow those shots up with shots from prone to confirm there is not variation in point of impact.
Last but not least, once you think you have your rifle fitted, take some notes on your adjustments and get out into the field to test them. Had our hero Andy spent even one afternoon shooting from field positions, he would have discovered he had some issues and maybe gotten an opportunity to correct them. Just remember that a properly fitted rifle should feel like an extension of the body. Hundreds of hours are spent making ammunition repeatable and exact. Big dollars are spent for the most repeatable optics. Rifles are handcrafted to be the most repeatable possible, so in the scheme of things making yourself repeatable through rifle fitting is kind of a drop in the bucket. We all know what they say about a chain only being as strong as its weakest link. Don't overlook fitting the rifle to the shooter.
Shawn Carlock is a veteran law enforcement sniper and the current USPSA national precision rifle champion. He runs his business building custom rifles and conducting precision rifle training for civilian and law enforcement interests.
Defensive Edge - Long Range Hunting Videos
Length of Pull
Length of pull is the distance from the trigger to the rear of the stock where it contacts the shoulder. Most stocks can be corrected by adding a spacer or shortening the stock. Keep in mind the amount of clothing worn effects the LOP. A removable spacer or adjustable system is a nice way to correct for clothing changes that effect the LOP. How do you know if you have the correct LOP? Well since you asked, I'll tell you. There is no perfect way to determine for every single person what constitutes perfect LOP. Chest depth, arm length, and neck length make for unlimited combinations. When I mount the rifle I want my strong arm bent at roughly 90 degrees.
I also want my thumb to be 3-4 inches in front of my face.
I have had a few people say they cannot mount the scope if their rifle fits correctly. If that is the case, figure out a different way to mount the scope. You don't compromise stock fit to the location of the scope. You locate the scope where the stock fits. When I am determining how I mount the rifle, I simply close my eyes and mount the rifle, then take note of where I am at when I open my eyes. I do this in fitting all aspects of the rifle.
Web To Trigger Distance
I want the center of the web to be in the grip. If it is not, you are reaching around the grip or holding it loose. Either of these conditions can affect the LOP and the placement of your eye in relation to the scope. Picture #1 is a loose grip, picture #2 is correct grip and picture #3 is a broken, reaching around too far grip.
Next, with the web in the proper location, I want the center of the pad of my index finger to contact the center of the trigger every time, from any position. If you don't have this kind of fit, the grip can be modified or there are some adjustable triggers that move fore and aft to correct this. In picture #7 the trigger finger is too far out with the very tip contacting the trigger. In picture #8, there is perfect center of the finger pad placement. In picture #9, there is too much finger through the trigger. The trigger is resting in the first crease of the finger right at the joint.
Grip
I simply want the grip to be long enough and shaped so I can get the exact same grip every time and again from any position. Some people like slight palm swells, some like none, and some like huge swells. To each their own, as long as it makes you grab the rifle the same way every time, and correctly positions the hand and trigger finger.
Cheek Weld
This is a key issue for field shooting. Some benchrest shooters would argue about cheek weld because they shoot insane groups with no cheek contact at all. That is fine on the bench but field positions are a huge difference from the bench.
The cheek rest portion of the stock should be parallel to the bore of the scope.
If it is not, if it drops in the front or rear, it is nearly impossible to get the same height to the scope by virtue of the fact that any given point on the cheek rest is a different height in relation to the scope. All it takes in conjunction with an angled cheekpiece to ruin a shot is a field condition or fitting issue that places the face in a slightly fore or aft location, thus changing the eye's position with the scope.
If you keep these axes parallel, it helps to minimize some differences in shooting positions. I adjust cheek height by mounting the rifle with eyes closed, then opening them to see where I am at. When it is properly adjusted, I can close my eyes, mount the rifle from or in almost any position, and see the same sight picture when opening them. It is important to note that if you have to move your position or head even the slightest bit, that you are not properly adjusted. Ultimately, when properly fitted, you should be able to be in position for long periods of time without getting neck fatigue or being uncomfortable.
In the above photos you will see the difference in the angle from the eye to the scope. Even though there was a clear sight picture in both photos, quite clearly you're not looking through the scope the same. All that is needed to correct this is to raise the cheekpiece for prone slightly and change our bench technique slightly so it is the same. Once you feel you have it correctly adjusted, go to the range and shoot from the bench, and follow those shots up with shots from prone to confirm there is not variation in point of impact.
Last but not least, once you think you have your rifle fitted, take some notes on your adjustments and get out into the field to test them. Had our hero Andy spent even one afternoon shooting from field positions, he would have discovered he had some issues and maybe gotten an opportunity to correct them. Just remember that a properly fitted rifle should feel like an extension of the body. Hundreds of hours are spent making ammunition repeatable and exact. Big dollars are spent for the most repeatable optics. Rifles are handcrafted to be the most repeatable possible, so in the scheme of things making yourself repeatable through rifle fitting is kind of a drop in the bucket. We all know what they say about a chain only being as strong as its weakest link. Don't overlook fitting the rifle to the shooter.
Shawn Carlock is a veteran law enforcement sniper and the current USPSA national precision rifle champion. He runs his business building custom rifles and conducting precision rifle training for civilian and law enforcement interests.
Defensive Edge - Long Range Hunting Videos
