Basic Rifle Maintenance - Part 3
By Vince Bottomley
©Copyright 2009, Target Shooter Magazine
In part one we covered the bolt, then the barrel in part 2, so now let's take a look at the action/stock.
We can divide our maintenance into three parts:
The action itself
The trigger
The action-bed
Let's start with the action. Most actions will be retained in the stock with two or maybe three screws. This method of retention dates back well over a century so it looks as though someone got it right pretty early on. By removing the action-screws we can separate the barrelled-action from the stock. If your rifle has an integral box-magazine, be prepared for a few bits to jump out. You can pre-empt this by releasing the floor-plate – usually achieved by operating a catch near to the trigger-guard.
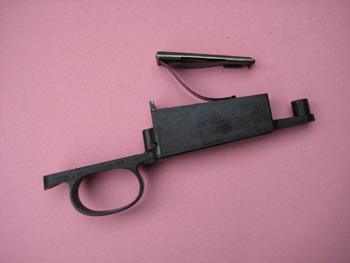
This type of integral box-magazine cum floor-plate and trigger-guard is standard on most factory hunting rifles.
If we put the stock to one side for a moment and concentrate on the action, we will probably see a recoil lug somewhere – usually sandwiched between the barrel and the action or maybe part of the action. The very name gives a clue to its function - it transfers the recoil to the stock rather than exerting a shear force through the action screws. If your action has a deep rear tang, that may also absorb recoil.
There is little we can do with the action itself beyond a thorough clean. With access now available from top and bottom we can give it a good clean internally, especially in the lug recesses. A large amount of debris can accumulate here and it often gets overlooked when we clean the barrel. Remove it with a proper cleaning tool or improvise with a bit of bent wire and a few cleaning patches. A squirt with WD40 will help loosen the crud. Don't forget to pass a patch or two through the barrel afterwards – it's easy to leave a patch or debris in there!

Now for the trigger. This is one bit that we can apply a little TLC to but don't get carried away. We like a clean trigger but we don't want it lubricated with oil. Oil will affect the function of the trigger and will also attract dust and grit – the enemy of our trigger. If your trigger is working satisfactorily, I would say leave well alone. If you attempt to clean it you could easily disturb grit or debris and end up jamming the trigger.
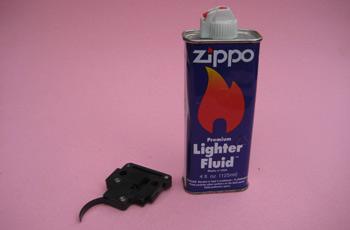
Zippo petroleum based lighter fuel is as good as anything for flushing triggers. This particular tin has accompanied me to Italy, New Zealand, Sweden, Austria and America – and I've yet to use it!
If the trigger looks really grungy, then it's a good opportunity to clean it. Start by removing it from the action. It will be fixed by one or two screws or it may be retained with a couple of pins – as in the case of Remington style triggers. Drive out the pins with a suitable punch – they should come out easily – but get ready for springs to fly! Although you will remember where the main screws or pins go, safeties can be another matter so, before you do anything, take a pic or two with your digital camera, then you will know how it all fits together.
Clean the trigger with old-fashioned Zippo lighter fluid – nothing else. Flush the trigger from the top, liberally dousing it with fluid. After flushing, allow it to drain onto some kitchen roll and dry naturally. Do not apply any further lubrication. As this article is 'basic maintenance', I do not intend to cover trigger adjustment.
The action-bed is perhaps the greatest influencer of accuracy outside of the actual barrel/chamber. For a rifle to deliver best accuracy, the barrelled-action and stock must be 'as one' when the two components are screwed together. This means that the recess in the stock where the action sits – which we call the 'bed' – must be a flawless, solid recess which is a perfect fit.
A custom-rifle builder will achieve this by individually bedding the action into the stock using one of several epoxy compounds available – the most popular of which is Devcon. Devcon is a two-pack epoxy putty which was designed for repairing metal castings, so in addition to being immensely strong is has one other essential feature – it does not shrink on curing. Beware, Devcon bedding is not for the amateur. It is all too easy to end up with your rifle glued into the stock – permanently! If you want to know more about the process, check out www.6mmbr.com/pillarbedding.html Incidentally, it's not uncommon for benchrest actions to be permanently glued into the stock. This is undoubtedly the best way to ensure a perfect trouble-free bed and when accuracy is paramount there is no better bed.
Of course, a one-off epoxy bed will not be found on any mass-produced rifle and guns from the 'big four' American manufactures will have an assortment of solutions to this critical bedding problem. Probably the best solution is the aluminium block found in rifles like the Remington PSS. Rifles with a laminate stock - like the Savage - will usually be bedded directly onto the wood-laminate, which can be a problem as the wood will gradually deform and allow the bedding to shift and the action screws slacken, so frequent checking of the action-screws is advisable with any wooden stock.
Wood-laminate is however very dense and can form a reasonable bed but walnut stocks are much softer and therefore prone to even greater deformities. This is exaggerated by the action of oil, water and cleaning fluids which inevitably find their way under the action and soak into the wood. Rather than providing a firm solid bed, the wood can soften and even split.

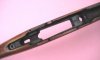
This stock has split beneath the action – you can just see the split to the rear of the tang and in the bed itself just forward of the magazine cut-out. The bed is also blackened with oil and the like but then it is over 100 years old and it still shoot amazingly well.
When this happens, there is not a lot you can do and a replacement stock is the best and cheapest option. An alternative could be pillar-bedding. Unfortunately, this is not a cheap process and will probably cost more than a decent aftermarket stock but, if you are in love with your chunk of walnut, it could certainly restore that lost accuracy and the aforementioned web article also covers the pillar-bedding process.
Before we replace the barrelled-action, check for any obvious high-spots in the bed which may be observed as shiny patches on the underside of the action. High spots will prevent a proper full bed and will do nothing for your rifle's accurac
Let's now re-assemble. Hopefully the trigger is back in place with the safety working. Leave the bolt out as you replace the barrelled-action. Do-up the action-screws finger-tight then stand the rifle on the butt and give it a 'bounce'. This will ensure that the recoil-lug is firmly against its recess. Tighten the action-screws with the rifle vertical. Place a finger at the end of the fore-end so that you can feel both the barrel and stock and, as you tighten the screws, you will feel the barrel move in relation to the stock. Tighten the front screw first and when you tighten the rear screw feel for any movement between barrel and stock. If your bed is perfect, movement will not be detected. If you feel movement, then the action is 'rocking' on the front screw. If this movement is excessive, you could actually be stressing the action by bending it. A rifle will never shoot well under these circumstances.
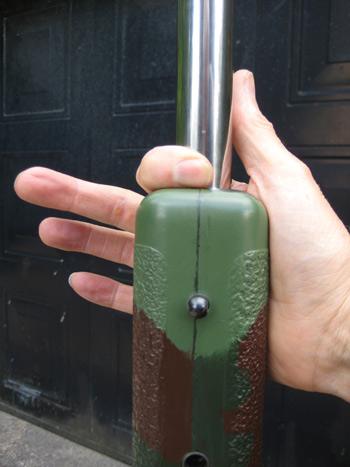
When tightening the action screws, do it with the rifle vertical and your finger touching the stock and barrel. Tighten the front screw, then as you tighten the rear screw you should not detect excessive movement with your finger. If you do, you have a bedding problem and you are stressing the action – not good for accuracy.
Remember, when tightening the action screws – they will only have around six threads into the action and an Allen key in the hands of the ham-fisted will soon strip a quarter-inch screw. Don't overdo it!
Finally, we will check that the barrel is free-floating (if it should be!) by passing a piece of thin card along the underside of the barrel and check that no part of the bolt-handle is touching the stock when the bolt is closed. Obviously, if the barrel or bolt is fouling the stock, it's not too difficult to carefully relieve it with a piece of sand-paper or what have you. Not all barrels are designed to be free-floating however - some are 'pressure-bedded' so that the barrel is deliberately in contact with the stock - usually near the tip of the fore-end.
After all that work, will your rifle shoot better? Maybe not but hopefully you will now know why!
Next month we will cover the scope and mounts.
Target Shooter is the first UK online shooting magazine and best of all it is free! The magazine is aimed at all target shooters, or 'paper punchers', that enjoy to read about their sports, reviews, product information, firearms, competitions, club information, etc, etc. Remember the name Target Shooter, as it is a magazine produced by shooters for shooters.
By Vince Bottomley
©Copyright 2009, Target Shooter Magazine
In part one we covered the bolt, then the barrel in part 2, so now let's take a look at the action/stock.
We can divide our maintenance into three parts:
The action itself
The trigger
The action-bed
Let's start with the action. Most actions will be retained in the stock with two or maybe three screws. This method of retention dates back well over a century so it looks as though someone got it right pretty early on. By removing the action-screws we can separate the barrelled-action from the stock. If your rifle has an integral box-magazine, be prepared for a few bits to jump out. You can pre-empt this by releasing the floor-plate – usually achieved by operating a catch near to the trigger-guard.
This type of integral box-magazine cum floor-plate and trigger-guard is standard on most factory hunting rifles.
If we put the stock to one side for a moment and concentrate on the action, we will probably see a recoil lug somewhere – usually sandwiched between the barrel and the action or maybe part of the action. The very name gives a clue to its function - it transfers the recoil to the stock rather than exerting a shear force through the action screws. If your action has a deep rear tang, that may also absorb recoil.
There is little we can do with the action itself beyond a thorough clean. With access now available from top and bottom we can give it a good clean internally, especially in the lug recesses. A large amount of debris can accumulate here and it often gets overlooked when we clean the barrel. Remove it with a proper cleaning tool or improvise with a bit of bent wire and a few cleaning patches. A squirt with WD40 will help loosen the crud. Don't forget to pass a patch or two through the barrel afterwards – it's easy to leave a patch or debris in there!
Now for the trigger. This is one bit that we can apply a little TLC to but don't get carried away. We like a clean trigger but we don't want it lubricated with oil. Oil will affect the function of the trigger and will also attract dust and grit – the enemy of our trigger. If your trigger is working satisfactorily, I would say leave well alone. If you attempt to clean it you could easily disturb grit or debris and end up jamming the trigger.
Zippo petroleum based lighter fuel is as good as anything for flushing triggers. This particular tin has accompanied me to Italy, New Zealand, Sweden, Austria and America – and I've yet to use it!
If the trigger looks really grungy, then it's a good opportunity to clean it. Start by removing it from the action. It will be fixed by one or two screws or it may be retained with a couple of pins – as in the case of Remington style triggers. Drive out the pins with a suitable punch – they should come out easily – but get ready for springs to fly! Although you will remember where the main screws or pins go, safeties can be another matter so, before you do anything, take a pic or two with your digital camera, then you will know how it all fits together.
Clean the trigger with old-fashioned Zippo lighter fluid – nothing else. Flush the trigger from the top, liberally dousing it with fluid. After flushing, allow it to drain onto some kitchen roll and dry naturally. Do not apply any further lubrication. As this article is 'basic maintenance', I do not intend to cover trigger adjustment.
The action-bed is perhaps the greatest influencer of accuracy outside of the actual barrel/chamber. For a rifle to deliver best accuracy, the barrelled-action and stock must be 'as one' when the two components are screwed together. This means that the recess in the stock where the action sits – which we call the 'bed' – must be a flawless, solid recess which is a perfect fit.
A custom-rifle builder will achieve this by individually bedding the action into the stock using one of several epoxy compounds available – the most popular of which is Devcon. Devcon is a two-pack epoxy putty which was designed for repairing metal castings, so in addition to being immensely strong is has one other essential feature – it does not shrink on curing. Beware, Devcon bedding is not for the amateur. It is all too easy to end up with your rifle glued into the stock – permanently! If you want to know more about the process, check out www.6mmbr.com/pillarbedding.html Incidentally, it's not uncommon for benchrest actions to be permanently glued into the stock. This is undoubtedly the best way to ensure a perfect trouble-free bed and when accuracy is paramount there is no better bed.
Of course, a one-off epoxy bed will not be found on any mass-produced rifle and guns from the 'big four' American manufactures will have an assortment of solutions to this critical bedding problem. Probably the best solution is the aluminium block found in rifles like the Remington PSS. Rifles with a laminate stock - like the Savage - will usually be bedded directly onto the wood-laminate, which can be a problem as the wood will gradually deform and allow the bedding to shift and the action screws slacken, so frequent checking of the action-screws is advisable with any wooden stock.
Wood-laminate is however very dense and can form a reasonable bed but walnut stocks are much softer and therefore prone to even greater deformities. This is exaggerated by the action of oil, water and cleaning fluids which inevitably find their way under the action and soak into the wood. Rather than providing a firm solid bed, the wood can soften and even split.
This stock has split beneath the action – you can just see the split to the rear of the tang and in the bed itself just forward of the magazine cut-out. The bed is also blackened with oil and the like but then it is over 100 years old and it still shoot amazingly well.
When this happens, there is not a lot you can do and a replacement stock is the best and cheapest option. An alternative could be pillar-bedding. Unfortunately, this is not a cheap process and will probably cost more than a decent aftermarket stock but, if you are in love with your chunk of walnut, it could certainly restore that lost accuracy and the aforementioned web article also covers the pillar-bedding process.
Before we replace the barrelled-action, check for any obvious high-spots in the bed which may be observed as shiny patches on the underside of the action. High spots will prevent a proper full bed and will do nothing for your rifle's accurac
Let's now re-assemble. Hopefully the trigger is back in place with the safety working. Leave the bolt out as you replace the barrelled-action. Do-up the action-screws finger-tight then stand the rifle on the butt and give it a 'bounce'. This will ensure that the recoil-lug is firmly against its recess. Tighten the action-screws with the rifle vertical. Place a finger at the end of the fore-end so that you can feel both the barrel and stock and, as you tighten the screws, you will feel the barrel move in relation to the stock. Tighten the front screw first and when you tighten the rear screw feel for any movement between barrel and stock. If your bed is perfect, movement will not be detected. If you feel movement, then the action is 'rocking' on the front screw. If this movement is excessive, you could actually be stressing the action by bending it. A rifle will never shoot well under these circumstances.
When tightening the action screws, do it with the rifle vertical and your finger touching the stock and barrel. Tighten the front screw, then as you tighten the rear screw you should not detect excessive movement with your finger. If you do, you have a bedding problem and you are stressing the action – not good for accuracy.
Remember, when tightening the action screws – they will only have around six threads into the action and an Allen key in the hands of the ham-fisted will soon strip a quarter-inch screw. Don't overdo it!
Finally, we will check that the barrel is free-floating (if it should be!) by passing a piece of thin card along the underside of the barrel and check that no part of the bolt-handle is touching the stock when the bolt is closed. Obviously, if the barrel or bolt is fouling the stock, it's not too difficult to carefully relieve it with a piece of sand-paper or what have you. Not all barrels are designed to be free-floating however - some are 'pressure-bedded' so that the barrel is deliberately in contact with the stock - usually near the tip of the fore-end.
After all that work, will your rifle shoot better? Maybe not but hopefully you will now know why!
Next month we will cover the scope and mounts.
Target Shooter is the first UK online shooting magazine and best of all it is free! The magazine is aimed at all target shooters, or 'paper punchers', that enjoy to read about their sports, reviews, product information, firearms, competitions, club information, etc, etc. Remember the name Target Shooter, as it is a magazine produced by shooters for shooters.