M Rosslee
Well-Known Member
How do you do it?
Here's my technique set out.
I charge casings with individual loads in increasing increments from the minimum prescribed load to the maximum prescribed load and all of these are then seated with projectiles to the same total cartridge length.
So there are generally 20 rounds charged as set out hereunder, all the same total cartridge length with the bullets numbered to keep track of them:
1. 49gr
2. 49.3gr
3. 49.6gr
4. 49.9gr
5. 50.2gr
6. 50.5gr
7. 50.8gr
8. 51.1gr
....
20. eg 52.5gr
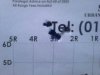
I then load 5 rounds right in between the minimum and maximum loads. I zero my rifle at 300m using these 5 shots - to make sure that my ladder doesn't start or end at the top or bottom of the target sheet (a large white poster with a 2"x2" solid dot in the middle)
Once my rifle's height has been adjusted to the dot's height at 300m with the middle load, we are ready to shoot the ladder.
I fire "Number 1" and for the purposes of the example, it's the 49gr load.
It will print a few inches lower than the target dot. I walk or drive to the target and mark the bullet hole with a "1". This provides my barrel ample opportunity to cool...
I then fire "Number 2" (49.3gr) and it prints above the hole marked "1". I repeat the above paragraph and mark that hole "2".
I repeat the above, and the successive shots continue to "climb the ladder" as the loads increase and the muzzle velocity increases.
After the last shot in the load group (Number 20), all of the shots are marked and were hopefully chronographed without "Err1"
I then examine the target. There should be a low-end and high-end node, where somewhere between shots 1-10 two, three of four bullets display and noticeably small variation in vertical sparsity from one another (they are close in vertical proximity and form a "group"). The height/vertical deviation is remarkably smaller than the other shots on the page. Let's say these were shots 2, 3 and 4 being 49.3gr, 49.6gr and 49.9gr respectively.
The same will happen on the higher end and let's say shots 16, 17 and 18 were 51.6gr, 51.9gr and 52.2gr respectively. You notice that they're close to one another. If there's no wind the horizontal variation will also be noticeably smaller.
These lower end and higher end groups identify velocity nodes...
Phase 2 would be refining either of these... I tend to ignore my low velocity nodes and only do my development around the abovementioned high-end groups...
I then load 4 rounds of numbers/charges 16, 17 and 18 at the same length as the first phase.
Thus there are 4 bullets loaded at 51.6gr, 4 bullets loaded at 51.9gr and 4 bullets loaded at 52.2gr...
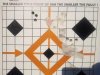
I then test the grouping potential of each of the abovementioned 4 shot groups again at 300m - they should now be printing just above the zero dot. Here I tend to shoot at a 1" diameter target dot to keep my aim small and do the precise loads justice...
The shot groups should all be rather tight and there shouldn't be vast differences and a vernier may be required to choose the "tightest" group - if you're doing it right.
Once the tightest group has been identified - you have your charge. For this example, let's choose 52.2gr.
You now have a cartridge that performs well with a specific cartridge length and charge - but it could be tighter...
PHASE 3
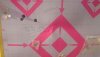
Load 3 cartridges with 52.2gr and at the same length.
Load 3 cartridges with the same charge and lengthen the cartridge length by 0.5mm and another 3 by antoher 0.5mm but to a maximum of 0.5mm away from the lands/rifling.
Load 3 cartridges and shorten the cartridge length by 0.5mm
Load 3 cartridges and shorten the cartridge length by 1mm.
Fire these 3 shot groups (allowing the barrel to cool adequately in between shots) and take note of the best result.
Your nodal development is complete and the harmonic that best suits your rifle has been identified and noted.
Over time, when the barrel starts to take a pounding, you will only need to lengthen the cartridge length in minuscule increments to close the groups as the barrel "shoots out"... You can continue with this method until complete barrel smoothing (time to re-barrel bud).
Here's my technique set out.
I charge casings with individual loads in increasing increments from the minimum prescribed load to the maximum prescribed load and all of these are then seated with projectiles to the same total cartridge length.
So there are generally 20 rounds charged as set out hereunder, all the same total cartridge length with the bullets numbered to keep track of them:
1. 49gr
2. 49.3gr
3. 49.6gr
4. 49.9gr
5. 50.2gr
6. 50.5gr
7. 50.8gr
8. 51.1gr
....
20. eg 52.5gr
I then load 5 rounds right in between the minimum and maximum loads. I zero my rifle at 300m using these 5 shots - to make sure that my ladder doesn't start or end at the top or bottom of the target sheet (a large white poster with a 2"x2" solid dot in the middle)
Once my rifle's height has been adjusted to the dot's height at 300m with the middle load, we are ready to shoot the ladder.
I fire "Number 1" and for the purposes of the example, it's the 49gr load.
It will print a few inches lower than the target dot. I walk or drive to the target and mark the bullet hole with a "1". This provides my barrel ample opportunity to cool...
I then fire "Number 2" (49.3gr) and it prints above the hole marked "1". I repeat the above paragraph and mark that hole "2".
I repeat the above, and the successive shots continue to "climb the ladder" as the loads increase and the muzzle velocity increases.
After the last shot in the load group (Number 20), all of the shots are marked and were hopefully chronographed without "Err1"
I then examine the target. There should be a low-end and high-end node, where somewhere between shots 1-10 two, three of four bullets display and noticeably small variation in vertical sparsity from one another (they are close in vertical proximity and form a "group"). The height/vertical deviation is remarkably smaller than the other shots on the page. Let's say these were shots 2, 3 and 4 being 49.3gr, 49.6gr and 49.9gr respectively.
The same will happen on the higher end and let's say shots 16, 17 and 18 were 51.6gr, 51.9gr and 52.2gr respectively. You notice that they're close to one another. If there's no wind the horizontal variation will also be noticeably smaller.
These lower end and higher end groups identify velocity nodes...
Phase 2 would be refining either of these... I tend to ignore my low velocity nodes and only do my development around the abovementioned high-end groups...
I then load 4 rounds of numbers/charges 16, 17 and 18 at the same length as the first phase.
Thus there are 4 bullets loaded at 51.6gr, 4 bullets loaded at 51.9gr and 4 bullets loaded at 52.2gr...
I then test the grouping potential of each of the abovementioned 4 shot groups again at 300m - they should now be printing just above the zero dot. Here I tend to shoot at a 1" diameter target dot to keep my aim small and do the precise loads justice...
The shot groups should all be rather tight and there shouldn't be vast differences and a vernier may be required to choose the "tightest" group - if you're doing it right.
Once the tightest group has been identified - you have your charge. For this example, let's choose 52.2gr.
You now have a cartridge that performs well with a specific cartridge length and charge - but it could be tighter...
PHASE 3
Load 3 cartridges with 52.2gr and at the same length.
Load 3 cartridges with the same charge and lengthen the cartridge length by 0.5mm and another 3 by antoher 0.5mm but to a maximum of 0.5mm away from the lands/rifling.
Load 3 cartridges and shorten the cartridge length by 0.5mm
Load 3 cartridges and shorten the cartridge length by 1mm.
Fire these 3 shot groups (allowing the barrel to cool adequately in between shots) and take note of the best result.
Your nodal development is complete and the harmonic that best suits your rifle has been identified and noted.
Over time, when the barrel starts to take a pounding, you will only need to lengthen the cartridge length in minuscule increments to close the groups as the barrel "shoots out"... You can continue with this method until complete barrel smoothing (time to re-barrel bud).