ShootnMathews
Well-Known Member
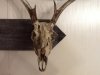
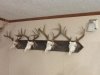
So I had a bunch of decent bucks in freezers. Some are from as long as 4 years ago. They are all nice bucks, but not "mounting" nice. So I finally learned to do European mounts myself after a little reading and Youtubing. I did 6 whitetails bucks all together. An 8 point, four 9 points and a 10 point. After cleaning all the heads ( which my wife greatly appreciated since she now can use her deep freeze for food and such) I had deer heads laying everywhere which is just a good way to break one. I really like the way the "Skull Hooker" device holds you mount upright in a natural position , but being a little apprehensive about dropping the cash for 6 of them. I decided to do what I always do under similar circumstances, make them myself. Took all of 5 minutes a hook to cut and weld myself and cost me a whopping $2 a hook. A piece of rough cut barn wood later and I have, in my opinion, a sharp looking display.
In the picture of the display board,the buck on the far left is not bleached. I just harvested him 9 days ago. One 9 point buck, due to lack of freezer space had been hanging in a tree for 11 months. I won't go into how disgusting that was to clean, but it still had a very pungent odor to it. So I needed another solution. My wife found a tutorial on how to make your own hydro dipping paint and apply. I figured that would at least minimize the stinch. And it worked beautifully in my opinion.
So tell me what you all think?
If any of you have any questions about how I made the hooks or did the paint, just hit me with them.
Jared