The Skull as a Trophy (The Economical Alternative)
By Troy Adams
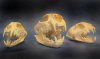
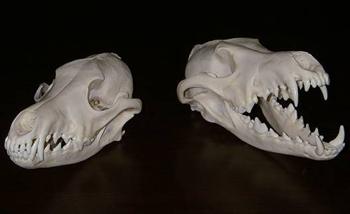
Lynx, Mountain Lion, Bobcat Skulls
Why Get a Skull Cleaned
It seems like the cost of everything hunting related is going up. Ammunition, reloading products, and firearms have all increased significantly in the last two years. Not to be left out, the price of taxidermy has also become quite a bit more expensive. So what is a hunter to do if he wants to have something more than just a photograph as a memento of the hunt? Why not a skull or European mount? Having a skull professionally cleaned for display in one’s trophy room is a very economical alternative. Most skulls cost a fraction of what a shoulder or life-sized mount costs. A skull does not always have to be the alternative to taxidermy either. If one kills a bear or mountain lion the skull is often just as important as the mount. The other really nice thing about having a skull as a trophy is that it does not take up much room. One can be as elaborate or conservative as one might wish in displaying a trophy skull. After cleaning skulls can be displayed in fancy glass and wood cases. Or simply set the skull on a mantle or book shelf. Some hunters even include the skull with the taxidermy mount. How one chooses to display the skull is only limited by one’s imagination.
Preparing a Skull for Shipping
So where does one begin if they want to have a skull professionally cleaned? There are a number of places that offer skull cleaning and they use generally one of three methods. The first method would be to boil the skull. Many sportsmen have tried cleaning a skull on their own, only to find it was more work than it’s worth. (I speak from personal experience on this.) Not to mention the risk of damaging the skull by over cooking it. Cleaning by boiling also tends to cause more shrinkage than other methods and this is not good if the skull is to be measured for any of the record books. The second method of skull cleaning is maceration. This involves putting the skull in warm water and changing out the water every few days while the flesh decomposes and rots off. It is a very effective method, but the smell is unbearable to most people. Plus, unless you live way out in the country it will not likely go over very well with your neighbors. (I speak from personal experience on this as well). The last method is to send the skull away to have it cleaned by dermestid beetles. These tiny beetles go through and clean every last speck of meat and tissue inside and out of the skull. There is minimal risk of skull shrinkage and very little risk of damage as the beetles prefer meat as opposed to chewing on the bone itself. However, raising beetles on your own to clean a few skulls a year is not a very viable option. They take a great deal of care and maintenance. Hence, it is more practical to send the skulls to a professional skull cleaning facility.
Step One
Where to Start
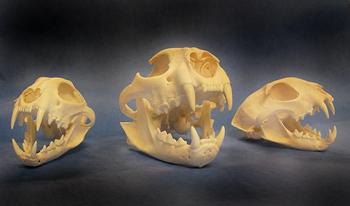
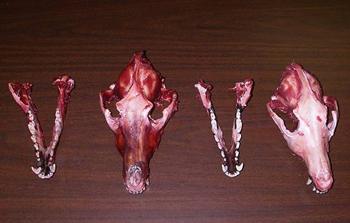
Okay, now let’s get down to preparing a skull for cleaning. Whether you choose to boil, macerate, or use beetles the preparation is the same. So the first thing after obtaining the animal you want to have cleaned is to remove the hide. In the photo below I severed the heads at the base of the head/neck juncture. Be careful to not damage the back of the skull. These were summer coyotes and their hides were no good. Had this been a hide I wanted to keep, I would have skinned out the entire coyote before severing the head. One little trick to make skinning easier is to pry the mouth open and place an object like a stick or small rock in it to keep it open before rigor mortis sets. That way it will be easier to skin later, especially around the canine teeth. Notice that the coyote on the right has its mouth open just for this purpose.
Step Two
Removing Excess Meat
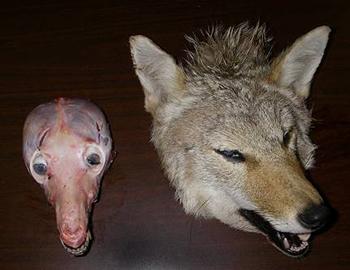
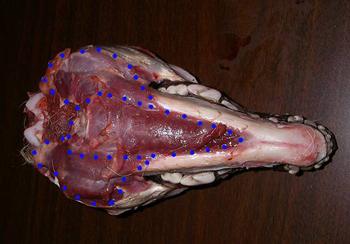
Once the hide is off then it is time to remove as much of the larger pieces of meat as possible, as well as, the eyes, and tongue. First remove the large muscles on either side of the top of the head and the eyes. Basically follow the dots in the photograph below. Try to be very careful to make all your cuts with the contour of the bone rather than directly into it. Any cuts you make into the skull or jaw bone will show up later as fine lines.
Then turn the skull over and remove the tongue and jaw muscles as indicated by the blue dots.
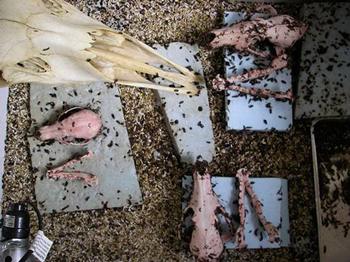
Once the meat is thoroughly cleaned, the skulls should look similar to this. The brain is difficult to remove and should be done by whomever you choose to do the final cleaning. If you are going to have it beetle cleaned now is the time to place the skulls back in the freezer for at least 48 hours to make sure they will be frozen solid before shipping them to a professional skull cleaning facility. For hunters that are not wanting to prepare skulls in this manner most places will offer to do the preparation work for an additional fee. One might keep in mind though, that if you do not prepare the skull by removing as much meat as possible, the eyes and tongue, that you will pay for it when you ship the skull as well. Basically you will be paying for weight and things that will be thrown away once it arrives at the cleaning facility.
Step Three
Shipping the Skulls
To prepare the skulls for shipping they should be placed inside two or three large Ziplock bags and sealed shut. Place the skulls in a box with enough room for packing material. Then pack the skulls tightly in wrinkled up newspaper to help insulate and protect the skulls from damage while being shipped. It is nearly impossible to be too careful. The more padding the better! Note that if any liquid (blood) leaks out of your package, you will get an unfriendly phone call from the post office. To be on the safe side, once it is all packaged up and ready to ship, I advise going immediately to the post office to ship it. ALWAYS SHIP ON A MONDAY!!! This is very important. If the package is shipped on a Monday it greatly reduces the risk of the package sitting around in the post office over a weekend. Trust me it will get very ripe smelling if it sits in a warm building for more than a couple days. Again, you will not be popular with the post office. Also try to avoid weeks with holidays occurring during the week for the same reason. It is best to ship all frozen skulls Overnight or Next Day. It costs a little more, but is necessary and worth it.
Once the Skull Arrives
Once your skulls arrive at the beetle cleaning business they will be taken out of the package, tagged, and inspected for any damage that may have occurred during shipping. After this is all taken care of, the skulls will be placed in the beetle enclosure, where the beetles will make short work of cleaning the skulls. Small skulls such as coyotes only take two to three days to clean. Larger skulls like bear may take up to five or six days, and a large buffalo make take a week or two.
Once the beetles have the skulls completely clean of any and all flesh, the skulls are ready to be whitened. First, all the beetles are removed or killed before going into the whitener. Bleach is not used in the whitening process, although it often referred to as bleaching. Using actual bleach would destroy the skull and cause it to deteriorate. In the photo below, the skulls are completely cleaned and ready to go through the whitening process. Note how there are dark splotches here and there on the skull. Most of this is blood that has stained the skull. The majority of this will come out during the whitening process. There is also grease and oily residue on the skull. Some of this will come out during the whitening, but most of the oil and grease will need to be removed through a separate process after whitening. The degreasing is the most time consuming part of the entire cleaning process. Depending on how greasy the skull is, it could take anywhere from 3 weeks to several months to remove the grease.
The Finished Product
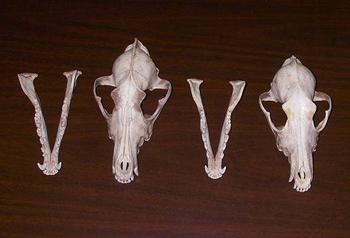
Here are the same skulls after they have been through the chemical whitening process, set in the sun, and then lastly, degreased.

The skulls can now be prepared to ship back to the customer either closed or permanently fixed open mouth. The rest is up to the customer how they want to use their imagination to display these very unique and economical trophies.
Summary
In short, preparing skulls to be beetle cleaned is very simple. Skin it, clean off excess meat, tongue and eyes. Freeze it solid and then package it in several Ziplock bags. Pack well in newspaper and ship it overnight. If you don’t mind paying extra, you can just skin it, freeze it, pack and send. Either approach is easy and results in a nice trophy upon its return.
For those interested in having skulls cleaned please feel free to contact me or ask questions in the comment area provided with this article.
Email Troy For Skull Cleaning Info
An avid big game hunter, Troy Adams has been hunting big game for nearly 30 years. Combining hunting and photography has helped him preserve many great memories. When not hunting, photographing, writing, or spending time with his family, Troy is usually found working on his wildlife art drawings.
By Troy Adams
Lynx, Mountain Lion, Bobcat Skulls
Why Get a Skull Cleaned
It seems like the cost of everything hunting related is going up. Ammunition, reloading products, and firearms have all increased significantly in the last two years. Not to be left out, the price of taxidermy has also become quite a bit more expensive. So what is a hunter to do if he wants to have something more than just a photograph as a memento of the hunt? Why not a skull or European mount? Having a skull professionally cleaned for display in one’s trophy room is a very economical alternative. Most skulls cost a fraction of what a shoulder or life-sized mount costs. A skull does not always have to be the alternative to taxidermy either. If one kills a bear or mountain lion the skull is often just as important as the mount. The other really nice thing about having a skull as a trophy is that it does not take up much room. One can be as elaborate or conservative as one might wish in displaying a trophy skull. After cleaning skulls can be displayed in fancy glass and wood cases. Or simply set the skull on a mantle or book shelf. Some hunters even include the skull with the taxidermy mount. How one chooses to display the skull is only limited by one’s imagination.
Preparing a Skull for Shipping
So where does one begin if they want to have a skull professionally cleaned? There are a number of places that offer skull cleaning and they use generally one of three methods. The first method would be to boil the skull. Many sportsmen have tried cleaning a skull on their own, only to find it was more work than it’s worth. (I speak from personal experience on this.) Not to mention the risk of damaging the skull by over cooking it. Cleaning by boiling also tends to cause more shrinkage than other methods and this is not good if the skull is to be measured for any of the record books. The second method of skull cleaning is maceration. This involves putting the skull in warm water and changing out the water every few days while the flesh decomposes and rots off. It is a very effective method, but the smell is unbearable to most people. Plus, unless you live way out in the country it will not likely go over very well with your neighbors. (I speak from personal experience on this as well). The last method is to send the skull away to have it cleaned by dermestid beetles. These tiny beetles go through and clean every last speck of meat and tissue inside and out of the skull. There is minimal risk of skull shrinkage and very little risk of damage as the beetles prefer meat as opposed to chewing on the bone itself. However, raising beetles on your own to clean a few skulls a year is not a very viable option. They take a great deal of care and maintenance. Hence, it is more practical to send the skulls to a professional skull cleaning facility.
Step One
Where to Start
Okay, now let’s get down to preparing a skull for cleaning. Whether you choose to boil, macerate, or use beetles the preparation is the same. So the first thing after obtaining the animal you want to have cleaned is to remove the hide. In the photo below I severed the heads at the base of the head/neck juncture. Be careful to not damage the back of the skull. These were summer coyotes and their hides were no good. Had this been a hide I wanted to keep, I would have skinned out the entire coyote before severing the head. One little trick to make skinning easier is to pry the mouth open and place an object like a stick or small rock in it to keep it open before rigor mortis sets. That way it will be easier to skin later, especially around the canine teeth. Notice that the coyote on the right has its mouth open just for this purpose.
Step Two
Removing Excess Meat
Once the hide is off then it is time to remove as much of the larger pieces of meat as possible, as well as, the eyes, and tongue. First remove the large muscles on either side of the top of the head and the eyes. Basically follow the dots in the photograph below. Try to be very careful to make all your cuts with the contour of the bone rather than directly into it. Any cuts you make into the skull or jaw bone will show up later as fine lines.
Then turn the skull over and remove the tongue and jaw muscles as indicated by the blue dots.
Once the meat is thoroughly cleaned, the skulls should look similar to this. The brain is difficult to remove and should be done by whomever you choose to do the final cleaning. If you are going to have it beetle cleaned now is the time to place the skulls back in the freezer for at least 48 hours to make sure they will be frozen solid before shipping them to a professional skull cleaning facility. For hunters that are not wanting to prepare skulls in this manner most places will offer to do the preparation work for an additional fee. One might keep in mind though, that if you do not prepare the skull by removing as much meat as possible, the eyes and tongue, that you will pay for it when you ship the skull as well. Basically you will be paying for weight and things that will be thrown away once it arrives at the cleaning facility.
Step Three
Shipping the Skulls
To prepare the skulls for shipping they should be placed inside two or three large Ziplock bags and sealed shut. Place the skulls in a box with enough room for packing material. Then pack the skulls tightly in wrinkled up newspaper to help insulate and protect the skulls from damage while being shipped. It is nearly impossible to be too careful. The more padding the better! Note that if any liquid (blood) leaks out of your package, you will get an unfriendly phone call from the post office. To be on the safe side, once it is all packaged up and ready to ship, I advise going immediately to the post office to ship it. ALWAYS SHIP ON A MONDAY!!! This is very important. If the package is shipped on a Monday it greatly reduces the risk of the package sitting around in the post office over a weekend. Trust me it will get very ripe smelling if it sits in a warm building for more than a couple days. Again, you will not be popular with the post office. Also try to avoid weeks with holidays occurring during the week for the same reason. It is best to ship all frozen skulls Overnight or Next Day. It costs a little more, but is necessary and worth it.
Once the Skull Arrives
Once your skulls arrive at the beetle cleaning business they will be taken out of the package, tagged, and inspected for any damage that may have occurred during shipping. After this is all taken care of, the skulls will be placed in the beetle enclosure, where the beetles will make short work of cleaning the skulls. Small skulls such as coyotes only take two to three days to clean. Larger skulls like bear may take up to five or six days, and a large buffalo make take a week or two.
Once the beetles have the skulls completely clean of any and all flesh, the skulls are ready to be whitened. First, all the beetles are removed or killed before going into the whitener. Bleach is not used in the whitening process, although it often referred to as bleaching. Using actual bleach would destroy the skull and cause it to deteriorate. In the photo below, the skulls are completely cleaned and ready to go through the whitening process. Note how there are dark splotches here and there on the skull. Most of this is blood that has stained the skull. The majority of this will come out during the whitening process. There is also grease and oily residue on the skull. Some of this will come out during the whitening, but most of the oil and grease will need to be removed through a separate process after whitening. The degreasing is the most time consuming part of the entire cleaning process. Depending on how greasy the skull is, it could take anywhere from 3 weeks to several months to remove the grease.
The Finished Product
Here are the same skulls after they have been through the chemical whitening process, set in the sun, and then lastly, degreased.
The skulls can now be prepared to ship back to the customer either closed or permanently fixed open mouth. The rest is up to the customer how they want to use their imagination to display these very unique and economical trophies.
Summary
In short, preparing skulls to be beetle cleaned is very simple. Skin it, clean off excess meat, tongue and eyes. Freeze it solid and then package it in several Ziplock bags. Pack well in newspaper and ship it overnight. If you don’t mind paying extra, you can just skin it, freeze it, pack and send. Either approach is easy and results in a nice trophy upon its return.
For those interested in having skulls cleaned please feel free to contact me or ask questions in the comment area provided with this article.
Email Troy For Skull Cleaning Info
An avid big game hunter, Troy Adams has been hunting big game for nearly 30 years. Combining hunting and photography has helped him preserve many great memories. When not hunting, photographing, writing, or spending time with his family, Troy is usually found working on his wildlife art drawings.