LabRadar Chronograph Review
By Jeff Brozovich
I was pretty excited to test this new bad boy of the chronograph world out, so I asked Rhian Mantha, AKA "BignGreen," to come along and help. I mean if a guy is going to go shoot, he might just as well have company right? Besides, this will set the stage for those that read this review to get two opinions from two long range guys.
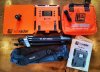
Opening the box showed a pretty good selection of parts and pieces. Looks like we have everything we need for sure. The LabRadar unit, tripod, plate for getting prone or off a bench if desired, USB cable, carrying cases, instructions and warranty card. So let’s get to the range and get her programmed.

The handy carry cases make transporting the unit and gear nice!

Programming is not too bad once you get the drift of the button sequence.
You will page through settings like:
By Jeff Brozovich
I was pretty excited to test this new bad boy of the chronograph world out, so I asked Rhian Mantha, AKA "BignGreen," to come along and help. I mean if a guy is going to go shoot, he might just as well have company right? Besides, this will set the stage for those that read this review to get two opinions from two long range guys.
Opening the box showed a pretty good selection of parts and pieces. Looks like we have everything we need for sure. The LabRadar unit, tripod, plate for getting prone or off a bench if desired, USB cable, carrying cases, instructions and warranty card. So let’s get to the range and get her programmed.
The handy carry cases make transporting the unit and gear nice!
Programming is not too bad once you get the drift of the button sequence.
You will page through settings like:
- Velocity Units: We chose feet per second.
- Distance Units: We chose yards
- Weight Units: Weight of projectile, we used grains.
- Velocity Range: Rifle (984 fps and up)
- Proj. Offset. Distance from the side of the unit to muzzle
- Set Distances: Distances in which the velocity measurements are made. DX 1 through DX 5. We played with this a lot. DX 1 was 6 yards out from the muzzle to simulate where we typically set up other chronos, and on out to see how far we could get readings.
- Projectile Weight: We tried 3 different weights.
- Arm Time: Time the unit will stay in ready to fire mode. This resets with each shot.
- Screen Saver: Time the display will stay up.
- Trigger Source: Internal Microphone.
- Trigger Level: This is a sensitivity setting.
- TX Channel: In case more than one unit is in the area.
- TX Power: Standard or Low. We chose STD for longer distances.