Bedding A Rifle
By Pat Sheehy
In every newsletter Len has a section at the bottom with suggestions for articles needing authors. One of those suggestions is for articles about Simple Gunsmith Things You Can Do. I don’t claim to be a gunsmith, but I’m a pretty accomplished tinkerer so I approached Len about writing a how-to for home glass bedding. He gave me the go ahead, so here it is!
I have to start out by saying that I am not a professional and I don’t have the time or funds to exhaust every possible option to find the best one. Ask every person that has ever attempted a bedding job what the best materials and procedures are and every one will give a different answer. I’ve used this procedure on many rifles and have achieved great results and have yet to glue a rifle to a stock. This article is meant to be presented as information to a community of like minded individuals and is by no means the end-all do-all of techniques.
Now that that’s out of the way, let’s have some fun!
Materials
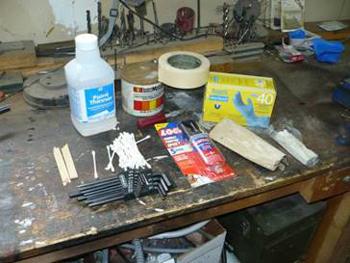
Besides a rifle and a stock, there are a few materials that need to be assembled. Here’s my list of what I’ll be using;
• A tube of 5 minute epoxy
• A can of bearing grease
• Masking tape
• Coarse sandpaper
• An Exacto knife with a few blades
• Paint thinner or some other degreaser
• Disposable Nitrile gloves
• Modeling clay (not Play-Doh)
• Epoxy mixing sticks and containers
• A good supply of rags and q-tips
• Some sort of vise or method to hold the stock
• Whatever tools are needed to remove the action from the stock
Place all of your materials close to the area where you’ll be working and make sure they’re all out of the packaging and ready to go.
Stock Preparation
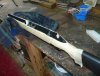
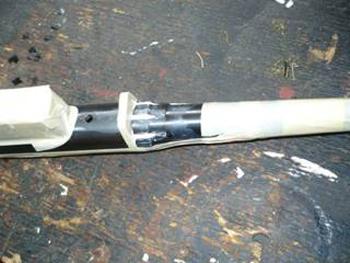
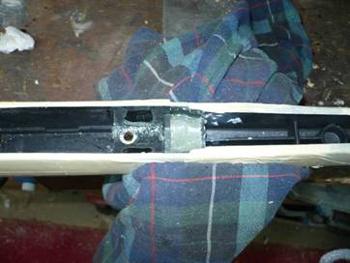
Once you have your materials laid out, separate the action from the stock and set the action aside. Note where the action bears on the stock and how the action fits*.
Removing action from stock. *Please note that the rifle being used in my example is a Savage 110 with a synthetic stock and that this procedure is more specific to this action and stock, but the principles of the procedure will work for most rifles.
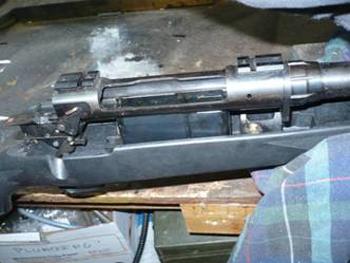
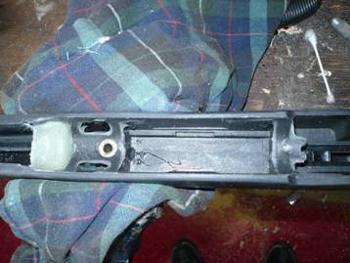
With the action out of the stock and gloves on, begin degreasing the action area. Keep cleaning with rags and q-tips until there is no trace of grease left in the action area. Throw those gloves away.
Degreasing action
The important areas to be bedded are the front of the action from the magazine well to the first inch or so of barrel and the area around where the action seats at the rear action screw. These areas need to be roughened and/or relieved to allow the bedding material to adhere to the stock.
This can be accomplished by a simple sanding with some rough sandpaper. Put new gloves on and wipe the action area down with a rag damp with degreaser to clean up any dust deposited by sanding then throw those gloves away.
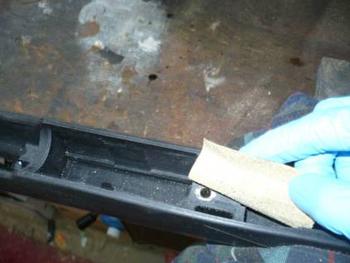
Sanding Action Bedding Areas
Once the bedding areas have been roughed up, a modeling clay dam is placed between 1 ½” to 2” up the barrel channel from where the front of the action would be when installed.
Now the taping begins. My theory is “If you don’t want to scrape epoxy off it later, tape it now”. Begin taping by running an edge of a length of masking tape along the edge of the action inlet on each side. From there, tape the outside of the stock all around the work area. Here’s what it looks like when I prep one.

Taped up stock.
Action Preparation
Once the stock is ready to go, turn your attention back to the action. Again we put gloves on and start with degreasing. Clean off the whole outside. Pay special attention to the bottom of the action and be sure to use q-tips to get into every tiny crack. The trigger doesn’t need to be as carefully worked over as the rest because it will be covered with tape. Throw your gloves away.
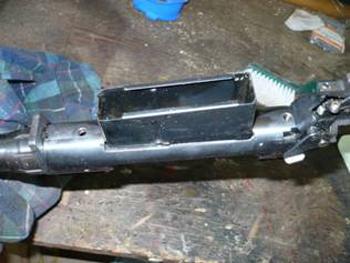
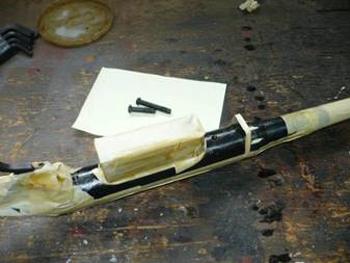
Action fresh from stock.
Degreased action.
After degreasing, comes taping. I tape everything above the wood line on the action. I also tape the barrel starting from about 2” from the front of the action (corresponding to the modeling clay dam in the stock) to well down the barrel. If the action has a magazine box, I put a single layer of tape around the whole thing, making sure to cover all gaps. I tape around the trigger as thinly as possible so that it still fits in the stock, but all gaps between the action and trigger are covered.
Two or three layers of tape go over all faces of the recoil lug but the back. The critical contact for the lug is the rear face and having the gap provided by the tape on the front and sides prevents the lug from binding in the stock. Use an Exacto™ knife to trim the tape around the edges of the lug.
I like to wrap a few layers of tape around the barrel about midway down to ensure that the action isn’t bedded with a tilt and that the barrel remains free floated. It may take a little trial and error to get the right number of tape layers as you want the tape to just fit the barrel channel. If you have bottom metal, tape off the bottom of it (the part exposed when the rifle is assembled in the stock).
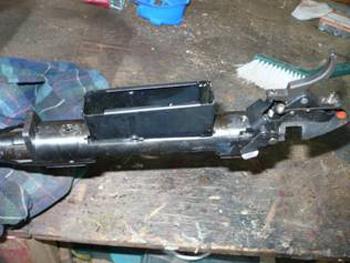
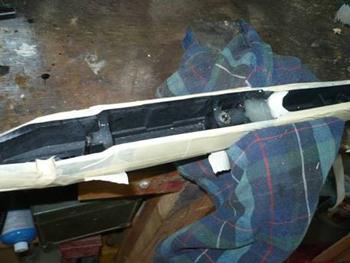
Action taped up.
At this point I place the action back in the stock and tighten the action screws enough to seat the action. This compresses the clay dam placed in the stock to fit the barreled action and allows me to diagnose if my tape is interfering with the fit of the action now rather than when I have wet epoxy down!
Remove the action from the stock and ensure that the clay dam is still in place. Check to make sure the masking tape isn’t damaged. If it is, repair it and repeat the last step until you get the right fit.
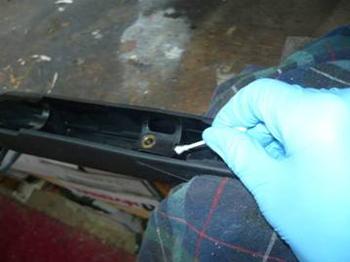
Use the clay to fill any delicate holes in the action that need to be bedded, i.e., the grooves in a Savage barrel nut.
Clay applied to barrel nut
Look over the action one last time and make sure there are no areas where epoxy bedding could seep into and bond to or lock the action. A lock occurs when the bedding doesn’t adhere to the action but rather wraps around it and cures, forming a sort of hook holding the action in.
Time for another pair of gloves! Dip a rag in the bearing grease and rub it on the bottom and sides of the action with a light coat, paying special attention to the lug area and any inside angle, such as where the magazine box comes in contact with the action. Don’t forget about the masking tape either, especially the tape on the lug, trigger and along the wood line. You want the lightest coat of grease possible and I highly recommend a couple practice runs with the epoxy you want to use and scrap steel to get a feel for how skimpy you can be. This is not a step you want to be too stingy on.
Greased up action ready for bedding.
Once you have greased the action, set it aside and apply a liberal coat of grease to the action screws. If you have bottom metal, grease the top of it (where it mates to the stock) over the whole surface. After you’re done greasing… you guessed it! Toss the gloves.
Note: If you put the action back in the stock after you have it greased up, you will have to fully degrease the stock again.
Bedding
Throw on another pair of gloves. Be sure you have your stock set up in the vise and that the action, bottom metal, screws and tools for assembly are close and ready to go.
Prepare your mixing containers and open the epoxy. When cutting the tip off the tubes, pull back slightly on the plunger. This will keep epoxy from shooting out the end if you live at higher elevations. Dispense more epoxy than you think you’ll need into the mixing container. If any is left over, cap the epoxy by pulling the plunger out slightly and then replacing the cap.
Mix the epoxy thoroughly and apply liberally to the stock in the areas that are to be bedded, including the sides of the action. Be sure to force epoxy to the bottom of the recoil lug area.
Try to keep epoxy out of the action screw holes in the stock. Once you feel that you have all the epoxy that you will need in place, set aside the mixed epoxy, but don’t throw it away.
Stock with epoxy placed, ready for action.
Press the action screws up through the stock and hold them in place with masking tape. If you have bottom metal, thread the screws through the bottom metal first and put the bottom metal and screws in place as a unit. Use a third piece of tape to hold the bottom metal in place. Clean any epoxy that got onto the top of the screws off with a q-tip. Slowly set the action down onto the stock. Remove the tape from the rear screw and thread it into the action just enough to hold it then do the same with the front screw.
Gently seat the action into the bedding by pressing down with your hands. Once you have the action seated, tighten the action screws until they are just snug to the bottom metal or stock. If there are areas around the action that have gaps in the bedding, use a mixing stick or tooth pick to work epoxy down into the gaps. Clean up any epoxy that was squeezed out from between the action and stock with a dry rag or toothpick.
Action in stock.
After about a minute, loosen both action screws one full turn, and then tighten them back down in the same manner as before, just snug. This step helps air bubbles escape.
Toss your gloves.
Trimming
Remember that mixing container you set aside? Keep checking that and when it’s cured to the point that it is no longer tacky to the touch and feels kind of spongy but returns to its shape when you push on it, it’s ready to be trimmed.
Loosen and remove the action screws and lift the action from the stock. Sometimes a wooden dowel through the rear bridge of the action helps.
With the action removed you can use the Exacto blade to trim the soft epoxy along the wood line. Also, you can trim the epoxy about an eighth of an inch behind your clay dam to get a neat line. The clay and this eighth an inch of epoxy can be removed.
Trimming should be completed as quickly as possible and the action should be replaced as soon as trimming is completed.
Recoil lug area after trimming.
Curing
Leave the action in the stock to cure overnight, or however long the epoxy takes to reach full strength. That’s about it for this step.
Final Clean-up
You should now have a fully glass bedded rifle!
Don a new pair of gloves and remove the action from the rifle. Use a rag, q-tips and some degreaser to clean the bearing grease from the action, screws and stock bedding. Remove the masking tape from all surfaces. Use some of your favorite gun oil on the metal parts to keep the rust off and screw it back together one last time.
Congratulations! You just bedded your rifle!
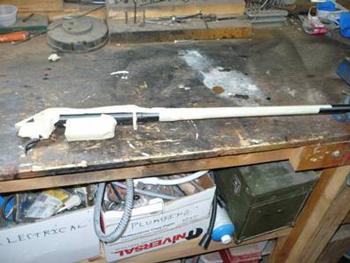
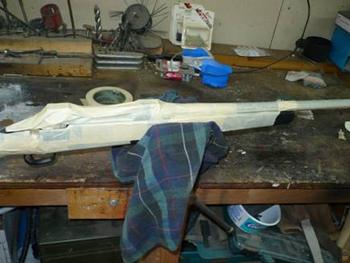
Final Product - Bedding.

Final Product - Action in stock.
By Pat Sheehy
In every newsletter Len has a section at the bottom with suggestions for articles needing authors. One of those suggestions is for articles about Simple Gunsmith Things You Can Do. I don’t claim to be a gunsmith, but I’m a pretty accomplished tinkerer so I approached Len about writing a how-to for home glass bedding. He gave me the go ahead, so here it is!
I have to start out by saying that I am not a professional and I don’t have the time or funds to exhaust every possible option to find the best one. Ask every person that has ever attempted a bedding job what the best materials and procedures are and every one will give a different answer. I’ve used this procedure on many rifles and have achieved great results and have yet to glue a rifle to a stock. This article is meant to be presented as information to a community of like minded individuals and is by no means the end-all do-all of techniques.
Now that that’s out of the way, let’s have some fun!
Materials
Besides a rifle and a stock, there are a few materials that need to be assembled. Here’s my list of what I’ll be using;
• A tube of 5 minute epoxy
• A can of bearing grease
• Masking tape
• Coarse sandpaper
• An Exacto knife with a few blades
• Paint thinner or some other degreaser
• Disposable Nitrile gloves
• Modeling clay (not Play-Doh)
• Epoxy mixing sticks and containers
• A good supply of rags and q-tips
• Some sort of vise or method to hold the stock
• Whatever tools are needed to remove the action from the stock
Place all of your materials close to the area where you’ll be working and make sure they’re all out of the packaging and ready to go.
Stock Preparation
Once you have your materials laid out, separate the action from the stock and set the action aside. Note where the action bears on the stock and how the action fits*.
Removing action from stock. *Please note that the rifle being used in my example is a Savage 110 with a synthetic stock and that this procedure is more specific to this action and stock, but the principles of the procedure will work for most rifles.
With the action out of the stock and gloves on, begin degreasing the action area. Keep cleaning with rags and q-tips until there is no trace of grease left in the action area. Throw those gloves away.
Degreasing action
The important areas to be bedded are the front of the action from the magazine well to the first inch or so of barrel and the area around where the action seats at the rear action screw. These areas need to be roughened and/or relieved to allow the bedding material to adhere to the stock.
This can be accomplished by a simple sanding with some rough sandpaper. Put new gloves on and wipe the action area down with a rag damp with degreaser to clean up any dust deposited by sanding then throw those gloves away.
Sanding Action Bedding Areas
Once the bedding areas have been roughed up, a modeling clay dam is placed between 1 ½” to 2” up the barrel channel from where the front of the action would be when installed.
Now the taping begins. My theory is “If you don’t want to scrape epoxy off it later, tape it now”. Begin taping by running an edge of a length of masking tape along the edge of the action inlet on each side. From there, tape the outside of the stock all around the work area. Here’s what it looks like when I prep one.
Taped up stock.
Action Preparation
Once the stock is ready to go, turn your attention back to the action. Again we put gloves on and start with degreasing. Clean off the whole outside. Pay special attention to the bottom of the action and be sure to use q-tips to get into every tiny crack. The trigger doesn’t need to be as carefully worked over as the rest because it will be covered with tape. Throw your gloves away.
Action fresh from stock.
Degreased action.
After degreasing, comes taping. I tape everything above the wood line on the action. I also tape the barrel starting from about 2” from the front of the action (corresponding to the modeling clay dam in the stock) to well down the barrel. If the action has a magazine box, I put a single layer of tape around the whole thing, making sure to cover all gaps. I tape around the trigger as thinly as possible so that it still fits in the stock, but all gaps between the action and trigger are covered.
Two or three layers of tape go over all faces of the recoil lug but the back. The critical contact for the lug is the rear face and having the gap provided by the tape on the front and sides prevents the lug from binding in the stock. Use an Exacto™ knife to trim the tape around the edges of the lug.
I like to wrap a few layers of tape around the barrel about midway down to ensure that the action isn’t bedded with a tilt and that the barrel remains free floated. It may take a little trial and error to get the right number of tape layers as you want the tape to just fit the barrel channel. If you have bottom metal, tape off the bottom of it (the part exposed when the rifle is assembled in the stock).
Action taped up.
At this point I place the action back in the stock and tighten the action screws enough to seat the action. This compresses the clay dam placed in the stock to fit the barreled action and allows me to diagnose if my tape is interfering with the fit of the action now rather than when I have wet epoxy down!
Remove the action from the stock and ensure that the clay dam is still in place. Check to make sure the masking tape isn’t damaged. If it is, repair it and repeat the last step until you get the right fit.
Use the clay to fill any delicate holes in the action that need to be bedded, i.e., the grooves in a Savage barrel nut.
Clay applied to barrel nut
Look over the action one last time and make sure there are no areas where epoxy bedding could seep into and bond to or lock the action. A lock occurs when the bedding doesn’t adhere to the action but rather wraps around it and cures, forming a sort of hook holding the action in.
Time for another pair of gloves! Dip a rag in the bearing grease and rub it on the bottom and sides of the action with a light coat, paying special attention to the lug area and any inside angle, such as where the magazine box comes in contact with the action. Don’t forget about the masking tape either, especially the tape on the lug, trigger and along the wood line. You want the lightest coat of grease possible and I highly recommend a couple practice runs with the epoxy you want to use and scrap steel to get a feel for how skimpy you can be. This is not a step you want to be too stingy on.
Greased up action ready for bedding.
Once you have greased the action, set it aside and apply a liberal coat of grease to the action screws. If you have bottom metal, grease the top of it (where it mates to the stock) over the whole surface. After you’re done greasing… you guessed it! Toss the gloves.
Note: If you put the action back in the stock after you have it greased up, you will have to fully degrease the stock again.
Bedding
Throw on another pair of gloves. Be sure you have your stock set up in the vise and that the action, bottom metal, screws and tools for assembly are close and ready to go.
Prepare your mixing containers and open the epoxy. When cutting the tip off the tubes, pull back slightly on the plunger. This will keep epoxy from shooting out the end if you live at higher elevations. Dispense more epoxy than you think you’ll need into the mixing container. If any is left over, cap the epoxy by pulling the plunger out slightly and then replacing the cap.
Mix the epoxy thoroughly and apply liberally to the stock in the areas that are to be bedded, including the sides of the action. Be sure to force epoxy to the bottom of the recoil lug area.
Try to keep epoxy out of the action screw holes in the stock. Once you feel that you have all the epoxy that you will need in place, set aside the mixed epoxy, but don’t throw it away.
Stock with epoxy placed, ready for action.
Press the action screws up through the stock and hold them in place with masking tape. If you have bottom metal, thread the screws through the bottom metal first and put the bottom metal and screws in place as a unit. Use a third piece of tape to hold the bottom metal in place. Clean any epoxy that got onto the top of the screws off with a q-tip. Slowly set the action down onto the stock. Remove the tape from the rear screw and thread it into the action just enough to hold it then do the same with the front screw.
Gently seat the action into the bedding by pressing down with your hands. Once you have the action seated, tighten the action screws until they are just snug to the bottom metal or stock. If there are areas around the action that have gaps in the bedding, use a mixing stick or tooth pick to work epoxy down into the gaps. Clean up any epoxy that was squeezed out from between the action and stock with a dry rag or toothpick.
Action in stock.
After about a minute, loosen both action screws one full turn, and then tighten them back down in the same manner as before, just snug. This step helps air bubbles escape.
Toss your gloves.
Trimming
Remember that mixing container you set aside? Keep checking that and when it’s cured to the point that it is no longer tacky to the touch and feels kind of spongy but returns to its shape when you push on it, it’s ready to be trimmed.
Loosen and remove the action screws and lift the action from the stock. Sometimes a wooden dowel through the rear bridge of the action helps.
With the action removed you can use the Exacto blade to trim the soft epoxy along the wood line. Also, you can trim the epoxy about an eighth of an inch behind your clay dam to get a neat line. The clay and this eighth an inch of epoxy can be removed.
Trimming should be completed as quickly as possible and the action should be replaced as soon as trimming is completed.
Recoil lug area after trimming.
Curing
Leave the action in the stock to cure overnight, or however long the epoxy takes to reach full strength. That’s about it for this step.
Final Clean-up
You should now have a fully glass bedded rifle!
Don a new pair of gloves and remove the action from the rifle. Use a rag, q-tips and some degreaser to clean the bearing grease from the action, screws and stock bedding. Remove the masking tape from all surfaces. Use some of your favorite gun oil on the metal parts to keep the rust off and screw it back together one last time.
Congratulations! You just bedded your rifle!
Final Product - Bedding.
Final Product - Action in stock.