ATN X-Sight II HD 3-14 Day/Night Riflescope Review
By TR Nelson
The ATN X-Sight II HD 3-14 Day/Night Riflescope is the latest generation of software assisted digital optics. It is available as either a 5-20x or a 3-14x magnification, and is capable of doing a ton of neat, slick and even downright useful things, provided you know how to operate it. As the name implies, the scope allows the user to run the exact same optic during the night as in the daytime with the push of a couple buttons.

The ATN X-Sight II HD represents the future of optics, as the tagline says. This scope can record video with audio and take pictures at 1080p quality either through manual user input or recoil initiation. Yes, you can immediately review the video on the device to see how good the hit was on that whitetail, or you can attach the scope to an external video monitor via a micro HDMI cable for everyone at the camp to see how awesome you are for all time. The scope can be paired to external devices, such as your smart phone, a remote control, and a laser rangefinder. It also has a built-in weather station that automatically tracks temperature, barometric pressure and altitude, you can manually enter wind speed, direction, and relative humidity. The X-Sight II HD also has a manual rangefinder that utilizes basic MIL range finding techniques. You also get a WiFi hotspot, Bluetooth ability to pair, a GPS enabled compass, built-in level and angle readouts, a ballistic compensation calculator (that pairs to the ATN1500 rangefinder) and an IR illuminator. And that's just to start. There is quite a bit more that this optic is capable of that will be touched upon later in the article.

Upon delivery of the ATN X-Sight II HD 3-14 I spent an evening going through the basic instructions that come along with everything in the box, familiarizing myself with the terminology of the technology. These are basic instructions and will get you to a place that you can start to operate the optic. You will have a ton of questions at this point. There is a lot going on with the riflescope and unless you are a natural with modern tech-based systems I would highly recommend spending a bit of time looking at the various threads located at www.atnowners.com. In all seriousness, every one of my, 'what about this,' and, 'how do you do that' questions were answered right there, everything from tech support questions and suggested updates to accessories, and there are even links to contact customer service.
I am not a super tech savvy guy so there was a bit of a learning curve involved for me. There are also some very good videos on YouTube that walk you through several of the features, like the one shot zero feature for instance. The next evening I spent poking around the ATN Owners Forum and YouTube, charging spare batteries and playing around with the settings and the setup of the riflescope systems. I never did figure out how to not have to reset the time and date, as you will probably notice by looking at the date and time stamps on the photos and videos. Over the course of my testing I mounted, set up and zeroed the riflescope on seven different rifles, so now I have that setup procedure down in my sleep. The process is very straightforward.
I mounted the riflescope, extended battery life package and remote controller on my 20" barreled 6.5 Grendel AR, a consistent and validated 0.6 MOA shooting rifle that I put together a few years back when the 6.5 Grendel was all the rage. l had set up the ballistic profile in the riflescope to match that of my proven load using the 130g Berger AR Hybrid at 2,400 fps, and it was time to head to the range and sling some lead getting this thing zeroed.

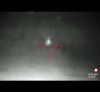
I started at 25 yards and was literally zeroed after the first shot, no kidding. I will walk you through that process. I simply fired a shot and went to the settings menu and then to the profiles/zero menu and selected current then moved the colored crosshair to the bullet hole on the target while holding the white crosshair on the center of the bullseye. I took one more shot to confirm the zero because I could not believe it was that easy; it was. I then turned on the ballistic compensation feature and went to the 200-yard range. I utilized the ATN1500 laser rangefinder that I had previously paired to the riflescope and ranged the target at exactly 200 yards. A little flag and, '200yd' appeared on the upper left of the display screen and I zoomed the display to 14X and fired three shots, which landed in a quarter-sized cluster, a little left of center. I moved the zero of the reticle to take that into account and sent another three shots dead into the center of the bullseye. Easy as pie.
It was time to stretch the riflescope system out and see how well it handled longer distances and the never-ending gusting Nebraska wind. We set up early in the morning the following Saturday at 917 yards with a steady 12mph wind gusting to 18mph. I entered the temperature, wind velocity and direction into the riflescope. I ranged the steel plate with the ATN1500 laser rangefinder, and verified that I saw 917yd next to the little flag in the upper left of the display and centered the reticle on the plate. I fired and made a cold bore hit on the plate in a 12mph wind that I followed up with two more within the margins of the changing wind on the steel plate.

The ballistic compensation features work well, provided you have valid velocity and ballistic information entered. My velocity data was previously recorded with a Magnetospeed and the ballistic data was validated with live fire. The riflescope tracked nearly exactly with my recorded values. I took the opportunity to also test the internal rangefinder by entering the known size of the plate target and taking a reading at the top and bottom of the target, it calculated the range to be 877yd. Your ability to aim and take a reading precisely at the top and bottom of the target heavily influence its output values, inside of 400 yards it is pretty well ok and will get the job done. It has several default object sizes and you can manually enter the exact size of a target as well.
I mounted the riflescope next on my Ruger 300 blackout bolt gun that I shoot a 250g Outlaw State Bullets low-velocity expanding round-nosed bullet from at 1,020fps. It is a sub-sonic expanding bullet for hunting that I have harvested a few whitetail deer with, and is a good fit for sub-sonic suppressed hunting. It has a similar ballistic arc to that of a thrown rock.
I zeroed it at 25 yards, only needing one shot again to zero it. I moved over to the 100-yard range and took a reading with the paired ATN 1500 rangefinder and fired a group. I made a slight adjustment in the zero and fired another group that centered right up on the target.
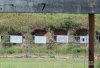
The next morning, I was able to get to my local range and really push the limits of what the riflescope ballistic compensation could do, both with manual range entry, internal rangefinder and the paired rangefinder. I started by entering the wind data and temperature into the system. Then I used the paired rangefinder and ranged a 6" square steel plate at 315 yards, and after I verified that 315yd appeared next to the little flag in the upper left of the display screen I sent five in a row into a neat little cluster on the plate. I then ranged a chicken silhouette at 27 yards and readily toppled it, followed by the steel plate at 315, a pig silhouette at 218, the chicken at 27 yards and back to another silhouette at 164 yards as fast as I could range them, aim and shoot.
If you are shooting at a known range you can also manually enter the distance and apply the same ballistic corrections. It is just more fiddly to scroll through the menus and enter the distance and isn't exactly quick, but it also works fine.
The ballistic compensator works by automatically making the corrections needed inside the riflescope. You hold the crosshairs where you want the bullet to hit and the computer does the rest. The crosshairs stay centered in the view finder. This works for elevation via your distance entry that you can enter manually, enter through the internal range finder or through pairing with the ATN 1500 laser rangefinder.
You can choose to either hold off for the wind, or to enter the direction and velocity values and the riflescope will compensate for the wind. You will see the offset that the calculator is applying in the lower left hand portion of the screen as an arrow pointing up or down followed by the correction in inches, then an arrow pointing left or right followed by the correction in inches. Think of it as a digital version of a ballistic turret on your traditional glass optic.
You click the rangefinder and the elevation correction happens automatically. No dialing in the wrong distance value accidentally or using the wrong hashmark for the wind. The feature works day or night and can be turned off at any time. Just manually set the distance back to your normal distance, or click a few times around your desired distance, and once you get it right just scroll to the menu and turn off the compensation calculator and you are right back to your normal zero range.
It works equally as well with your 22LR as it will with your 6.5 wildcat laser beam, provided your ballistic data is correct. I used this feature flawlessly to shoot my 50 yard zeroed 300blk out to 315 yards, 6.5 Grendel out to 917 yards, 5.56 x 45 to 625 yards, 7.62 x 39 to 315 yards, 6.5/06 to 865 yards, 308 to 865 yards and 22LR to shoot to 315 yards. Bottom line, it worked and could not be easier to use unless it utilized telepathy.
By TR Nelson
The ATN X-Sight II HD 3-14 Day/Night Riflescope is the latest generation of software assisted digital optics. It is available as either a 5-20x or a 3-14x magnification, and is capable of doing a ton of neat, slick and even downright useful things, provided you know how to operate it. As the name implies, the scope allows the user to run the exact same optic during the night as in the daytime with the push of a couple buttons.
The ATN X-Sight II HD represents the future of optics, as the tagline says. This scope can record video with audio and take pictures at 1080p quality either through manual user input or recoil initiation. Yes, you can immediately review the video on the device to see how good the hit was on that whitetail, or you can attach the scope to an external video monitor via a micro HDMI cable for everyone at the camp to see how awesome you are for all time. The scope can be paired to external devices, such as your smart phone, a remote control, and a laser rangefinder. It also has a built-in weather station that automatically tracks temperature, barometric pressure and altitude, you can manually enter wind speed, direction, and relative humidity. The X-Sight II HD also has a manual rangefinder that utilizes basic MIL range finding techniques. You also get a WiFi hotspot, Bluetooth ability to pair, a GPS enabled compass, built-in level and angle readouts, a ballistic compensation calculator (that pairs to the ATN1500 rangefinder) and an IR illuminator. And that's just to start. There is quite a bit more that this optic is capable of that will be touched upon later in the article.
Upon delivery of the ATN X-Sight II HD 3-14 I spent an evening going through the basic instructions that come along with everything in the box, familiarizing myself with the terminology of the technology. These are basic instructions and will get you to a place that you can start to operate the optic. You will have a ton of questions at this point. There is a lot going on with the riflescope and unless you are a natural with modern tech-based systems I would highly recommend spending a bit of time looking at the various threads located at www.atnowners.com. In all seriousness, every one of my, 'what about this,' and, 'how do you do that' questions were answered right there, everything from tech support questions and suggested updates to accessories, and there are even links to contact customer service.
I am not a super tech savvy guy so there was a bit of a learning curve involved for me. There are also some very good videos on YouTube that walk you through several of the features, like the one shot zero feature for instance. The next evening I spent poking around the ATN Owners Forum and YouTube, charging spare batteries and playing around with the settings and the setup of the riflescope systems. I never did figure out how to not have to reset the time and date, as you will probably notice by looking at the date and time stamps on the photos and videos. Over the course of my testing I mounted, set up and zeroed the riflescope on seven different rifles, so now I have that setup procedure down in my sleep. The process is very straightforward.
I mounted the riflescope, extended battery life package and remote controller on my 20" barreled 6.5 Grendel AR, a consistent and validated 0.6 MOA shooting rifle that I put together a few years back when the 6.5 Grendel was all the rage. l had set up the ballistic profile in the riflescope to match that of my proven load using the 130g Berger AR Hybrid at 2,400 fps, and it was time to head to the range and sling some lead getting this thing zeroed.
I started at 25 yards and was literally zeroed after the first shot, no kidding. I will walk you through that process. I simply fired a shot and went to the settings menu and then to the profiles/zero menu and selected current then moved the colored crosshair to the bullet hole on the target while holding the white crosshair on the center of the bullseye. I took one more shot to confirm the zero because I could not believe it was that easy; it was. I then turned on the ballistic compensation feature and went to the 200-yard range. I utilized the ATN1500 laser rangefinder that I had previously paired to the riflescope and ranged the target at exactly 200 yards. A little flag and, '200yd' appeared on the upper left of the display screen and I zoomed the display to 14X and fired three shots, which landed in a quarter-sized cluster, a little left of center. I moved the zero of the reticle to take that into account and sent another three shots dead into the center of the bullseye. Easy as pie.
It was time to stretch the riflescope system out and see how well it handled longer distances and the never-ending gusting Nebraska wind. We set up early in the morning the following Saturday at 917 yards with a steady 12mph wind gusting to 18mph. I entered the temperature, wind velocity and direction into the riflescope. I ranged the steel plate with the ATN1500 laser rangefinder, and verified that I saw 917yd next to the little flag in the upper left of the display and centered the reticle on the plate. I fired and made a cold bore hit on the plate in a 12mph wind that I followed up with two more within the margins of the changing wind on the steel plate.
The ballistic compensation features work well, provided you have valid velocity and ballistic information entered. My velocity data was previously recorded with a Magnetospeed and the ballistic data was validated with live fire. The riflescope tracked nearly exactly with my recorded values. I took the opportunity to also test the internal rangefinder by entering the known size of the plate target and taking a reading at the top and bottom of the target, it calculated the range to be 877yd. Your ability to aim and take a reading precisely at the top and bottom of the target heavily influence its output values, inside of 400 yards it is pretty well ok and will get the job done. It has several default object sizes and you can manually enter the exact size of a target as well.
I mounted the riflescope next on my Ruger 300 blackout bolt gun that I shoot a 250g Outlaw State Bullets low-velocity expanding round-nosed bullet from at 1,020fps. It is a sub-sonic expanding bullet for hunting that I have harvested a few whitetail deer with, and is a good fit for sub-sonic suppressed hunting. It has a similar ballistic arc to that of a thrown rock.
I zeroed it at 25 yards, only needing one shot again to zero it. I moved over to the 100-yard range and took a reading with the paired ATN 1500 rangefinder and fired a group. I made a slight adjustment in the zero and fired another group that centered right up on the target.
The next morning, I was able to get to my local range and really push the limits of what the riflescope ballistic compensation could do, both with manual range entry, internal rangefinder and the paired rangefinder. I started by entering the wind data and temperature into the system. Then I used the paired rangefinder and ranged a 6" square steel plate at 315 yards, and after I verified that 315yd appeared next to the little flag in the upper left of the display screen I sent five in a row into a neat little cluster on the plate. I then ranged a chicken silhouette at 27 yards and readily toppled it, followed by the steel plate at 315, a pig silhouette at 218, the chicken at 27 yards and back to another silhouette at 164 yards as fast as I could range them, aim and shoot.
If you are shooting at a known range you can also manually enter the distance and apply the same ballistic corrections. It is just more fiddly to scroll through the menus and enter the distance and isn't exactly quick, but it also works fine.
The ballistic compensator works by automatically making the corrections needed inside the riflescope. You hold the crosshairs where you want the bullet to hit and the computer does the rest. The crosshairs stay centered in the view finder. This works for elevation via your distance entry that you can enter manually, enter through the internal range finder or through pairing with the ATN 1500 laser rangefinder.
You can choose to either hold off for the wind, or to enter the direction and velocity values and the riflescope will compensate for the wind. You will see the offset that the calculator is applying in the lower left hand portion of the screen as an arrow pointing up or down followed by the correction in inches, then an arrow pointing left or right followed by the correction in inches. Think of it as a digital version of a ballistic turret on your traditional glass optic.
You click the rangefinder and the elevation correction happens automatically. No dialing in the wrong distance value accidentally or using the wrong hashmark for the wind. The feature works day or night and can be turned off at any time. Just manually set the distance back to your normal distance, or click a few times around your desired distance, and once you get it right just scroll to the menu and turn off the compensation calculator and you are right back to your normal zero range.
It works equally as well with your 22LR as it will with your 6.5 wildcat laser beam, provided your ballistic data is correct. I used this feature flawlessly to shoot my 50 yard zeroed 300blk out to 315 yards, 6.5 Grendel out to 917 yards, 5.56 x 45 to 625 yards, 7.62 x 39 to 315 yards, 6.5/06 to 865 yards, 308 to 865 yards and 22LR to shoot to 315 yards. Bottom line, it worked and could not be easier to use unless it utilized telepathy.