You are using an out of date browser. It may not display this or other websites correctly.
You should upgrade or use an alternative browser.
You should upgrade or use an alternative browser.
my homemade brass annealing machine
- Thread starter gunlover05
- Start date
ShootnMathews
Well-Known Member
No gears in my setup.
One DC power supply, two 12v motors, two potentiometers with rheostats and display. All can be found on Amazon .
My total cost was $90 or something for the entire build.
That's a little bit pricey for my pockets right now. I do have access to many different high torque reduction geared motors in a variety of RPMs. 5-6 rpm, 10-12 rpm and more.
The 12 rpm would give a 5-6 second burn in the flame.
The 5-6 rpm about a 10 second burn.
I think one of those I could use and then adjust the hotness of the flame and the distance from the brass to get the desired temp. I'm thinking the 5-6 rpm. The slower it goes the lower flame temp I could use. With a hotter flame, time in the flame becomes more critical. Where as a lower flame there would be a slight more margin of error on the time in flame without burning it up.
ShootnMathews
Well-Known Member
I prefer to anneal as hot and quickly as possible to avoid transferring too much heat to the case head . And yes my cases drop into water .
That's a good point. Maybe I should go with the 5-6 second burn.
gunlover05
Well-Known Member
- Joined
- Sep 23, 2015
- Messages
- 46
That's a good point. Maybe I should go with the 5-6 second burn.
agree 5-7 second burn should be good for the average med size cases (@308/30-06) without a concern of overheating. I watched many videos online and the 5-7 seconds seemed the norm for a single propane flame. I am using slightly thicker brass in some cases (lapua, lake city) than winchester or remington, so for me @ 5.5-6.5 sec should be about right with lake city 308 cases. I did use the method of turning out the lights and finding the point right before the neck starts to glow, which was about 6.0-6.5 seconds with my setup. In the video I posted while testing I was going a bit longer though, 8 seconds which is longer than I will do going forward. Technically we should be checking with tempalac paint, but admit I didn't have any and will probably pick some up next online order (it isn't cheap). And yes I'm sure you can adjust the flame back and forth to modulate temperature a little.
Dropping in water wouldn't hurt anything either, will just need to dry them good before reloading of course.
ShootnMathews
Well-Known Member
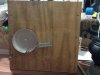
Well you inspired me to make my own since I have so much brass that needs annealed. I ordered 2 of the 10 rpm motors. $37 shipping and all. Bought an $8 Wilton pan and a $13 propane pencil torch head. I tested the flame. It seems adequate. I buzz cut some 7/16" plywood I had laying around and screwed together a quick platform along with some 1.5"X 1.5" porch ballisters to sturdy the corners some. I Mounted a motor to the back using Two 6x6" squares of the plywood as spacers on the motor. That spaced the pan to sit 1/4" off of the plywood back. The cake pan I had already trimmed to a depth that I should be able to anneal my 7.62x54 ( my shortest) up to my 6.5-284 cases without the pan getting in the way for the short ones and without the 284 falling out. I build a feed ramp out of sheet metal and build a sheet metal "j" bead that I used as the spacer to keep the case out far enough to make a clean drop into the pan. It took a time or two trimming the opening of the pan to get the slot just big enough to drop the cases in without making a huge gap. Ended up with about a 1.5" opening. I then hooked up the motor to spin the pan and function fed ( by hand dropping onto the rear of the feed ramp) with 7.62x54R, 7-08, and 6.5-284. It fed fine with all of them. I expected the rimmed cartridges to roll down the ramp in an arc and roll off. But they didn't. They ended up about 1/2" inch out from being flush against the spacer bead, but none fell off and they all dropped into the pan fine and were flush to the back of the pan. They even spun nicely against the stop rod. The stop rod BTW was just a piece of 1/4" steel rod that I use for many contraptions. I bent it long enough on the pan side that I should be able to buy another pan and leave it to full length to run 7 Rem mag and 300 WM. On the other side of the rod I simply drilled a 7/32" hole into the 1.5 X 1.5 corner board that I screwed the plywood to, put some dish soap on the rod and twisted it into place. It fits very firm and stable but if I ever needed to I could twist it back out. So that is where I'm at in the picture
Now I just need to make some sort of adjustable devise to hold the torch where I can adjust the flame in and out for different length brass and I'll at least be able to single feed brass at that point to work on getting the flame distance from the brass to get the brass to about 750 degrees.
After that I'll make some kind of feed head for the second motor to feed single cases from the bulk hopper that I'll fashion from sheet metal.
The hopper will be easy, the torch holder shouldn't be too bad either. The feed head for the hopper will be the trickiest part to make. It needs to be light weigh as these aren't super workhorse motors. I'm thinking of buying a block of balsa wood and turning it in my lathe to about 2" diameter. Maybe 2-1/4". Then just running a forester bit down the side of it to make the channel. That should be light weight and I believe it will function.
I'll post more with progress. Comments or tips are welcome
Attachments
450hunter
Well-Known Member
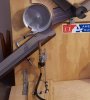
Here is my annealer.
Last edited:
450hunter
Well-Known Member
450hunter
Well-Known Member
Not sure how good the video will be
Look closely at the base of the torch, it's on its own independent base. I can move , rotate, pivot or elevate the setup. I used aluminum rod so its bendable also.Well you inspired me to make my own since I have so much brass that needs annealed. I ordered 2 of the 10 rpm motors. $37 shipping and all. Bought an $8 Wilton pan and a $13 propane pencil torch head. I tested the flame. It seems adequate. I buzz cut some 7/16" plywood I had laying around and screwed together a quick platform along with some 1.5"X 1.5" porch ballisters to sturdy the corners some. I Mounted a motor to the back using Two 6x6" squares of the plywood as spacers on the motor. That spaced the pan to sit 1/4" off of the plywood back. The cake pan I had already trimmed to a depth that I should be able to anneal my 7.62x54 ( my shortest) up to my 6.5-284 cases without the pan getting in the way for the short ones and without the 284 falling out. I build a feed ramp out of sheet metal and build a sheet metal "j" bead that I used as the spacer to keep the case out far enough to make a clean drop into the pan. It took a time or two trimming the opening of the pan to get the slot just big enough to drop the cases in without making a huge gap. Ended up with about a 1.5" opening. I then hooked up the motor to spin the pan and function fed ( by hand dropping onto the rear of the feed ramp) with 7.62x54R, 7-08, and 6.5-284. It fed fine with all of them. I expected the rimmed cartridges to roll down the ramp in an arc and roll off. But they didn't. They ended up about 1/2" inch out from being flush against the spacer bead, but none fell off and they all dropped into the pan fine and were flush to the back of the pan. They even spun nicely against the stop rod. The stop rod BTW was just a piece of 1/4" steel rod that I use for many contraptions. I bent it long enough on the pan side that I should be able to buy another pan and leave it to full length to run 7 Rem mag and 300 WM. On the other side of the rod I simply drilled a 7/32" hole into the 1.5 X 1.5 corner board that I screwed the plywood to, put some dish soap on the rod and twisted it into place. It fits very firm and stable but if I ever needed to I could twist it back out. So that is where I'm at in the picture
Now I just need to make some sort of adjustable devise to hold the torch where I can adjust the flame in and out for different length brass and I'll at least be able to single feed brass at that point to work on getting the flame distance from the brass to get the brass to about 750 degrees.
After that I'll make some kind of feed head for the second motor to feed single cases from the bulk hopper that I'll fashion from sheet metal.
The hopper will be easy, the torch holder shouldn't be too bad either. The feed head for the hopper will be the trickiest part to make. It needs to be light weigh as these aren't super workhorse motors. I'm thinking of buying a block of balsa wood and turning it in my lathe to about 2" diameter. Maybe 2-1/4". Then just running a forester bit down the side of it to make the channel. That should be light weight and I believe it will function.
I'll post more with progress. Comments or tips are welcome
gunlover05
Well-Known Member
- Joined
- Sep 23, 2015
- Messages
- 46
great job guys!