You are using an out of date browser. It may not display this or other websites correctly.
You should upgrade or use an alternative browser.
You should upgrade or use an alternative browser.
Ramblings and Such From Hunting Coyote
- Thread starter DSheetz
- Start date
trapper1954
Well-Known Member
Thanks guys. I picked up an older Delta wood lathe 2 months ago and plan on turning some wooden calls. I have some redbud thats really pretty wood and hard.
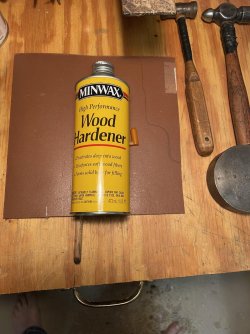
If you know a stock maker French walnut has a good tone. I never thought about redbud or dogwood. I have some persimmon in the process now as well as some LiveOak that I got from a friend on here. I use wood hardener to soak my blanks in till they sink to the bottom of a quart mason jar. than let them set and dry well before I turn my calls. that way they won't absorb moisture or crack if they get in a dryer climate. I have also just left them as is to turn them then just varnished the wood, I like minmax's polyurethane, a pint goes a long way. what thickness of reed material do you use? Is it plane or does it have the linen thread in it? I have been using the .015 thickness plane mylar. Some people like the .020
Attachments
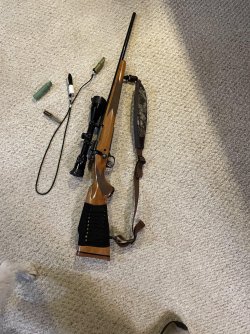
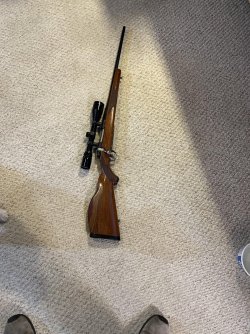
My kit for the normal hunt as I like to travel lite. Plus a Ruger M-77 IN 22-250 that wouldn't carry a group. I was a truck gun for years the bluing was missing in a lot of places, the stock looked like it had been rubbed in some places by the seat as it was riding behind it. I gave it a good cleaning, re-blued it, and finished the stock then decided to play with the stock and add on a wooden cheek riser. I loaded some 55 grain Sierra H.P.B.T. bullets running a moderate velocity played with the seating depth. It will break clays at two hundred yards now as long as they are stationary no wing shots lol.
Attachments
trapper1954
Well-Known Member
I dont know what thickness it is.If you know a stock maker French walnut has a good tone. I never thought about redbud or dogwood. I have some persimmon in the process now as well as some LiveOak that I got from a friend on here. I use wood hardener to soak my blanks in till they sink to the bottom of a quart mason jar. than let them set and dry well before I turn my calls. that way they won't absorb moisture or crack if they get in a dryer climate. I have also just left them as is to turn them then just varnished the wood, I like minmax's polyurethane, a pint goes a long way. what thickness of reed material do you use? Is it plane or does it have the linen thread in it? I have been using the .015 thickness plane mylar. Some people like the .020
trapper1954
Well-Known Member
I run nosler 55gr ballistic tips & h414 in my Ruger mk2 in 22-250. It likes em stretched out there too but they wouldnt go in the magazine they were so long. it shot hole for hole. Sooo I sawed the magazine into and welded it back making it an 1/8 or so bigger than it was. I have won several contests with it.My kit for the normal hunt as I like to travel lite. Plus a Ruger M-77 IN 22-250 that wouldn't carry a group. I was a truck gun for years the bluing was missing in a lot of places, the stock looked like it had been rubbed in some places by the seat as it was riding behind it. I gave it a good cleaning, re-blued it, and finished the stock then decided to play with the stock and add on a wooden cheek riser. I loaded some 55 grain Sierra H.P.B.T. bullets running a moderate velocity played with the seating depth. It will break clays at two hundred yards now as long as they are stationary no wing shots lol.
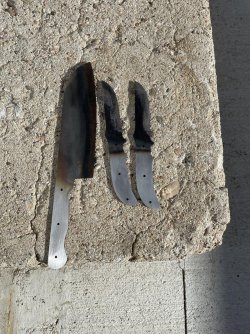
The only time it would make any difference is if you were to need to get more of it as long as it's working the way you want it to it doesn't matter. The two smaller blades that I started a while back and a chef's knife blade heat treated and ready for the crio treatment. The smaller ones are 52-100 bearing steel so were brought up to 1450 F or non-magnetic. The chef's knife is AEB-L stainless, so it was brought up to 1950 F . You can see how the different steels react differently to the heat treatment just by looking at the way the tempering oil carburizes on them. I like to edge harden them. The spines will be tough but not so hard that you can't file them while the edge will be so hard a file won't touch it yet not brittle. Kind of like my head harder than a diamond. The little ones aren't meant to have scales on them.Time will tell what happens to them in their new homes.
Attachments
trapper1954
Well-Known Member
I've made a knife or two. Mr Bob Sims showed me lots about it, he had a nice portable building/shop, baldor sanders, ovens and he was particular as heck. Made folders too. Mine I made aint right they dont hold an edge like I want.The only time it would make any difference is if you were to need to get more of it as long as it's working the way you want it to it doesn't matter. The two smaller blades that I started a while back and a chef's knife blade heat treated and ready for the crio treatment. The smaller ones are 52-100 bearing steel so were brought up to 1450 F or non-magnetic. The chef's knife is AEB-L stainless, so it was brought up to 1950 F . You can see how the different steels react differently to the heat treatment just by looking at the way the tempering oil carburizes on them. I like to edge harden them. The spines will be tough but not so hard that you can't file them while the edge will be so hard a file won't touch it yet not brittle. Kind of like my head harder than a diamond. The little ones aren't meant to have scales on them.Time will tell what happens to them in their new homes.
trapper1954
Well-Known Member
On old circle saw blade for firewood 24-30"What steel did you use? That make a difference as to how you heat treat them.
Good enough steel for sure they will make good blades. It's a high carbon steel, heated to 1450F quenched in a good quality tempering oil they can be quite hard then heated too 350 and held at temp. for a couple of hours before quenching in cold to the touch water will draw it back to not brittle. You can get by with your kitchen oven for this just make sure you have all of the oil off of it first, so you don't smoke up the house. 1450 F is when it first becomes nonmagnetic or is a good cherry red but not a shiny glowing red. When you first quench them, have a vice with a couple of pieces of angle iron in the jaws loosely opened so that as you come out of your oil you can clamp it between them and keep it straight as it comes to room temp. bring it out of the oil when you see the carburized oil on the blade starting to let loose but still hot enough that you don't want to touch it. The oil will be running off of the blade like it was water, at this point and go straight in the vice with it, till you can hold it in your hand. At this time, you can finish grinding it taking your time and cooling it in water so that you don't overheat the metal if it turns blue it's way too hot a light brown is still okay, I preferer to edge harden mine heating just the edge to temp. with a torch having the flame adjusted to still slightly carburizing flame, slight feathery edged flame, not a hard sharp edge, with and good sound to it not a hissing oxygenated flame.
When the fur prices are down a lot of people, it seems, tend to not be as particular about putting up their fur as when the prices are high. But for me it meant that I needed to get the best price I could for my fur. So that meant I needed to be even more picky about putting my fur up, cleaning it and stretching it, sewing up any holes getting the burs, mud and blood out. I skinned mine carefully, I used air and a sports ball needle sharpened to a point to air then up like a balloon by inserting it under the skin of the legs and pumping them up gently. Made my cuts up the back legs and wrists then pealed it down to the head and carefully made the ear cuts eye cuts and around the lips. Then I turned them fur side out put them in my old wringer type washer and washed them with a milder detergent, I have used Dawn dish soap in a pinch, and cold water then rinsed them in clean water after hand wringing them out. I would wring them by hand again then hang them by the nose in a cool place, not cold enough for them to freeze, let then drip dry for a day then turn them fur side in and put them on my wooden stretchers snug them tight but not quite tight as I were stretching them and use my curved needle with mint green dental floss, so the tanner would know it was sewn up and not ruin it, use a running stich to close the holes if I had any. Pull it tight and stretch it then if I needed to clean any excess fat off of the skin. I tucked the front legs in to the leg holes for ease of pulling them out latter. I then hung them up by the nose again till it was time to turn them fur side out when the skin felt good and dry to the touch not sticky. I had holes drilled in the end of my stretchers so they would fit onto headless nails to hang them on bent at an upward angle. Thats when the combing and deburring started the burs would be softened by washing the fur and make it easier to get them out of the fur without breaking the fur. Would you rather have a nice new shiny silver dollar or an old dull worn one that has been carried around for years in someone's pocket? If I'm going to get 5.00 tops for my fur that is the best, I want all of my furs to look their best in hopes of getting the best the buyer will pay. After a few times the buyer will know what you do and will be able to see you and expect that you are doing as well as you can and that you give a s607 about handling your fur so he will do you the best that he can.