Bedding A Rifle By Pat Sheehy

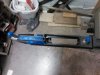
I just finished up two pillar bedding jobs on a pair of Winchester M70s and used Devcon 10110. It was the first time of used this product and the first time I pillar bedded a rifle. I Basically did everything as suggested in past post using Kiwi neutral shoe polish and taping the sides of the recoil lug as described. The Devcon is very tacky and stays where it is put which is a good thing when pillar bedding. Naturally the action screw holes need to be drilled out over size and I went 1/32" over the size of the pillar in one rifle and 1/16" over in the other since the stock was machined off center and needed wiggle room to center the action in the stock so there would be clearance in the barrel channel. The first one I did which was the Boyd's laminated stock had the action cut machined off center and I did a two step bedding on it. I first bedded the pillars to get a better alignment and then the recoil lug and two inches in front of the action. The second one was a Winchester factory laminated stock and I bedded everything in one step, the pillars, recoil lug and barrel shank in front of the action.
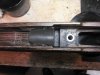
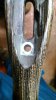
As you can see I removed the trigger mechanism fro the action and filled the open areas with modeling clay. I also put modeling clay on the screw heads to keel the epoxy from forming a mechanical weld.
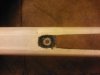
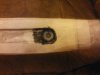
You also need to relieve the area behind the rear action screw pillar on a M70 so you don't have a second recoil lug which will cause the wrist to split. You can remove about 1/32" after the epoxy has set when you remove the action once the epoxy has set up and this will give enough clearance to keep from having a second recoil lug.
 

Attachments

  • NCM_0410.jpg
    NCM_0410.jpg
    125.9 KB · Views: 73
  • NCM_0417.jpg
    NCM_0417.jpg
    114.9 KB · Views: 90
  • NCM_0418.jpg
    NCM_0418.jpg
    112.5 KB · Views: 74
  • NCM_0422.jpg
    NCM_0422.jpg
    134.1 KB · Views: 79
  • KIMG0004.jpg
    KIMG0004.jpg
    80.1 KB · Views: 71
Thank you so much for the article. Lots of cool stuff in there. I've had good luck with both AcraGlas and Devcon 10110, preferring the latter these days. Also, 30 years ago, I bedded a Rem700BDL LA in standard walnut stock without providing any clearance in recoil lug channel. This rifle shoots 0.5 inch groups very regularly and won't stray outside of 1.0MOA with 3 shots. I don't have occasion to heat up the barrel more than that, so I can see where there may be a fault here if it does heat up. My recent work has included the tiny gaps on bottom, side, and front. One thing I can share is I found that eliminating the 1 inch of bedding on the barrel near the lug made a huge improvement to my wife's model 70 featherweight, whereas my model 700 loves the first inch or so to be part of the bedding job.

It is scary the first time you go to pull your rifle apart and it doesn't come easily. Be patient and persistent and gently pry the rifle apart. Be prepared for a heart-stopping popping sound as if you've broken something. It is ok (at least has been for me), it is just how this sucker is going to come apart most times.

Also, I prefer to dremel out about 3/16" of stock behind the recoil lug to make sure the resin is thick enough to not crack and break, itself. In general, I try to keep the resin at least 1/8" thick anywhere I'm asking it to form a bedding layer...which means eliminating some of the stock material in those areas.
 
What's the consensus on taping the sides of the recoil lug, in addition to the front and bottom of the recoil lug, prior to setting the barreled action into the bedding compound? I'm reading of people doing this both ways. Some don't recommend providing relief on the sides of the recoil lug, claiming the sides of the lug are the best resistance to the action torque under recoil. While most seem to recommend relieving the sides of the recoil lug in addition to the front and bottom faces of the lug.

I'll be bedding a BAT HR action for a 338 Lapua Improved in Devcon soon. Recoil lug is integral to the bolt body. Wondering which might be the better way to proceed.
 
I don't think it matters one way or the other. I taped the sides, front and bottom to make it a little easier to remove the action from the stock and I still have to tap on the stock to remove the action from it. It may be different with a round type M700 action than a M70 which doesn't flex as much since it's flat and rectangular.
 
I have been using plumbers putty instead of clay because it's easier for me to get at the local hardware store but I usually have some around.
Thanks for the info !
 
Warning! This thread is more than 9 years ago old.
It's likely that no further discussion is required, in which case we recommend starting a new thread. If however you feel your response is required you can still do so.
Top