How To Camouflage Paint Your Rifle
By Greg Ballard
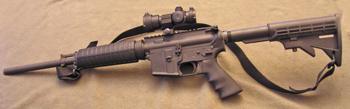
In this article we are going to show you how to camouflage paint your rifle for your predator hunting. This will enable you to blend in better with your surroundings, reduce shine and glare from your weapon, protect it from the elements, and it just looks darn nice to boot. In this project I am going to be camouflage painting a BushMaster AR15 Shorty that is topped with a red dot scope. This is an ideal woods gun for predator hunting as well as a versatile all around gun. The first pic is the gun before we begin working on its camouflage painting. You want to clean the gun of all oils on the surface and this is easily done by wiping it down with a rag and acetone.
Leave Camouflage Paint Off Some Areas
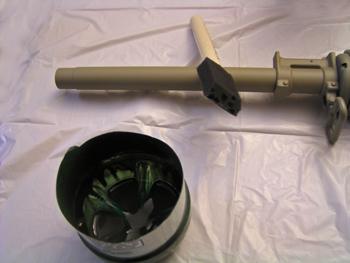
There will be parts of the gun that we do not wish to get any camouflage paint on. These would be areas like the lens of the scope, the numbers on the dial for your powers or settings, the grip on this gun, the bolt, etc. To avoid getting camouflage paint on these areas you can simply use masking tape and tape off those areas as shown in the picture below.

Once we have taped off the areas that we don't wish to paint then, we are ready to spray the gun down with the base coat of camouflage paint. I like to hang the gun from a wire and for this I use a coat hanger. I do this so that I can walk around the gun and spray it from all angles without having to touch the gun at all. I also do this outdoors with plenty of ventilation and little wind. You will also want to paint when the temperatures are above 50 degrees so that the camouflage paint goes onto the gun well. You want to start out with your base coat being a lighter color. In this case I am spraying the gun with the base coat of Khaki and I am using the camouflage spray paint made by Krylon and available at about any Wal Mart. You can see the gun hanging for paint in the following picture.
By Greg Ballard
In this article we are going to show you how to camouflage paint your rifle for your predator hunting. This will enable you to blend in better with your surroundings, reduce shine and glare from your weapon, protect it from the elements, and it just looks darn nice to boot. In this project I am going to be camouflage painting a BushMaster AR15 Shorty that is topped with a red dot scope. This is an ideal woods gun for predator hunting as well as a versatile all around gun. The first pic is the gun before we begin working on its camouflage painting. You want to clean the gun of all oils on the surface and this is easily done by wiping it down with a rag and acetone.
Leave Camouflage Paint Off Some Areas
There will be parts of the gun that we do not wish to get any camouflage paint on. These would be areas like the lens of the scope, the numbers on the dial for your powers or settings, the grip on this gun, the bolt, etc. To avoid getting camouflage paint on these areas you can simply use masking tape and tape off those areas as shown in the picture below.
Once we have taped off the areas that we don't wish to paint then, we are ready to spray the gun down with the base coat of camouflage paint. I like to hang the gun from a wire and for this I use a coat hanger. I do this so that I can walk around the gun and spray it from all angles without having to touch the gun at all. I also do this outdoors with plenty of ventilation and little wind. You will also want to paint when the temperatures are above 50 degrees so that the camouflage paint goes onto the gun well. You want to start out with your base coat being a lighter color. In this case I am spraying the gun with the base coat of Khaki and I am using the camouflage spray paint made by Krylon and available at about any Wal Mart. You can see the gun hanging for paint in the following picture.
How To Camouflage Paint Your Rifle
Make sure that you have shaken the paint up very well before starting to paint. You are going to want to start your painting with a very light coat of paint and use small short bursts of spray while avoiding spraying on one area for too long. You do not want to see a lot of shine as you are painting as this indicates that you are spraying too heavily and you may get runs in your paint. I will go back and forth to different parts of the gun and at various angles until I have completely colored the gun. I will then allow the paint to dry for a while and then I will go over the gun and apply another coat of the same color to complete the base coat. I will allow this coat to dry for about a half an hour before touching the gun. You can see the gun after the Khaki base coat in the picture below.
Once we have the base coat on then we are ready to apply the second color to the gun. We will use a darker color to contrast the base coat. I am using the same camo Krylon paint, but this time I am using Olive Drab Green. I will not spray this coat onto the gun, but I will be using a sponge brush that I have torn small chunks out of the tip to allow me to dapple the paint color to the gun.
For this coat I like to have slightly less than one half of the gun's surface covered by this second color and I simply use irregular blobs of paint at various locations on the surface. I will cut the bottom out of a plastic soda bottle and use that as my paint cup by simply spraying the paint into the "cup" until I have an amount in the bottom as liquid. Do not use regular plastic drinking cups or styrofoam cups or the solvent in the paint will eat a hole in it and you will have a mess on your hands and for that matter your feet. When you are done your gun would look similar to the picture below.
<Previous | Home | Next Page >
How To Camouflage Paint Your Rifle
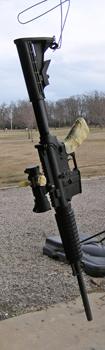
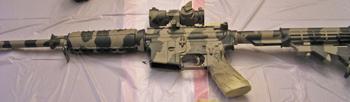
Once you have the second coat on the gun is starting to take shape, but the third and final coat adds the finishing touches that makes the gun look great. This final coat is done using the same procedure as the second coat, but I am using Krylon Camo Brown. I will use vertical stripes of this brown color with a very light touch of the sponge brush onto the gun. I will use a dabbing technique so that I do not apply too much paint in any one spot. I want more of an overshadow and touch of paint here rather than a blob of paint. The little tears in the surface of the sponge make this easily done. You can see the results of this last coat of paint in the following picture. It is also a good idea to overcoat the whole project using a Matte finish clear coat.
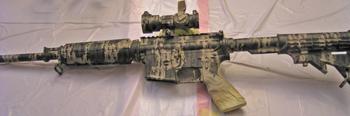
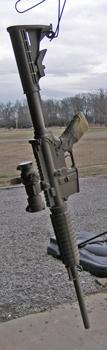
Now we are ready to remove the masking tape from our gun and get a look at the final product. I really like it. It is very easy to do and adds a lot of character and functionality to the gun. I hope that you give this a try to your own personal predator gun. Don't be afraid to try this customization. It is easier than you might think to get a good result and it is also a lot of fun to do. Below you can see the final product ready to hit the woods and take out a predator or two. The picture is a bit washed out by the flash, but you can get the idea. Enjoy
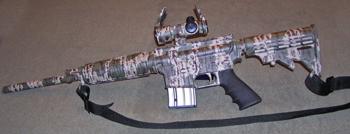
Here is another picture of the finished product lying on the ground.
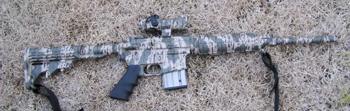
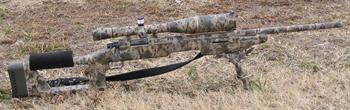
Here is another rifle that was also painted using the techniques shown above and using Krylon.
Join the discussion of this article with the author HERE at the Article Discussion Forum.Greg Ballard resides in Arkansas where he is a computer programmer building automated stock market trading systems and stock market trading software tools. He is an avid outdoorsman who has been hunting since he was big enough to walk and has been doing so primarily as a bowhunter for the past 25 years. He is on the Pro Field Staff for PSE Archery and the Pro Staff for Grim Reaper Broadheads. Greg hunts a wide variety of game, but one of his most favorite things to hunt is predators. He has recently formed and is President of the Arkansas Predator Hunters Association.
Now we are ready to remove the masking tape from our gun and get a look at the final product. I really like it. It is very easy to do and adds a lot of character and functionality to the gun. I hope that you give this a try to your own personal predator gun. Don't be afraid to try this customization. It is easier than you might think to get a good result and it is also a lot of fun to do. Below you can see the final product ready to hit the woods and take out a predator or two. The picture is a bit washed out by the flash, but you can get the idea. Enjoy
Here is another picture of the finished product lying on the ground.
Here is another rifle that was also painted using the techniques shown above and using Krylon.
Join the discussion of this article with the author HERE at the Article Discussion Forum.Greg Ballard resides in Arkansas where he is a computer programmer building automated stock market trading systems and stock market trading software tools. He is an avid outdoorsman who has been hunting since he was big enough to walk and has been doing so primarily as a bowhunter for the past 25 years. He is on the Pro Field Staff for PSE Archery and the Pro Staff for Grim Reaper Broadheads. Greg hunts a wide variety of game, but one of his most favorite things to hunt is predators. He has recently formed and is President of the Arkansas Predator Hunters Association.