Building An Accurate AR-15
By Steve Adelmann
©Copyright, Precision Shooting Magazine
Like most married men, I've learned that combining my passion for something with the joy of giving doesn't always end well. Giving power tools to my wife is a good example; camouflage clothing is another. However in late 2007 my lovely wife made a whopper of a request: she wanted an AR-style rifle for Christmas. In this case giving something I'd enjoy having was going to be a win-win. After coming down from my high, the next step was deciding what to buy her. There are so many AR configurations and chamberings to choose from (45-50 and counting) that selecting just one can be daunting. Like a stymied kid trying to choose just one jellybean from a candy dish, a month later I still had no plan. While frantically searching the aisles of a local gun show I happened upon a table of AR receivers and had an uncharacteristically good idea: build it myself. I figured I could buy some parts, give them to her in a box and eventually decide what flavor it should be. That would have made a lot of sense were it not for the fact that although I'd carried and shot ARs of all shapes, sizes and styles, since I was 17, I'd never taken one down past basic field-stripping. I knew a lot about how to employ them and a little about what makes them tick, but that was it. When I presented her with a stripped upper and lower receiver set on Christmas morning, it was with the assurance that I'd have it built "in no time at all". Thus began my odyssey into the deep and cavernous world of custom AR building. So far I've learned several key lessons:
1. Building and customizing ARs is a rewarding challenge I thoroughly enjoy.
2. Even an idiot can build a fully functional AR (see #1).
3. AR-style rifles are the most versatile modern firearm platform available.
4. Good material selection, attention to detail, and solid technique can yield very accurate rifles and carbines.
I configured that first gun as an accurized 5.56x45mm carbine out of both utility and curiosity. A carbine best suited her needs and I wanted to see how well the product of my unskilled hands could be made to shoot. The result is a very handy gun for the dense woods and tight fields of the eastern US, yet accurate enough for 300 yard shots at predators and targets alike. It came out better than I'd hoped, but not without some hand wringing in the process.
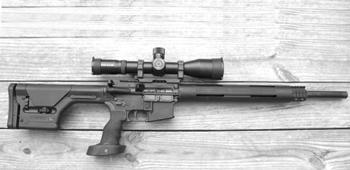
The Varmint/Match rifle configuration that's a consistent performer uses heavy 20" barrels, 2-stage match trigger, rifle-length gas systems and adjustable pistol grips/stocks. Thus far it's been a good combination for accuracy and reliability. Photo courtesy of Rifleman Consulting LLC.
Components 101
Being a do-it-yourselfer (sometimes referred to as a "cheapskate") I decided to build from stripped parts instead of using one of the AR kits. The latter consist of either complete upper or lower receiver groups. While affording great modularity with minimal effort, the kits are better suited to changing configuration on an existing AR. A key attribute of this rifle is that with the push of two takedown pins, receiver groups can be swapped, transforming a tactical carbine into a varmint hunter or mid-range competitor in less than a minute. I like to have a hand in parts selection and fitting so I decided early on to order everything separately. Of course, I also figured out that route is cheaper than buying a kit. Aside from the stripped lower receiver purchased from a local FFL dealer, all other components were purchased from parts companies like Del-Ton Inc. (DTI), Midway USA and Brownells. It's worth mentioning that all AR lower receivers have to come through an FFL since they're classified by BATF as the "firearm" and serial numbered accordingly. My only formal gunsmith training at that point was on bolt-action rifles and auto-loading pistols, so I dove into the internet and found enough info to get started. Using sites like AR15.com (http://www.ar15.com), I was able to find guides for building an AR. This website is a decent resource for novices, which I definitely fit in with for this project. Like all blog-type affairs though, you have to understand you're reading opinions, so nothing is gospel. Still, I found the site's pages informative enough to keep me tracking in the right direction. An additional web resource is available for intrepid AR-builders, courtesy of Brownells. They now have video clips posted online from their instructional CD-Rom that talk you through the basics. I've not personally reviewed them but given the quality of Brownells other products and services, I'm confident it's well put together.
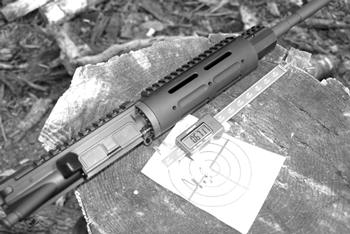
Typical performance of standard grade carbine barrels from Wilson Arms is in the 1 to 1-1/4 MOA range at 100 yds. After accurization most carbines shoot consistent 3/4 MOA groups. After all work was done, this Rifleman Consulting Eastern Predator shot regular .6 to .7 MOA groups with 55 gr. factory loads. Photo courtesy of Rifleman Consulting LLC.
As with most accurate platforms, ARs need good quality, free-floated barrels and match-type triggers to have a chance at turning in tight groups. The latter component was the easiest choice; pointing me towards a company I became familiar with while still in the Army: Geissele Automatics (GA) of Jeffersonville, PA. Bill Geissele's triggers were well covered in the Nov, 2008 PS article "Geissele Automatics, the Trigger of the Future" by Dan Arnold. Over the years I've been exposed to many good and bad triggers. It seems attaching "Match" as a suffix is all that's needed to make triggers sell, but a trigger's quality isn't in the naming scheme, it's in the flawless form, fit and function. I'll simply say GA's products are the finest 2-stage triggers available to AR aficionados. Bill's engineering and manufacturing expertise are backed by excellent quality control and rounded out with a background in competitive shooting. The end products are superb and I've put them in many ARs I've built, including replacing inferior or problem triggers from other manufacturers. These triggers are simple to install, adjust and hold their settings well and are well worth every penny paid.
The other key ingredient-the barrel-initially gave me night terrors as I tried to decide which one to use. Like optics, the more I learn about barrels the harder it is to settle on one. I can't afford premium barrels for personal use, so I'm always stuck between budget and need. As luck would have it, while talking triggers with Mr. Geissele at SHOT '08, the General Manager of Wilson Arms happened by the booth. After playing "20 Questions" with Mr. Steven Pawl, I decided to take a chance on a Wilson barrel for the project. My only reluctance was that their barrels are only available with button rifling which I suspected would hamper downrange performance. After SHOT I ordered a medium contour, button rifled, 1:9, chrome-moly, 16" tube with a threaded or "post ban" muzzle. I planned an objective evaluation so I ordered from a wholesaler, avoiding any hand-picking. I chose a non-chrome lined chamber and bore, since my wife has no intention of fighting in the jungle or shooting hundreds of rounds between cleanings. The barrel I received is of good quality for a lightweight carbine barrel, currently turning in consistent 3/4 MOA groups at 100 yds with factory fodder. I've built several rifles since this project using Wilson barrels, and found all-including chrome lined versions-to be in the same category. None of these are marketed as match barrels, so I'm very happy with that performance.
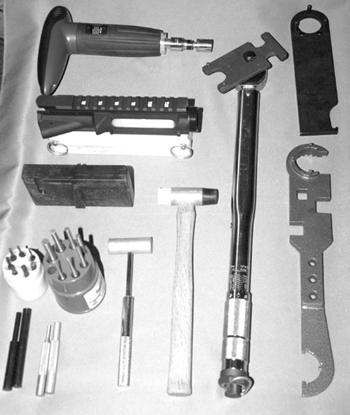
Some of the basic tools needed for AR assembly include (clockwise from L to R) a good torque wrench, barrel nut wrenches, non-marring hammers, punches and lower and upper receiver blocks. Photo courtesy of Rifleman Consulting LLC.
When I started this project, I was operating purely on theory. I was positive the gun would be safe to operate before presenting it to my wife, confident it would function and cautiously optimistic I could put the pieces in the right places well enough that my wife wouldn't suspect I was clueless. But I had no idea how well or poorly it would shoot. In the Army I'd either used mass-produced rifles and carbines with their mediocre accuracy or precision long-guns tweaked by very talented sniper-rifle 'smiths. So after the initial 10 round "Whew, it didn't blow-up" shoot, I went to the first range test with a blank sheet of paper. The break-in process hinted that this carbine would shoot in the "acceptable" category. After break-in, and prior to other accurization steps, the carbine shot consistent 1 MOA groups with several different factory loads at 100 yards. While not astounding performance on paper, I was happy to see it grouping and happier to be able to tell my wife her rifle worked. Being short on patience and long on inquisitiveness, it wasn't long before I began learning how to make ARs shoot better. Several carbines and heavy barreled match rifles later, I've learned this venerable platform is worthy of a second look for anyone dismissing it as inaccurate.
After learning some tricks and ensuring all my light carbines were shooting well (including tightening my wife's project gun down to 3/4 MOA) I endeavored to build a heavy barrel rifle with an eye towards accuracy. I figured if the first one didn't pan out I'd keep that little project to myself and stick with shorter range hunters and tactical guns. Since I already had luck with non-match barrels, I decided on a low cost gamble that wouldn't dent the wallet if it turned out to be a dog. I opted for a 20", 0.936" (OD), button rifled, chromemoly barrel from Olympic Arms. As with all my barrels, this one had a 5.56 NATO chamber. I tried several factory "match" loads and had terrible performance, not surprisingly the worst were loaded for .223 Remington chambers. The best I could get were a few .9 to 1 MOA groups with Hornady 75 gr. AMAX factory ammo. On a hunch I tried the favorite load of all carbines I've built: Hornady 55 gr. V-MAX. I promptly hit mass-produced pay-dirt. This cartridge averages .51" in all [5 round] heavy barrel rifle groups I've shot, with the best to date being .261" at 100 yards. Overall, this mid-sized V-MAX has been a superbly accurate projectile in all of my .224 bores. The addition of adjustable buttstock, pistol grip and the much needed free-float handguard rounded out the heavy rifle nicely.
Tool Time
Not surprisingly, a few select tools greatly aid basic AR assembly. A bench-mounted vice is a must, coupled with an upper receiver block used to it firmly while all manner of services are performed. The next item is a lower receiver block, which locks into the magazine well, stabilizing the lower so you can install the trigger, receiver extension (buffer tube) and all small parts. It's important to get the right size upper and lower receiver blocks for large (AR10) or small (AR15) platforms. Another AR-specific tool is a barrel nut wrench. I have several types and all have their pros and cons (hence owning several). The basic function is to remove or install a barrel nut but some combination versions also work on flash suppressors/muzzle brakes and free-float tube lock rings as well. A good torque wrench is helpful for certain parts of the gun. Just as with turn-bolt rifles, ARs benefit from proper torque on barrel nuts, muzzle brakes and optics mounts. I have several because I'm constantly switching barrels and parts but one good torque wrench would suffice for someone interested in building only a rifle or two. Lastly, a brass/polymer/rawhide hammer and good set of punches—roll pin, steel, brass and nylon—will make life easier. Having extra 1/16" punches will make life a lot easier. As I've gained more experience, I've bought or made additional specialized tools for different accoutrements and functions, but they're generally unnecessary for someone building just one gun.
Assembling an AR isn't particularly difficult, but an understanding of the parts and how they function is important. I suggest researching direct impingement gas operation in general, and AR function in specific before beginning such a project. AR triggers range from fairly complex to dirt simple, depending on type and brand. Again, if you lack basic AR-smiting skills a web resource like AR15.com is invaluable. The folks that have taken time to photograph and detail all assembly steps deserve a pat on the back. It's important that applicable safety procedures are followed during and after AR assembly/accurization, just as with any firearm. If in doubt about things like barrel nut torque and bolt/barrel headspace measurements, let a professional do it for you.

The tool list for accuracy work can be extensive but the basics include a receiver lapping tool, lapping compound and receiver block as well as tools to clean up or repair a muzzle's crown. Photo courtesy of Rifleman Consulting LLC.
By Steve Adelmann
©Copyright, Precision Shooting Magazine
Like most married men, I've learned that combining my passion for something with the joy of giving doesn't always end well. Giving power tools to my wife is a good example; camouflage clothing is another. However in late 2007 my lovely wife made a whopper of a request: she wanted an AR-style rifle for Christmas. In this case giving something I'd enjoy having was going to be a win-win. After coming down from my high, the next step was deciding what to buy her. There are so many AR configurations and chamberings to choose from (45-50 and counting) that selecting just one can be daunting. Like a stymied kid trying to choose just one jellybean from a candy dish, a month later I still had no plan. While frantically searching the aisles of a local gun show I happened upon a table of AR receivers and had an uncharacteristically good idea: build it myself. I figured I could buy some parts, give them to her in a box and eventually decide what flavor it should be. That would have made a lot of sense were it not for the fact that although I'd carried and shot ARs of all shapes, sizes and styles, since I was 17, I'd never taken one down past basic field-stripping. I knew a lot about how to employ them and a little about what makes them tick, but that was it. When I presented her with a stripped upper and lower receiver set on Christmas morning, it was with the assurance that I'd have it built "in no time at all". Thus began my odyssey into the deep and cavernous world of custom AR building. So far I've learned several key lessons:
1. Building and customizing ARs is a rewarding challenge I thoroughly enjoy.
2. Even an idiot can build a fully functional AR (see #1).
3. AR-style rifles are the most versatile modern firearm platform available.
4. Good material selection, attention to detail, and solid technique can yield very accurate rifles and carbines.
I configured that first gun as an accurized 5.56x45mm carbine out of both utility and curiosity. A carbine best suited her needs and I wanted to see how well the product of my unskilled hands could be made to shoot. The result is a very handy gun for the dense woods and tight fields of the eastern US, yet accurate enough for 300 yard shots at predators and targets alike. It came out better than I'd hoped, but not without some hand wringing in the process.
The Varmint/Match rifle configuration that's a consistent performer uses heavy 20" barrels, 2-stage match trigger, rifle-length gas systems and adjustable pistol grips/stocks. Thus far it's been a good combination for accuracy and reliability. Photo courtesy of Rifleman Consulting LLC.
Components 101
Being a do-it-yourselfer (sometimes referred to as a "cheapskate") I decided to build from stripped parts instead of using one of the AR kits. The latter consist of either complete upper or lower receiver groups. While affording great modularity with minimal effort, the kits are better suited to changing configuration on an existing AR. A key attribute of this rifle is that with the push of two takedown pins, receiver groups can be swapped, transforming a tactical carbine into a varmint hunter or mid-range competitor in less than a minute. I like to have a hand in parts selection and fitting so I decided early on to order everything separately. Of course, I also figured out that route is cheaper than buying a kit. Aside from the stripped lower receiver purchased from a local FFL dealer, all other components were purchased from parts companies like Del-Ton Inc. (DTI), Midway USA and Brownells. It's worth mentioning that all AR lower receivers have to come through an FFL since they're classified by BATF as the "firearm" and serial numbered accordingly. My only formal gunsmith training at that point was on bolt-action rifles and auto-loading pistols, so I dove into the internet and found enough info to get started. Using sites like AR15.com (http://www.ar15.com), I was able to find guides for building an AR. This website is a decent resource for novices, which I definitely fit in with for this project. Like all blog-type affairs though, you have to understand you're reading opinions, so nothing is gospel. Still, I found the site's pages informative enough to keep me tracking in the right direction. An additional web resource is available for intrepid AR-builders, courtesy of Brownells. They now have video clips posted online from their instructional CD-Rom that talk you through the basics. I've not personally reviewed them but given the quality of Brownells other products and services, I'm confident it's well put together.
Typical performance of standard grade carbine barrels from Wilson Arms is in the 1 to 1-1/4 MOA range at 100 yds. After accurization most carbines shoot consistent 3/4 MOA groups. After all work was done, this Rifleman Consulting Eastern Predator shot regular .6 to .7 MOA groups with 55 gr. factory loads. Photo courtesy of Rifleman Consulting LLC.
As with most accurate platforms, ARs need good quality, free-floated barrels and match-type triggers to have a chance at turning in tight groups. The latter component was the easiest choice; pointing me towards a company I became familiar with while still in the Army: Geissele Automatics (GA) of Jeffersonville, PA. Bill Geissele's triggers were well covered in the Nov, 2008 PS article "Geissele Automatics, the Trigger of the Future" by Dan Arnold. Over the years I've been exposed to many good and bad triggers. It seems attaching "Match" as a suffix is all that's needed to make triggers sell, but a trigger's quality isn't in the naming scheme, it's in the flawless form, fit and function. I'll simply say GA's products are the finest 2-stage triggers available to AR aficionados. Bill's engineering and manufacturing expertise are backed by excellent quality control and rounded out with a background in competitive shooting. The end products are superb and I've put them in many ARs I've built, including replacing inferior or problem triggers from other manufacturers. These triggers are simple to install, adjust and hold their settings well and are well worth every penny paid.
The other key ingredient-the barrel-initially gave me night terrors as I tried to decide which one to use. Like optics, the more I learn about barrels the harder it is to settle on one. I can't afford premium barrels for personal use, so I'm always stuck between budget and need. As luck would have it, while talking triggers with Mr. Geissele at SHOT '08, the General Manager of Wilson Arms happened by the booth. After playing "20 Questions" with Mr. Steven Pawl, I decided to take a chance on a Wilson barrel for the project. My only reluctance was that their barrels are only available with button rifling which I suspected would hamper downrange performance. After SHOT I ordered a medium contour, button rifled, 1:9, chrome-moly, 16" tube with a threaded or "post ban" muzzle. I planned an objective evaluation so I ordered from a wholesaler, avoiding any hand-picking. I chose a non-chrome lined chamber and bore, since my wife has no intention of fighting in the jungle or shooting hundreds of rounds between cleanings. The barrel I received is of good quality for a lightweight carbine barrel, currently turning in consistent 3/4 MOA groups at 100 yds with factory fodder. I've built several rifles since this project using Wilson barrels, and found all-including chrome lined versions-to be in the same category. None of these are marketed as match barrels, so I'm very happy with that performance.
Some of the basic tools needed for AR assembly include (clockwise from L to R) a good torque wrench, barrel nut wrenches, non-marring hammers, punches and lower and upper receiver blocks. Photo courtesy of Rifleman Consulting LLC.
When I started this project, I was operating purely on theory. I was positive the gun would be safe to operate before presenting it to my wife, confident it would function and cautiously optimistic I could put the pieces in the right places well enough that my wife wouldn't suspect I was clueless. But I had no idea how well or poorly it would shoot. In the Army I'd either used mass-produced rifles and carbines with their mediocre accuracy or precision long-guns tweaked by very talented sniper-rifle 'smiths. So after the initial 10 round "Whew, it didn't blow-up" shoot, I went to the first range test with a blank sheet of paper. The break-in process hinted that this carbine would shoot in the "acceptable" category. After break-in, and prior to other accurization steps, the carbine shot consistent 1 MOA groups with several different factory loads at 100 yards. While not astounding performance on paper, I was happy to see it grouping and happier to be able to tell my wife her rifle worked. Being short on patience and long on inquisitiveness, it wasn't long before I began learning how to make ARs shoot better. Several carbines and heavy barreled match rifles later, I've learned this venerable platform is worthy of a second look for anyone dismissing it as inaccurate.
After learning some tricks and ensuring all my light carbines were shooting well (including tightening my wife's project gun down to 3/4 MOA) I endeavored to build a heavy barrel rifle with an eye towards accuracy. I figured if the first one didn't pan out I'd keep that little project to myself and stick with shorter range hunters and tactical guns. Since I already had luck with non-match barrels, I decided on a low cost gamble that wouldn't dent the wallet if it turned out to be a dog. I opted for a 20", 0.936" (OD), button rifled, chromemoly barrel from Olympic Arms. As with all my barrels, this one had a 5.56 NATO chamber. I tried several factory "match" loads and had terrible performance, not surprisingly the worst were loaded for .223 Remington chambers. The best I could get were a few .9 to 1 MOA groups with Hornady 75 gr. AMAX factory ammo. On a hunch I tried the favorite load of all carbines I've built: Hornady 55 gr. V-MAX. I promptly hit mass-produced pay-dirt. This cartridge averages .51" in all [5 round] heavy barrel rifle groups I've shot, with the best to date being .261" at 100 yards. Overall, this mid-sized V-MAX has been a superbly accurate projectile in all of my .224 bores. The addition of adjustable buttstock, pistol grip and the much needed free-float handguard rounded out the heavy rifle nicely.
Tool Time
Not surprisingly, a few select tools greatly aid basic AR assembly. A bench-mounted vice is a must, coupled with an upper receiver block used to it firmly while all manner of services are performed. The next item is a lower receiver block, which locks into the magazine well, stabilizing the lower so you can install the trigger, receiver extension (buffer tube) and all small parts. It's important to get the right size upper and lower receiver blocks for large (AR10) or small (AR15) platforms. Another AR-specific tool is a barrel nut wrench. I have several types and all have their pros and cons (hence owning several). The basic function is to remove or install a barrel nut but some combination versions also work on flash suppressors/muzzle brakes and free-float tube lock rings as well. A good torque wrench is helpful for certain parts of the gun. Just as with turn-bolt rifles, ARs benefit from proper torque on barrel nuts, muzzle brakes and optics mounts. I have several because I'm constantly switching barrels and parts but one good torque wrench would suffice for someone interested in building only a rifle or two. Lastly, a brass/polymer/rawhide hammer and good set of punches—roll pin, steel, brass and nylon—will make life easier. Having extra 1/16" punches will make life a lot easier. As I've gained more experience, I've bought or made additional specialized tools for different accoutrements and functions, but they're generally unnecessary for someone building just one gun.
Assembling an AR isn't particularly difficult, but an understanding of the parts and how they function is important. I suggest researching direct impingement gas operation in general, and AR function in specific before beginning such a project. AR triggers range from fairly complex to dirt simple, depending on type and brand. Again, if you lack basic AR-smiting skills a web resource like AR15.com is invaluable. The folks that have taken time to photograph and detail all assembly steps deserve a pat on the back. It's important that applicable safety procedures are followed during and after AR assembly/accurization, just as with any firearm. If in doubt about things like barrel nut torque and bolt/barrel headspace measurements, let a professional do it for you.
The tool list for accuracy work can be extensive but the basics include a receiver lapping tool, lapping compound and receiver block as well as tools to clean up or repair a muzzle's crown. Photo courtesy of Rifleman Consulting LLC.
