Basic Rifle Maintenance - Part 1
By Vince Bottomley
©Copyright, Target Shooter Magazine
We mentioned the possibility of an article covering basic rifle maintenance in the April issue of Target Shooter and enough of you responded to make it a reality, so here goes.
We'll keep it simple and restrict it at this stage to the centrefire bolt-action rifle and we will start with the bolt itself.
The bolt is a key part of our rifle. Not only does it close the breech, sealing the pressure-chamber, it also extracts the fired case and provides ignition via the firing-pin striking the primer. It is this latter function that concerns us most when it comes to maintenance.
Lock-time - the time taken for the firing-pin to strike the primer after we have pulled the trigger - is measured in milli-seconds. Even though the lock-time is unimaginably small, movement of the rifle can occur in this time-period and if it does, accuracy will obviously suffer. Clearly, a fast lock-time is desirable - even more desirable with a hand-held rifle, where movement is more likely to occur.
A number of factors will influence lock-time but the one that we can do something about is the firing-pin/spring assembly. But first, let's dismantle our bolt. Most bolts are designed to easily 'field-strip' and even if our featured bolts are different from your rifle, you'll be surprised what you can find on the internet. (In less than a minute I had a YouTube video of a Mauser bolt strip).
The spring assembly usually screws into the main bolt-body (e.g.Remington, Winchester, Stolle) but some bolts employ a bayonet-style engagement (e.g. Howa, BAT) or even a screw-on cap (e.g. Savage, Barnard, RPA).
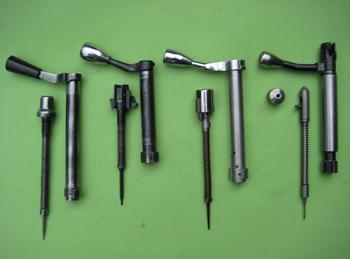
The picture above shows a few types – from the left: Remington, Winchester, Howa and Barnard. We will concentrate on the Remington as it is one of the most popular and I just happen to be trouble-shooting a light-striking problem with one.
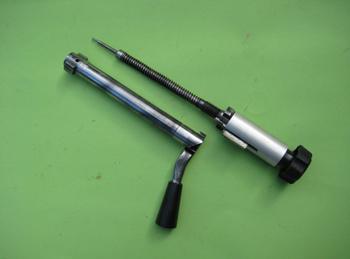
Using a suitable stripping tool, we can compress the spring and easily unscrew the firing-pin/spring assembly. We now have two parts – put the spring assembly to one side and we'll deal with the bolt-body first.

The problem here is the likelihood of crud accumulating deep down inside the narrow passage that guides the firing-pin. Gases blow back through the firing-pin hole and if you've ever pierced a primer, this is where the small metal disc ends up. An aerosol of auto carburettor cleaner (Halfords) is useful here . Spray inside the body and swill out the crud. If it looks very dirty, use a pointed stick – like a kebab stick with a cleaning patch attached. Shine a torch inside to ensure it's clean. Whilst you're at it, spray the bolt-face with the cleaner – particularly around the extractor and ejector pin. Depress the pin a few times to make sure it's running free. If you have access to an air-line, give it a blast inside and out and the job is done.
Now for the spring assembly. I'm intending to fully dismantle the Remington spring assembly as there is a problem with light-strikes but for normal maintenance it's not necessary and we are simply going to clean the spring-assembly with our aerosol carb. cleaner to remove all traces of crud and grease. We do not want ANY grease or oil on the spring or pin – it will cause drag and increase lock-time! Again, dry off with an air-line if you have one. A light spray with WD40 is all we need – no oil or grease on the spring or pin please! You can put a very small amount of grease on the threads or bayonet prior to assembly.
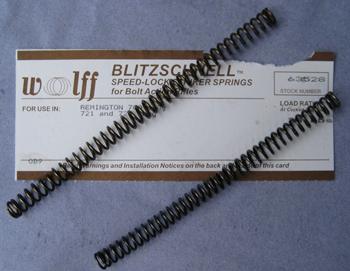
Whilst the bolt was in pieces, it was a simple job to fit a new spring. Springs for the popular rifles are available from www.brownells.com for a few dollars. For a few dollars more, you can buy a slightly stronger (longer) one which will in theory give you a shorter lock-time. It arrived within a week!
One last thing to check - particularly if your rifle isn't as accurate as you think it should be. Check that both bolt-lugs are making contact with the action lugs. The back of both lugs should appear shiny. If one looks shiny but the other doesn't, there's not a lot you can do about it – it's really a machining job to true 'em up and it probably isn't worth the cost as you could end up having to adjust the headspace but at least you know what could be causing the accuracy problem.
Finally, never store your rifle with the bolt cocked or the spring will soon lose its tension. If you prefer to leave the bolt in the rifle, close it on an empty chamber and pull the trigger to un-cock it. If you store the bolt separately – best for safety – de-cock it by twisting the shroud to drop the pin. Re-cock using the stripping tool.
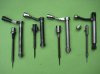
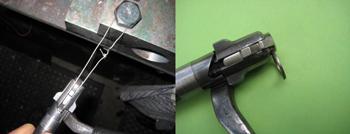
Bolt stripping tools for popular actions can be obtained from Sinclair International in America. www.sinclairintl.com Barnard bolts come apart without any tools, as do RPA and Savage – except for an Allen-key. In the absence of a stripping tool, you can improvise (see pic below) with a bit of wire and a washer (or 5p coin) in the case of Remington bolts!
More basic rifle maintenance next month.
Target Shooter is the first UK online shooting magazine and best of all it is free! The magazine is aimed at all target shooters, or 'paper punchers', that enjoy to read about their sports, reviews, product information, firearms, competitions, club information, etc, etc. Remember the name Target Shooter, as it is a magazine produced by shooters for shooters.
By Vince Bottomley
©Copyright, Target Shooter Magazine
We mentioned the possibility of an article covering basic rifle maintenance in the April issue of Target Shooter and enough of you responded to make it a reality, so here goes.
We'll keep it simple and restrict it at this stage to the centrefire bolt-action rifle and we will start with the bolt itself.
The bolt is a key part of our rifle. Not only does it close the breech, sealing the pressure-chamber, it also extracts the fired case and provides ignition via the firing-pin striking the primer. It is this latter function that concerns us most when it comes to maintenance.
Lock-time - the time taken for the firing-pin to strike the primer after we have pulled the trigger - is measured in milli-seconds. Even though the lock-time is unimaginably small, movement of the rifle can occur in this time-period and if it does, accuracy will obviously suffer. Clearly, a fast lock-time is desirable - even more desirable with a hand-held rifle, where movement is more likely to occur.
A number of factors will influence lock-time but the one that we can do something about is the firing-pin/spring assembly. But first, let's dismantle our bolt. Most bolts are designed to easily 'field-strip' and even if our featured bolts are different from your rifle, you'll be surprised what you can find on the internet. (In less than a minute I had a YouTube video of a Mauser bolt strip).
The spring assembly usually screws into the main bolt-body (e.g.Remington, Winchester, Stolle) but some bolts employ a bayonet-style engagement (e.g. Howa, BAT) or even a screw-on cap (e.g. Savage, Barnard, RPA).
The picture above shows a few types – from the left: Remington, Winchester, Howa and Barnard. We will concentrate on the Remington as it is one of the most popular and I just happen to be trouble-shooting a light-striking problem with one.
Using a suitable stripping tool, we can compress the spring and easily unscrew the firing-pin/spring assembly. We now have two parts – put the spring assembly to one side and we'll deal with the bolt-body first.
The problem here is the likelihood of crud accumulating deep down inside the narrow passage that guides the firing-pin. Gases blow back through the firing-pin hole and if you've ever pierced a primer, this is where the small metal disc ends up. An aerosol of auto carburettor cleaner (Halfords) is useful here . Spray inside the body and swill out the crud. If it looks very dirty, use a pointed stick – like a kebab stick with a cleaning patch attached. Shine a torch inside to ensure it's clean. Whilst you're at it, spray the bolt-face with the cleaner – particularly around the extractor and ejector pin. Depress the pin a few times to make sure it's running free. If you have access to an air-line, give it a blast inside and out and the job is done.
Now for the spring assembly. I'm intending to fully dismantle the Remington spring assembly as there is a problem with light-strikes but for normal maintenance it's not necessary and we are simply going to clean the spring-assembly with our aerosol carb. cleaner to remove all traces of crud and grease. We do not want ANY grease or oil on the spring or pin – it will cause drag and increase lock-time! Again, dry off with an air-line if you have one. A light spray with WD40 is all we need – no oil or grease on the spring or pin please! You can put a very small amount of grease on the threads or bayonet prior to assembly.
Whilst the bolt was in pieces, it was a simple job to fit a new spring. Springs for the popular rifles are available from www.brownells.com for a few dollars. For a few dollars more, you can buy a slightly stronger (longer) one which will in theory give you a shorter lock-time. It arrived within a week!
One last thing to check - particularly if your rifle isn't as accurate as you think it should be. Check that both bolt-lugs are making contact with the action lugs. The back of both lugs should appear shiny. If one looks shiny but the other doesn't, there's not a lot you can do about it – it's really a machining job to true 'em up and it probably isn't worth the cost as you could end up having to adjust the headspace but at least you know what could be causing the accuracy problem.
Finally, never store your rifle with the bolt cocked or the spring will soon lose its tension. If you prefer to leave the bolt in the rifle, close it on an empty chamber and pull the trigger to un-cock it. If you store the bolt separately – best for safety – de-cock it by twisting the shroud to drop the pin. Re-cock using the stripping tool.
Bolt stripping tools for popular actions can be obtained from Sinclair International in America. www.sinclairintl.com Barnard bolts come apart without any tools, as do RPA and Savage – except for an Allen-key. In the absence of a stripping tool, you can improvise (see pic below) with a bit of wire and a washer (or 5p coin) in the case of Remington bolts!
More basic rifle maintenance next month.
Target Shooter is the first UK online shooting magazine and best of all it is free! The magazine is aimed at all target shooters, or 'paper punchers', that enjoy to read about their sports, reviews, product information, firearms, competitions, club information, etc, etc. Remember the name Target Shooter, as it is a magazine produced by shooters for shooters.