Recoil lug jig/fixture

shortgrass

Well-Known Member
Joined
Mar 31, 2010
Messages
3,672
Location
Weatherford, Oklahoma
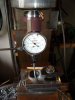
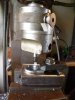
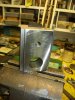
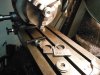
Taking a short break so I thought I'd post this as I've not seen it posted before. There's a commercial jig/fixture offered these days, but I'm not about to spend $125 for one. I took a piece of hot rolled flat bar that was about 1 1/4" thick by 3" wide and squared it up. I made 'grasping' cuts on each side of the bottom for my vise to clamp on and then used them and surfaced the top side. I centered up on the 3" width and found an appropriate spot to drill the 1 1/8" 'clearance' hole. I then located a spot for the bolt hole. Clamp your recoil lug down so that it's over the 'clearance' hole. Dial it in using a centering indicator. Anyone who owns a vertical mill should have a centering indicator. It'll save a lot of time and insure you are centered over an existing 'hole', if you don't know here center is. "Open" the 1 1/16" hole in the recoil lug to the desired size using your adjustable boring head. Again, another tool anyone who owns a vertical mill should have. Both of these tools, the boring head & centering indicator, have a bunch of other uses besides this job. That commercially made fixture/jig has only ONE use, opening the hole on a recoil lug.
 

Attachments

  • DSCF0995.jpg
    DSCF0995.jpg
    77.5 KB · Views: 445
  • DSCF0996.jpg
    DSCF0996.jpg
    87 KB · Views: 378
  • DSCF0997.jpg
    DSCF0997.jpg
    108.4 KB · Views: 360
Nicely done. The indicator is a coaxial indicator.

When I used to open lugs I found a 4 jaw in the lathe worked really well. I just dialed in the hole and bored away with a very sharp small boring bar.

Later on I found that if the action is only trued enough to get a 100% cleanup we are only going .003" or .004" at most oversize. I still just cut the tennon diameter to the 1.0625" or as tight as I can still slip fit the lug and cut the threads till it fits the action. I don't like the threads pointed up anyway so I can get a super tight fit on the action threads without starting with an oversized tennon. The point is there is no real need to open up a lug unless you are radically opening it up for say much larger action.
 
I see actions from everywhere, HG. And they can and are 'all over the map' when it comes to "how much metal was removed". I don't have the luxury of following through with my own work all the time. Customers seem to carry in an arm load of parts to be "put together" these days, and those parts come from everywhere. The coaxial indicator,,,,,,known as a centering indicator in every machine shop I've been in over the past 40+ yrs. ,,,,,, machine shop slang, like a parting tool is known as 'a cut-off blade' to those on the shop floor. I do have the luxury of having the machine tools to make/fix what I might need. You can't see it in the pics I posted, but that lug has been surface ground on both sides before adjusting the 'hole' size. I've got two coffee cans of factory Rem. barrel brackets (recoil lugs) left behind by those who thought they needed a thicker, custom lug. With a trip to the surface grinder those factory lugs become just as flat as those sold as 'custom'. There's really no need for the lug to be thicker, but it makes a good selling point for those who make and market those "custom lugs". I used to enlarge the hole by holding it in a 4 jaw chuck, like you do, until I thouht it through. By grinding it first and fastening it to a flat jig that gets placed in the milling vise in the same fashion as it was made, I 'm insuring the hole to be 90* to the flat sides (at least within minutes of 90*). No possible 'bind' when installed, that way. I made that jig more than 10 yrs ago and it was worth the time to make it.
 
I love building tools and fixtures to help do a better job. No criticism was meant.

About factory lugs though. Have you ever tried putting a tenth indicator up against a factory lug secured in the action and barrel like they are supposed to be? I can flex it with my thumb. Not much but I can. A .250" lug I can not. .250" lugs just seem to make the rifle feel much more solid under recoil. I'm sure I could never actually feel the difference in a blind test but knowing the lug is not flexing as much makes me think the flex and vibration is helped dampened by the heavier lug. I throw factory lugs away. Same as take of barrels. Even if they were worth using the time spent reconditioning them is far more valuable spent in rifle production. If I were to do all what you are doing to a lug I would have to charge $75 for that blueprinted lug. Holland hand delivers precision hardened lugs to me for 1/3 of that.

When you lay 20-24 lugs on that magnetic chuck and grind them all at once you're "makin' time". Takes no more than 15 minutes to do both sides. To do them one at a time wouldn't make any sense. As for boring the hole on the jig,,, 10 minutes max. Properly bedded and torqued, one would never know the difference between "custom" and prepped.
 
I made a recoil lug on a mandrel in the chuck of a rotary table on the mill table.
I used flat steel.

It was uniform thickness, until I tried to remove the burrs with fine wet/dry paper on a flat surface. My fingers pushing down on the narrow part of the ring with the same force as the fat part of the ring, made higher pressure on the narrow part. It was quickly out of flat by a couple thou.

I won't make that mistake again.
 

Attachments

  • Using rotary table on mill to make Rem 700 recoil lug b 2-29-2012.jpg
    Using rotary table on mill to make Rem 700 recoil lug b 2-29-2012.jpg
    108.8 KB · Views: 213
Warning! This thread is more than 9 years ago old.
It's likely that no further discussion is required, in which case we recommend starting a new thread. If however you feel your response is required you can still do so.
Top