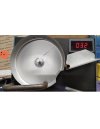
My home made annealer. Thoughts?

Use the paint in a bottle with the brush-- not the pens.

Brush a little inside the neck-- once it's in the flame and up to temp the paint turns a dark gray -- that's when you stop heating. The paint turns to an ash like substance and brushes out easily with a bronze or nylon brush in 1 or 2 strokes. I use it on about 5 cases until I get my timing set right-- then just leave the speed and flame alone while I do that batch of cases.

Do some homework on temps-- most guys run the 700,750,800,or850 paint-- you'll have to decide what's right for you.

Some guys also use a lower temp paint near the head-- but I've never had any issues with heat migrating towards the head. Some guys drop into water- I've never used that method either. You'll have to decide what's right for you as there serm to be several thoughts on what is the right way.
I have the bottle with the brush. I was afraid to put the paint on the inside of the neck because of the "stain" I was getting on the outside when I used it. I wasn't sure how that may affect seating and firing of the bullet. Of course, that stain may only be there because of direct flame applied to the paint. I will try the inside of the neck and see if it wipes clean afterwards. Thanks!
 
If it works it works. I say send it man. I built a flame annealer and it served me well for years. Recently built a induction annealer and will use it. The challenge with flame is just the consistency of it all but it works for sure. Good for you tinkering, I love home brew gadgets.
 
Simple is good if it is repeatable.
I have a almost new Annealeze that doesn't rotate the cartridges without skipping (no traction). The socket and torch method still works great until I can replace the wheels with something that rotates steady.
Clean the blue wheel with brake clean and make sure Yur is also free of residue
 
I copied a DIY annealer and have been using it for about 4 years now, works great, same concept as the OP's. Get the flame set and then adjust the speed, I do use dummy cases with tempilaq on the inside of the necks for reference.
 

Attachments

  • FD3240ED-464C-4134-A681-FCC303EDB15B.jpeg
    FD3240ED-464C-4134-A681-FCC303EDB15B.jpeg
    93.8 KB · Views: 67
Simple is good if it is repeatable.
I have an almost new Annealeze that doesn't rotate the cartridges without skipping (no traction). The socket and torch method still works great until I can replace the wheels with something that rotates steady.
I had that same issue. So I first cleaned any case lube off the cases and the wheels with powder blast on a rag. So far it seems to do a good job.
 
Simple is good if it is repeatable.
I have an almost new Annealeze that doesn't rotate the cartridges without skipping (no traction). The socket and torch method still works great until I can replace the wheels with something that rotates steady.
Can you add traction? Maybe a rubber strip that has the adhesive strip on the back?
 
I built one similar, I also did the digital speed controller. I had plans to do the case feeder and everything also but it honestly goes so quick that I never bothered so I just stand there and feed them onto the ramp one at a time. Roughly 6 seconds per case the way I run it.
 
I stopped annealing when I started noticing higher ES. Consistency is what reloading is all about and even though that contraption worked well I didn't feel it annealed as consistent as desired.

I resize as little as possible and usually get 8 + loadings before I see ES fall off. Then if necks are in will anneal and see where they are at. If decent I keep if not start over.
 
Boy those prices have changed for that set up! :)
 

Recent Posts

Top