Muzzle brakes that don't blow off

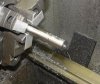
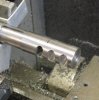
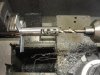
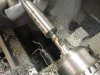
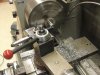
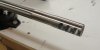
Timing is next. The first photo is where the brake started. I view the brake and barrel as a clock face. The black line on the barrel is top dead center. The line is at 12:00. The brake is at 10:30. I divide one by the thread pitch. In this case, twenty eight threads per inch. This gives me .0357 per revolution. I divide this by twelve to get my clock face (.0029 per twelfth). I now multiply by 1.5 to get the brake to top dead center. I take .0044 off the barrel shoulder. In practice, I would take .003, test fit, and approach the final cut carefully. The brake has been timed in the second photo.
 

Attachments

  • timing1.JPG
    timing1.JPG
    41.5 KB · Views: 97
  • timing2.JPG
    timing2.JPG
    38.9 KB · Views: 90
I check my dial in before cutting the crown. This crown has two steps. The main cut is eleven degrees. The second cut is a tiny forty five degree chamfer. All cuts are made from the center out to avoid pushing a burr into the bore. The tiny chamfer breaks the sharp edge so the crown doesn't wear quickly, and provides a very visible indication the crown is perfectly concentric to the bore.
 

Attachments

  • crown1.JPG
    crown1.JPG
    40.3 KB · Views: 92
  • crown2.JPG
    crown2.JPG
    34 KB · Views: 81
The brake is now bored to the correct size, and chamfered. I start with a centering drill, finish with a drill bit or chucking reamer. I cut the brake bore .020 over bullet diameter. Clearance and alignment is checked with the indicator rod.
 

Attachments

  • brakebore3.JPG
    brakebore3.JPG
    33.7 KB · Views: 96
  • brakebore2.JPG
    brakebore2.JPG
    39.5 KB · Views: 73
  • brakebore1.JPG
    brakebore1.JPG
    36.2 KB · Views: 82
The brake is now chucked in the lathe, dialed in off a mandrel, and tapered to match the barrel.
 

Attachments

  • braketaper.JPG
    braketaper.JPG
    38.7 KB · Views: 90
The threads of brake and barrel are cleaned. Anti seize is applied to the threads to prevent galling. Sorry, no red lock tite or JB weld. The brake is installed and torqued on.
 

Attachments

  • brakeinstall1.JPG
    brakeinstall1.JPG
    32.5 KB · Views: 87
  • install2.jpg
    install2.jpg
    64.5 KB · Views: 77
The barrel and brake are now blended and polished to 320 grit. I use a barrel spinning jig and a belt sander.
 

Attachments

  • blend.JPG
    blend.JPG
    27.7 KB · Views: 118
Here's the installed and blended brake. At this point, the brake looks like part of the barrel. The crown is within .020 of the first baffle to enable cleaning. There are two more steps for this install. I will relieve the sharp edges of the brakes baffles and finish with a satin bead blast.
 

Attachments

  • done.JPG
    done.JPG
    29.2 KB · Views: 79
Honestly, thanks for putting in so much time to let us see your whole process. It was super easy to understand and see every step along the way.

I'm with Clayne, I look forward to any future threads like this one.
 
A barrel spinner and a belt sander huh? I wondered how my gunplumbers got an invisable seam on some of my brakes. I lernt sumthing. Good post! Next time you chamber a barrel show us how you do it. Or better yet, I should come down and watch.
 
Warning! This thread is more than 12 years ago old.
It's likely that no further discussion is required, in which case we recommend starting a new thread. If however you feel your response is required you can still do so.
Top