Howa Trigger adjustment How to.

Kiwi Nate

Well-Known Member
Joined
May 18, 2007
Messages
188
Location
Taranaki New Zealand
This is a basic tutorial for folk who have tried to adjust the M1500 trigger or Weatherby Vanguard (same unit) below 3lb with minimal creep but have run into trouble with the safety operation. Obviously, a degree of mechanical aptitude is required for this. The main priority must always be towards avoiding the creation of an unsafe condition within the firearm. I accept no responsibility for the misuse of this information and the instructions here are not endorsed by Howa. If you stuff this up, somebody could die, doesn't get any plainer than that.

Right, with that out of the way, lets get to it.

Howa%20action.jpg


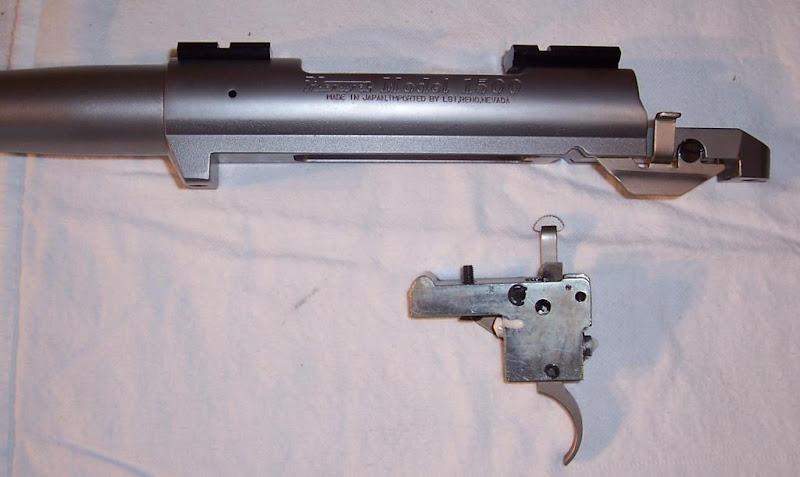
The M1500/ Vanguard trigger is designed to have a range of adjustment for both trigger pull weight and sear engagement. From the factory, the trigger is usually set to around 7lb along with a large degree of sear engagement which is felt as trigger creep. As set by the factory, it is difficult to shoot accurate groups with this trigger. The factory Howa trigger will eventually induce flinch in most people.

The trigger can be adjusted for minimal sear engagement by screwing clockwise the screw at the rear of the trigger unit (Metric thread). As the screw is turned in, this increases the pull weight of the trigger as it forces the trigger forwards.

The pull weight can be reduced to whatever weight is desired by undoing the nut and turning the screw anti clockwise however as the pull weight is reduced below 3lb, along with the change in sear engagement, the safety mechanism is rendered inoperable.

To remedy this, the trigger must be modified so that the safety mechanism is once again operable within the desired pull weight and sear engagement range.

Before starting this modification and having adjusted the pull weight and sear engagement to the desired range, the action should be cycled as fast as possible on an empty chamber to check for potential slam firing from poor sear engagement. If the sear is not engaging during rapid cycling, the sear should be altered now to avoid removing too much stock later.

Howa%20trigger%20mechanism%20in%20detail.jpg


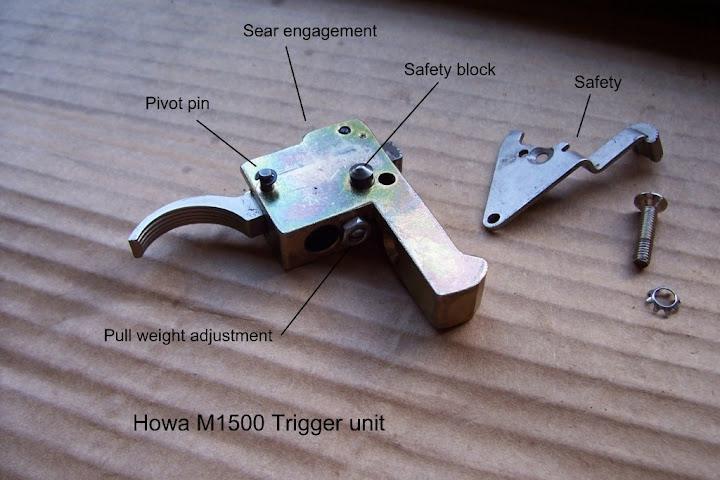
The safety on the M1500 consists of a spring loaded blocking pin. In the fire position, the block sits in the right side wall of the trigger unit and allows the tigger to move forwards. Once the safety lever is engaged, the block is forced left through and into the trigger unit, blocking the forwards travel of the trigger.

If the sear engagement has been adjusted down to a minimum level and the trigger lightened to 2lb, the trigger will now be so far forwards that it is now blocking the safety block pin from entering the housing. To get the safety working, material must be removed from the front face of the trigger.

NOTE: IF TOO MUCH MATERIAL IS REMOVED, THE SAFTEY WILL NO LONGER WORK.

Howa%20trigger%202.jpg


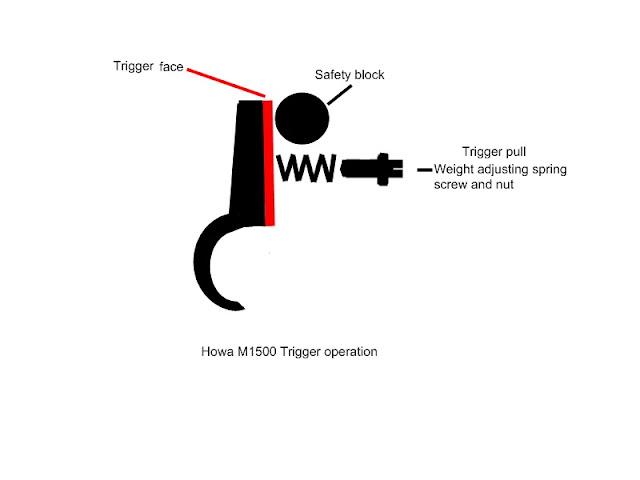
Remove the pivot pin from the trigger housing and remove the trigger. Place sand paper on a bench or use a stone. Lay the trigger flat against the abrasive and begin honing the front face (marked in red on the picture above). A very light skim is all that is needed on some units, others need a bit more stock removal. The most important task during this stage is to refit the trigger every few strokes over the abrasive and check the safety operation. The other thing to check, silly as it may sound, is that you are indeed honing the front face of the trigger and don't have the trigger around the wrong way.

If the honing is done slowly/ gradually, it is not a "heart in your mouth" or as we say in NZ, "a##s puckering experience". If the job is rushed, such as with a disc grinder and 120 grit fiber discs, the job can be ruined in seconds. The safety should go from- not working at all, to- stiff and cannot be disengaged to- smooth yet safe. In this respect, you do not have to go from say 180 grit to 400 grit every time you take more stock away. Simply keep with 180 grit paper testing every few strokes, until the safety is working but slightly tight, then move to the finishing grits. 400 grit is ample but those who have polishing mops may want to give the job a final lick.

As the safety becomes smooth and operable, it is important to cock the rifle on an empty chamber, engage the safety and pull the trigger with extra force to check the safety.

Once the rifle is reassembled (but no scope), switch the safety to fire and slam the butt of the rifle against a block of wood or work bench, lightly at first, increasing force in a bouncing style motion to duplicate dropping the rifle in the field. Don't go overboard with this, use common sense to avoid stock breakages.

If too much stock is taken away, the trigger face will need to be built up again with either weld or spray metal weld. The rifle must go to a gunsmith who is able to either perform these operations or outsource them, followed by re-heatreating and quenching the part. With trigger faces/ sears, if no other knowledge of the parent material can be found, it is (in my experience) best to use 2205 (duplex) filler wire and case harden the part with casenit then oil quench. 400 series filler wire is probably a better bet however 2205 has a slightly less brittle nature for these jobs and case hardens well (small parts). The part should be file tested before final fitting.

These instructions might sound a little confusing but when the job is in front of you, you will see its not too big of a deal.


Cheers, Nathan.

Disclaimer/ WARNING: The views and opinions expressed in this article are solely those of the author and are not endorsed by any manufacturers. Terminal Ballistics Research and the author take no responsibility for the use or misuse of any views, opinions or information expressed in this article.

 
Last edited:
Outstanding write up Nate! Thanks for posting and glad you put the pics up. That is exactly what my 1983 S&W M1500 receiever and trigger assembly look like. In my case, all I had to do was let out the trigger pull weight screw to the desired weight, which I'm guessing is, 1 - 1 1/2 lbs. It is very crisp and absolutley no creep. Very sweet! I have done the usual "safety" tests. Quick cycle slamming the bolt several times, safety on and off, slamming the rifle butt down onto a carpeted floor (without breaking the stock), trying to pull trigger with great force while safe is on. Seems to work fine and I am very pleased with it.

Side question... how do you like the in-built recoil lug in the receiver design vs the Rem 700 recoil lug design?

Thanks,

Mark
 
The recoil lug is easy to bed but better still, easier to break out of the bedding when its time to seperate the barreled action from the stock after the compound has cured. The bedded area of the lug is easy to inspect for crumbs etc. Ultimately, its kind of foolproof with regards to accuracy potential. I can't say whether I find the M700 lug better or worse. That said, when I bed an M700, I always disc a taper on the sides of the lug and at the bottom of the front face (am having trouble typing on the laptop here as I have a 130lb Boar trying to cuddle me!- big ginger doof)

As for accuracy. I haven't had a Howa or Vanguard that didn't shoot sub MOA after bedding. The only problem I have had is with the most recent run of Howa rifles (2009) (see the receiver markings in the first pic regarding the importer), the bores have not been finished to the usual high standard. These rifles give a wide fcouple of fliers on the first 1-2 fouling shots, a couple of sub MOA groups, then groups open right up again. The Bore then needs to be de-fouled and hand polished with an abrasive. In other words, the shooter has to bring the Howa bore up to a final finish which once done, results in an excellent rifle.

It is very frustrating for shooters who don't understand the effects of fouling. I am gussing that the drop in quality is related to the recent recession. The Japanese are near obsessive compulsive when it comes to machining tolerences so this is why I have to assume that the only cut back in cost could be made in the final finishing process. Don't know for sure though.

The one thing I am kicking myself about is that I haven't sat down and had a look at whether the mag box and action could be altered with relative ease, to house full length magnum cartridges such as the STW, RUM's etc. The mag box has an internal length of 91mm and for smooth feeding, COAL should be 90mm or 3.54". I will have to wait till the next client rifle turns up before I can have a good look at this.
 
Last edited:
Thanks for the reply Nate - learning a lot here. I'm liking the Howa's more and more. My S&W M1500 is a solid piece of work and the bolt works very smoothly.

In your article you linked in the other thread you reviewed number of rifles and how you dealt with their accuracy problems. I have a Sako M85 Finnlight 300 WSM that is a problem child. Groups (if you can call them that) range about 1.5 - 4 MOA with most around 2 - 2.5 It shoots erratically both factory and handlods. It's been the the factory twice and sent back saying it's fine which is BS. I think it may be the recoil lug design and or a bedding issue and or the barrel. Have any ideas?

Here's a thread I post on the recoil lug....

http://www.longrangehunting.com/forums/f19/no-recoil-lug-what-say-ye-49659/

Cheers,

Mark
 
Well, lets dispense with the BS part of your problem. A shady factory or importer can do a few things to shoot a good group and make your life a misery- after all, you are merely the inconvenient customer.
1. Take the rifle out of the stock, set the action in a test jig and shoot a tight group.
2. Simply shoot the rifle at short range.
3. Use an underpowered ammo that is sure to produce lower harmonic vibrations.
4. Make efforts to erode the customer's self confidence by introducing shooter ability accusations.
5. Tell customers that a rifle need only be minute of deer but not ever explain what minute of deer means.
6. When all else fails- Have a temper tantrum at people like me during a trade show at around 6am before the punters arrive- for helping shooters understand the difference between rifle problems versus human error.

Now, about that Finnlight.
I was kind of lucky, I had both a normal contour M85 and a Finnlight on the bench at the same time, a chance to observe both.

Historically, there have been a lot of complaints about the Finnlight. The rifle I had on my bench, shot exactly the same as yours. The wood stainless (heavier version), seemed to shoot around 1-1.5 MOA but the owner wanted it bedded to avoid any future problems with moisture/ warping etc. I think it was the right thing to do.

I bedded both rifles and learned a lot from the excersize.

You are dead right about the lug set up, with regard to the new magazine release system and its negative effect on the bedding surface. The extra metal has the potential to cause great problems. If the bedding is pinching in this area, even minutely, groups will open up. So, the first thing is to make sure that the bedding is as correct.

When checking the bedding over(am talking about after epoxy resin bedding), start at the tang and check firstly for relief at the rearmost of the tang. After this, observe the actual stock fit along the sides of the action back to the tang, warpages within the plastic mold, tight areas. The Sako is made to "look aesthetically pleasing" so the stock to metal is often too tight. If you find pinching, relieve it.

Next, check the fit of the bedding around the recoil lug area. This rifle is difficult to bed in that the action sidewalls are parallel with no taper. Parralel metal has the potential to pinch. One has to be very careful to avoid either too tight a fit, or too loose a fit. The old favorite Kiwi clear boot polish (instant wax shine) is no good as a release agent for the Modern Sako rifles. Not that it matters, Kiwi have discontinued making this product. The latex release agents and tougher polymer release agents are much better. I use/ supply a polymer.

OK, here is a terrible pic. I have used the Howa M1500 action and doctored the pic a little, to make it look like the Sako- albeit in the roughest manner.

The added green rectangle is the problematic bottom material/ magazine release we have been chatting about. The color green denotes that I would prefer to use masking tape to relieve this area. All the masked areas are correct. Any area not masked, should be relieved with a thick release agent.

Mock%20Sako%2085.jpg


If you have a rifle that has been bedded by another person and is pinching throught the sidewalls of the action, scraping or sanding won't work. The epoxy resin needs to be bead blasted to obtain a better fit. Either this or start again. I learnt this by doing an incorrect job on a Sako (not enough relief). I used blasting as means of relief and testing- was able to watch groups shrink down.

Barrel issues.
The barrel on the Finnlight is a potential problem. On the two rifles I had side by side, once bedded properly, the heavier barrel jobby shot .9 with Federal factory ammo, better with handloads. The Finnlight seemed to shoot no tighter than 2.5MOA, pretty much where I had started from (was starting to sweat).

After a lot of experimenting/ double checking/crying to wife- I discovered that the Finnlight barrel shot very tight groups as long as the barrel was cool. By cool, I mean cold shot cool. I could shoot between .8 and .9 as long as I shot the group over 3 minutes. The barrel was the only difference between the two rifles, the bedding was the same, checked over- dye tested for contact etc. It is my conclusion (after seeing further complaints), that Sako are not yet capable of creating an ultra light weight barrel capable of sub MOA groups when three shots are fired within less than a minute.

When things get to this stage, you have to make some bigger decisions- Rebarrel, adopt a muzzle brake perhaps. Auprressor is out becuase of the fluting. There is a lot to think about, even the simple question of whether you still like the rifle after what it has put you through.

European engineering has been suffering from a few problems of this nature over the last few years. Some of the designers/ draughtsmen, try to out do each other with regard to 'innovation'. Square toe high polished leather shoes, fine coffee, a knowledge of fine wines and silly terms such as woody, nutty with hints of chocolate. Designer glasses, morning meetings, collectable coupe vehicles- these are the tools of some of our great thinkers in the gun design world.

Few people seem to understand that the term innovative, in modern engineering, should reflect simplicity, efficiency and effect.
 
Last edited:
A lot of good info there Nate. Much appreciated. Yeah, I've been through the hoops with the Beretta folks. Their strategy is to blame it on copper fouling which they did in my case saying they had taken "a lot" copper out of my rifle which was total BS. When a patch comes out white after a good long soaking of Wipeout, there is no copper in it as a locla gunsmith has confirmed to me after borescoping a couple of my rifles. And this is the way Isent it to Beretta - with a spotless bore. It made me irate, especially the second time and a 3 page letter with it. Then of course they questioned the scope, shooter, recoil, etc,. to which I replied that I was using a NF NXS and had shot sub .5 MOA groups at several hundred yards with both my Sendero 25-06 and 300 RUM (mega recoil) with same scope. But there was no way they would admit fault with their rifle. But enough of that rant.

I think it would easy enough to make a simple mod to their design and build in a recoil lug similar to Howa's design even with their magazine deal.

The injection molded stock fits very snug and maybe a very slight pinch. There is little to no room for any epoxy bedding unless I remove a lot of material. I did do some sanding arount the bolt channel and the plastic material seems to be fiberous. It seems fairly stiff and stable to me and the forearm supports a good bit of weight on a bipod with out closing the gap between the stock and barrel.

I really, really like the action. It is silky smooth (and the trigger too) and if it was a shooter I would keep it. As it is, I am leaning to sell it because I dont see much future in trying to modify it or build off of it because of the convoluted lug design. I am thinking about getting another lug piece to replace what they is there but the locla machine shop estimated $250 for the work because of the set uop required and all the intricate angles and cuts. That's alot of $$$ for what would basically be an experiment. What I am thinking of doing next is taking some electrical tape and wrapping it around the barrrel near the sling stud until it provides some pressure from the stock. If that works, I'll figure some way to build in a pressure point in the foearm of the stock and see if that works. If it does, it's a keeper or at least I could sell it for a good price with a good conscience. if not, I'll probably just sell it as is and get what I can for it and let the buyer know it's history.

Thanks again for the feedback.

Cheers,

Mark
 
Hello guys... I'm new here and joined just to tell you guys this. Here's the best kept secret about the HOWA M1500 trigger. You can adjust the trigger right down without having to modify the trigger face to enable the safety. All you have to do is when you run the bolt open, pull the safety back to the middle position (bolt free/trigger safe) while the bolt handle is lifted and before you chamber the next round. Now close the bolt. You can now—as normal—either pull the safety back further and lock the bolt and have the trigger safe, or you can push it home ready to fire the gun. You can re-engage the safety again in a cancel situation, so long as you made it safe initially before chambering that round.

It's a product of having "cock on open" function as opposed to cock on close like the Mauser Argie. To that end you can also relax the pin without dry-firing by lowering the bolt handle from an up position while holding the trigger in "fire" position.

Hope this helps.

-=TPR=-
 
I tried to do this on my Vanguard 22-250. I removed 0.010 inches of material and it rendered my safety inoperable. The tolerances are very close and as the OP mentioned, make sure to be patient and only remove a very small amount of material at a time! I am guessing a few thousandths of an inch is all that is required.
Be Advised.
 
hi people,
refering to make the tigger 'ligther' that is to lessen the wheigt of it, I tried instead of remouving material from the tigger, replacing the spring of it, by a lower pressure one,- taken fron an automatic pen- their measures are 4mm diam., by 8mm long and it fixes ok,
I've tried it with empy cases and it works smoothly and very very light, too much perhaps, This afternoon I'll try it at the range, and make some comments, tomorrow
laters,
 
Hi Nathan

I live in Northern NSW, Australia. Thanks for the info on the Howa trigger adjustment. I have been shooting for 50 odd years, and because of raising a family etc, (read perpetually broke) I have only recently acquired what I call a modern rifle, which is a 0.204 Howa 1500, with a Hogue moulded stock. I have had many 22';s. shotguns and 303's. I have done everything to the rifles, like adjusting triggers changing parts etc.
The new Howa has a smooth but heavy trigger, and thanks to your tutorial, I will address the problem. I would like your opinion on 2 questions.
Is it worth bedding the action into a Houge Stock?
And how does one polish the bore? Mine is the same as in your photo, imported by dealers in Reno. I have not shot the rifle yet. I have been waiting half a year for a Meopta scope. Any comments re those 2 questions would be appreciated Thanks. Peter, Nimbin NSW.
 
hello guys,
after shooting a couple of hundreds rounds trying the trigger pressure with the replaced spring from a pen, I find it very comfortable, about a pound of wheigt, and the safe working ok, think it's good for the range not very safe for hunting
growler, there are many threads about the barrel polishing but it's a matter of patience, clean the bore make the first shot, clean again the first 10 and after 3 groups rounds the next 50, you have a good task to do.
merry christmas!!!!
 
Is it worth bedding the action into a Houge Stock?

Thanks. Peter, Nimbin NSW.
I bedded just the recoil lug of my Weatherby Vanguard in a Hogue youth sized stock for my daughters. It was not difficult using Devcon, but note that you can't bed to the rubberized coating as nothing will stick. Some bedding material around the recoil lug is really all you will need. The rifle shoots very well at this time so I see no need to do more.

And, with a Howa/Vanguard action don't forget that you do NOT put tape on the bottom of the recoil lug.
 
Hi Growler, sorry for the late reply, been having a Christmas break.

Yes, the Hogue stocks need bedding. Also, you will find that only one bolt locking lug will be touching and due to the play in the action, the rearward bolt thrust will be suffering a degree of yaw. I have highlighted all of these details in my book, the Practical Guide to Long Range Hunting Rifles.

The barrels on the post 2011 Japanese earthquake rifles are very hit and miss. Some are so badly marred internally that they cannot be saved. By the time the circumferential burrs are smoothed, the bores are oversize. I have detailed polishing methods in the barrel break in article on the Terminal Ballistics Research website. There are also bedding instructions relative to Hogue stock on the site with regard to our MatchGrade bedding compound.

If/when you need further help, please email or call by phone. We can work through the job one step at a time.
 
Warning! This thread is more than 8 years ago old.
It's likely that no further discussion is required, in which case we recommend starting a new thread. If however you feel your response is required you can still do so.
Top