Bedding a howa mini

snox801

Well-Known Member
Joined
Sep 19, 2012
Messages
5,287
Location
Spring Lake Michigan
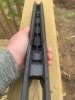
So bedding is kinda easy but I did my first howa mini. The front action screw goes through the recoil lug. So very tough to keep it out of the screw. So I got it very good the first time by letting the jb weld set up a bit. Then waited a day and did a final job filling in any spots left without and bedding the chamber area of the barrel. I'll try and grab some pics tomorrow if I didn't weld it the the stock. Lol
First one came out fine.
 
There is an easier way......

Get some studs such as in the photo from your local hardware store. If you cant find any with a hex head or slot head, cut off the head and cut a slot head in them like this. Put plenty of release on them. After applying release and clay to the action in spots you don't want the bedding, drop the action (studs installed) into the bedding compound.

Also, while more expensive, Devcon is easier to work with than jb weld, because it is thicker. Jb weld tends to run and leave some voids, and is also not as tough as devcon. It still works however.

This is an 03 A3, not a howa, but same idea. I do all my action bedding jobs with studs installed prior to dropping the action in. Epoxy compound inside the action is a bad thing.
20190521_101704.jpg
20190519_211226.jpg
 
Oh wow that's awsome. Great idea I will steal that on my next one. I just did jb because it's hard to find Devcon around here. Used to use it on motors all the time but haven't found it locally in a while. May have to get in the internet machine and track some down.
 
https://www.amazon.com/gp/product/B072XTJRLF/?tag=lrhmag19-20

They don't have it around here either unfortunately, so I get all mine through amazon. I used jb weld on a few for the same reason, but never went back after trying devcon 10110.

Ya it makes it nice for doing pillar jobs too, just use the action screws and screw the pillars to the action, no release on the pillars of course, and drop it into the action with bedding material. Here was my most recent pillar bed job
20181229_191653.jpg
20181229_191613.jpg
20181229_191636.jpg
 
That is some fine work. Lol maybe I shouldn't post mine.
I just enjoy playing with this stuff so my new house is gonna have a room dedicated to small gunsmithing stuff and reloading. All the stuff I wanna do now but no room in my shoebox.
 
No absolutely post yours!! I tell ya what, I have bedded many rifles prior to getting it figured out and getting a system, I have my share of hack jobs ha ha!!! I have stuck an action and had to drill off a screw head, and other things ha ha. Posting threads like this with pictures is how I learned. Lots of people smarter than myself have given me some great advice to help me improve my work!!
 
Man yours look so good. Last one I did worked great function wise but didn't look great when the action was out. I'm tend to be very good at hands on projects and wanting it perfect leads me to think I can do better but usually I end up making it worse then starting over. When I pop or if I can get it popped out tomorrow I'll post some pics. It's a 300 yard and under gun so I'm hoping it helps.
I will say my many years or porting race engines for sleds and bikes makes opening up the channel look great and easy all with a small grinder.
 
Well I popped it out this morning. Little sticky had to wrap on the bolts a bit with dead blow to get it loose then rock it back and forth gently to get it free. Not as nice as yours for sure but I havent done many and first with jb. I have a bit of clean up to make it look better but it should be very functional.
 

Attachments

  • 24504529-6785-458E-B02F-81B38FA57821.jpeg
    24504529-6785-458E-B02F-81B38FA57821.jpeg
    1.3 MB · Views: 556
I think there's an even easier way to bed the Mini. Pillar it first, then bed the action. I've relieved all around the recoil lug and at the tang (leaving a tiny bit at the rear of the hole for elevation location), but left all other wood in place. I'll remove under the action after the pillars are in.

I do not understand the use of the steel filled Devcon. I use the aluminum filled, and while I've only done a couple bedding jobs ever I feel that the aluminum filled is the better choice. Choosing the steel filled isn't going to achieve an exact match to the receiver in thermal expansion, it technically can rust (though I doubt that it does), and it is slightly heavier.

Are you going to fill that forearm to stiffen it?

BTW, the Howa Mini action screws are M6 x 1.0
 
has anyone else heard of "stock maker's screws"? they works so well for bedding, you can put them in before you set the action and barrel into the stock with the bedding compound. the only way to go. you can get them at Brownells and some other places.
 
I've seen those. If I end up doing more of my own I will buy a set. This was just a gun quick project. I didn't plan to fill the end. It's surprisingly stiff.
I planned to do it based on the other howa and rugers I've had but this is pretty stiff and I can make it flex enough to touch the barrel so I'll leave it empty for now to save some weight. I really didn't need to do this it was just fun to try out. This gun was cheap and only gonna be used for 300 yards so I was already shooting good. But between this and the 99gr hammers it should be pretty cool. Gonna give it to my dad for his walking deer gun.
 
Well I popped it out this morning. Little sticky had to wrap on the bolts a bit with dead blow to get it loose then rock it back and forth gently to get it free. Not as nice as yours for sure but I haven't done many and first with jb. I have a bit of clean up to make it look better but it should be very functional.
did you create "mechanical locks" for that polymer stock? -- polymers have oils in them and over time the bedding compound will break free if you don't create mechanical locks for the epoxy to "hold" on to

epoxy's will bond to wood, fiberglass, and carbon fiber stocks, but polymer stocks need a mechanical bond
 
I do not understand the use of the steel filled Devcon. I use the aluminum filled, and while I've only done a couple bedding jobs ever I feel that the aluminum filled is the better choice. Choosing the steel filled isn't going to achieve an exact match to the receiver in thermal expansion, it technically can rust (though I doubt that it does), and it is slightly heavier.
The steel putty has less shrinkage and finishes harder. It is not a huge difference, but it is a difference. The weight difference is slightly over half a gram per cubic cm. However if someone was very picky about a light build they could look at the titanium or aluminum. While it may not match exactly, steel putty will match a steel receiver for thermal expansion better than aluminum would, aluminum expands and contracts much more than steel does, the coefficient of thermal expansion for aluminum is 2.73, where as steel is 1.63 (and titanium is 1.0). I have stocks with bedding 10 years old used for hunting and have been exposed to the elements, and I personally have never seen any rust. Not saying it can't happen, I just haven't seen it.

Not saying that any of these would make a huge overall difference in a bedding job, it's just why nearly all custom rifle builders use Devcon steel putty vs. other epoxies.
 
Warning! This thread is more than 5 years ago old.
It's likely that no further discussion is required, in which case we recommend starting a new thread. If however you feel your response is required you can still do so.

Recent Posts

Top