jreagle
Well-Known Member
i am no expert; here is what i have learned after 5 rifles..... a couple of points that IMO might make things proceed a little easier..... sorry for being so wordy.... this got away from me....
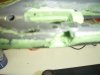
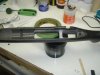
devcon 10110 is my favorite with kiwi clear paste polish and blue painters tape...... the videos online show what needs to be done as well as good advice here.
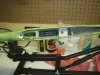
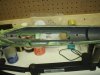
Mostly just bed the recoil lug, 1" -1 1/2" in the barrel channel under the chamber and tang on my rifles
I found a thread a few years ago from Broz on the weatherby.dk forum..... he popped the stock off the action after 3.5 4hrs (no more) cure time at 70F. the devcon has set up but is still soft enough to trim the globs off of the stock with a blade; no sanding just trimming. He also let the stuff harden for longer than 24 hrs. before firing the rifle.
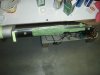
at this point i dont put the action back in the stock once i separate for trimming off the globs of Devcon, just clean up the barrel and action, trim the globs with a razor and make sure the action screw holes in the stock are free; then maybe start a copper cleaning of the barrel and a good cleaning of the action while waiting for the Devcon to fully cure.
be generous but not over generous with the Devcon and do not rush the prep.
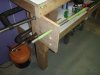
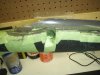
i use wide sneaker strings around the action front and rear to hold it together (after lightly squeezing out a little of the bedding compound), rifle on front and rear bags fairly level while curing.
sometimes i get a bubble or many under the chamber after waiting the 4 hours and popping the action off the stock; never seem to estimate getting enough under there to have globs squeezed out upon assembly. so, will mix up some more devcon, fill the holes and a little extra, apply more release agent to the barrel and tang widely around the area aligned with the bulbbles put the stock and action together and let cure 4 more hrs with receiver screws lightly tightened (light 2 finger grip on the screw drier) to make sure there are no high spots in the newly applied to areas; then seperate and trim if needed. the rest has setup enough to accept some light pressure from the screws at this time.
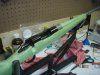
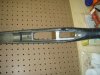
taping the barrel with a few wraps helps center and free float it in the barrel channel.
test fit everything before applying the Devcon.
White vinegar on a paper towel or q tip is good for cleanup in the 1st half hour or so, in case some Devocn accidentally gets on the stock or any place else.
one more thing to check.... Recoil lug - some are perfect and some are not.
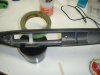
measure the width and depth (left to right, then front to back) of the recoil lug on top near the barrel and at the bottom with a good caliper. If the bottom is wider than the top you will have a mechanical lock when the devcon sets up and will not be able to separate the barreled action from the stock. the lug is wedged in at this point. Prepare the recoil lug by using painters tape on the sides of the recoil lug, and the front if needed, from the top down about 1/2 to 3/4 of the way to make the top of the lug just a little wider than the bottom. Measure twice to make sure you have neutralized the mechanical lock possibility. Some guys use tape on 3 sides of the lug to make the assembly and disassembly after the process easier to take apart. Never apply tape on the back of the recoil lug; this is the recoil bearing surface when firing, the area the bedding job will make a 100% contact point for stock and recoil lug.
some remove the trigger if bedding near the tang and sides of the action. I have taped all around the trigger completely sealing it from any Devcon leaking into that point of least resistance in the trigger cutout where the trigger mechanism resides.
making sure the receiver screw holes are centered with the holes in the stock is another spot to look at carefully. Some recoil lug cut outs in the stock have some space forward that the Devcon will fill out. it may be possible to have the stock and receiver holes misaligned a little if doing this blind where too much devcon slips in behind the lug. sliding the lug into the cutout with a little pressure on the back of the lug as it slides down will strip away goop that gets there. but just incase though you can use a threaded rod, old set of receiver screws with the heads cut off or wooden dowels (chop sticks sometimes work) about 3" long screwed into the action screw holes. Wrap what is exposed with masking tape for a snug fit into the action holes in the stock. Apply release agent all over around the pegs and inside the holes in the stock. The pegs helps align everything and keeps devcon out of the action threads on the receiver and holes in the stock when you put the parts together and gently squeeze out a little of the excess Devcon. test fit this first before Devcon is applied to the stock to get a feel how it all goes together. as a precaution.
Always apply release agent in the action screw hole threads, it can be removed with alcohol and q tips afterwards.
devcon 10110 is my favorite with kiwi clear paste polish and blue painters tape...... the videos online show what needs to be done as well as good advice here.
Mostly just bed the recoil lug, 1" -1 1/2" in the barrel channel under the chamber and tang on my rifles
I found a thread a few years ago from Broz on the weatherby.dk forum..... he popped the stock off the action after 3.5 4hrs (no more) cure time at 70F. the devcon has set up but is still soft enough to trim the globs off of the stock with a blade; no sanding just trimming. He also let the stuff harden for longer than 24 hrs. before firing the rifle.
at this point i dont put the action back in the stock once i separate for trimming off the globs of Devcon, just clean up the barrel and action, trim the globs with a razor and make sure the action screw holes in the stock are free; then maybe start a copper cleaning of the barrel and a good cleaning of the action while waiting for the Devcon to fully cure.
be generous but not over generous with the Devcon and do not rush the prep.
i use wide sneaker strings around the action front and rear to hold it together (after lightly squeezing out a little of the bedding compound), rifle on front and rear bags fairly level while curing.
sometimes i get a bubble or many under the chamber after waiting the 4 hours and popping the action off the stock; never seem to estimate getting enough under there to have globs squeezed out upon assembly. so, will mix up some more devcon, fill the holes and a little extra, apply more release agent to the barrel and tang widely around the area aligned with the bulbbles put the stock and action together and let cure 4 more hrs with receiver screws lightly tightened (light 2 finger grip on the screw drier) to make sure there are no high spots in the newly applied to areas; then seperate and trim if needed. the rest has setup enough to accept some light pressure from the screws at this time.
taping the barrel with a few wraps helps center and free float it in the barrel channel.
test fit everything before applying the Devcon.
White vinegar on a paper towel or q tip is good for cleanup in the 1st half hour or so, in case some Devocn accidentally gets on the stock or any place else.
one more thing to check.... Recoil lug - some are perfect and some are not.
measure the width and depth (left to right, then front to back) of the recoil lug on top near the barrel and at the bottom with a good caliper. If the bottom is wider than the top you will have a mechanical lock when the devcon sets up and will not be able to separate the barreled action from the stock. the lug is wedged in at this point. Prepare the recoil lug by using painters tape on the sides of the recoil lug, and the front if needed, from the top down about 1/2 to 3/4 of the way to make the top of the lug just a little wider than the bottom. Measure twice to make sure you have neutralized the mechanical lock possibility. Some guys use tape on 3 sides of the lug to make the assembly and disassembly after the process easier to take apart. Never apply tape on the back of the recoil lug; this is the recoil bearing surface when firing, the area the bedding job will make a 100% contact point for stock and recoil lug.
some remove the trigger if bedding near the tang and sides of the action. I have taped all around the trigger completely sealing it from any Devcon leaking into that point of least resistance in the trigger cutout where the trigger mechanism resides.
making sure the receiver screw holes are centered with the holes in the stock is another spot to look at carefully. Some recoil lug cut outs in the stock have some space forward that the Devcon will fill out. it may be possible to have the stock and receiver holes misaligned a little if doing this blind where too much devcon slips in behind the lug. sliding the lug into the cutout with a little pressure on the back of the lug as it slides down will strip away goop that gets there. but just incase though you can use a threaded rod, old set of receiver screws with the heads cut off or wooden dowels (chop sticks sometimes work) about 3" long screwed into the action screw holes. Wrap what is exposed with masking tape for a snug fit into the action holes in the stock. Apply release agent all over around the pegs and inside the holes in the stock. The pegs helps align everything and keeps devcon out of the action threads on the receiver and holes in the stock when you put the parts together and gently squeeze out a little of the excess Devcon. test fit this first before Devcon is applied to the stock to get a feel how it all goes together. as a precaution.
Always apply release agent in the action screw hole threads, it can be removed with alcohol and q tips afterwards.