Reticle Perpendicularity
By Darrell Holland
Long range shooters go through great pains to properly set-up their rifles for long range shooting. Bipods, muzzle brakes, cosine indicators and a host of other widgets often adorn their newly created thunder stick. How many of them actually check to see that their scope reticle is perpendicular to the bore?
Often times they take for granted that the store clerk/gunsmith properly installed the scope and it is true to the rifle's bore? Others often cant the rifle and set the reticle to what "looks vertical" in their opinion? The resulting misalignment can cause problems when we engage targets at long range.
Over the years I've watched shooters adjust both elevation and windage in apparent dead calm conditions. When queried about the "extra windage" they dialed, the excuses ranged from rotational drift, to the Coriolis effect? Never once did they question the possibility that the reticle was not perpendicular to the bore. Rotational drift at 500 yards is minimal (approx. 1.5 inches depending upon caliber and bullet) and is of no real concern to the long range hunter. Can you judge point of impact that accurately under field conditions? Probably not?
The Coriolis Effect comes into play if we are shooting at extreme range, 1000 yards plus and is more than not masked by winds between the shooter and his or her target. The earth rotates at approximately 750 miles per hour ( easterly direction), take your time of flight and divide it into 750
miles per hour.
On to bigger and more important things. It is an easy test to determine if your reticle is perpendicular to the bore and requires less ammunition than shooting the BOX. We should all be shooting a quality scope who's turrets are 90 degrees apart and have taken the time to do our best in optically zeroing the reticle ( when setting up the scope mounts) liminating the dreaded erector tube windage/elevation movement when we make an adjustment with our target knobs.
Having done so, we can now move to testing our rifle and scope. Precisely zero the rifle at 100 yds. Staple a fresh sheet of cardboard or butcher's paper to the target backer. Using a 4 foot contractors level scribe a plumb line on our paper with a "Sharpie felt pen". Make this line 20-30 inches long and at the bottom of the line, scribe a horizontal line that will act as our aiming reference. For those of you who are artistically inclined we've created an inverted capital "T".
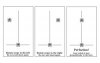
From the bench, align the reticle's vertical wire with the plumb line on the paper and aim at the intersection of our lines. Fire a single round and note its location. Dial 15-20 MOA of "UP" elevation in our scope and aim at the same reference line. Be sure the reticle is aligned with our plumb line on the paper and fire a second round. If all is well, our bullet should be within a bullet diameter of striking our line, indicating our reticle is indeed perpendicular to the bore. We have now confirmed that our elevation knob is tracking true to the centerline of our bore. Any extreme elevation correction will now launch the bullet inline with our intended target given a dead calm condition.
[floatright]
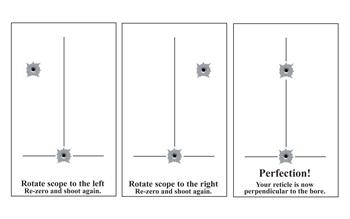
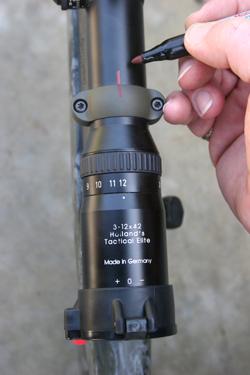 [/floatright]If for some reason the shooting Gods have frowned upon you and the bullet strikes 1-2 inches "left or right" of the line, a scope rotation is in order. We must first note the location of our scope to the ring cap, take the Sharpie pen and make a "WITNESS" mark on the scope tube and ring. We next loosen the ring cap screws and "rotate" the scope in the direction of our bullet impact. A slight rotation is all that is necessary, be precise in our rotation, a 1/32 or 1/16 circumfrencial rotation will make a big difference in point of impact. Re-zero the rifle ( yes, this is an important step and must not be overlooked) and repeat the above exercise until the bullet strikes our vertical line.** Don't forget to paste the old bullet holes!
You've now successfully confirmed that your reticle is perpendicular to your rifles bore. Slip the windage/ elevation knobs and set them to "0". Grab the bino's, Data Card and start searching for a distant target to shoot. You'll be confident that reticle perpendicularity is no longer a concern when you need to stretch the barrel on your next long shot!
If we take the time to be confident in our equipment by periodic testing and evaluating. We will eliminate our "equipment related" shooting slumps and can isolate areas that require our focused attention. Position, sight alignment, breathing, trigger squeeze and follow thru are area's we can ALL improve upon.
All too often shooters blame errant shots on equipment, ammunition, imperfect zero's and a host of other excuses. Often times we find that by retracting our eye from the ocular lens we can see the reflection of who is indeed responsible for the missed shot? You will never make any real progress in your shooting if you do not take responsibility for your actions...
Thanks again for the opportunity to share my experiences regarding practical long range shooting.
Darrell Holland is a Custom Riflesmith and designer of Advanced Reticle Technology in Leupold, Schmidt & Bender and NIGHTFORCE rifle scopes. Darrell offers an intense 4 day shooting school that is ideal for long range hunters and tactical enthusiasts.
Join the discussion of this article with the author HERE at the Article Discussion Forum.
By Darrell Holland
Long range shooters go through great pains to properly set-up their rifles for long range shooting. Bipods, muzzle brakes, cosine indicators and a host of other widgets often adorn their newly created thunder stick. How many of them actually check to see that their scope reticle is perpendicular to the bore?
Often times they take for granted that the store clerk/gunsmith properly installed the scope and it is true to the rifle's bore? Others often cant the rifle and set the reticle to what "looks vertical" in their opinion? The resulting misalignment can cause problems when we engage targets at long range.
Over the years I've watched shooters adjust both elevation and windage in apparent dead calm conditions. When queried about the "extra windage" they dialed, the excuses ranged from rotational drift, to the Coriolis effect? Never once did they question the possibility that the reticle was not perpendicular to the bore. Rotational drift at 500 yards is minimal (approx. 1.5 inches depending upon caliber and bullet) and is of no real concern to the long range hunter. Can you judge point of impact that accurately under field conditions? Probably not?
The Coriolis Effect comes into play if we are shooting at extreme range, 1000 yards plus and is more than not masked by winds between the shooter and his or her target. The earth rotates at approximately 750 miles per hour ( easterly direction), take your time of flight and divide it into 750
miles per hour.
On to bigger and more important things. It is an easy test to determine if your reticle is perpendicular to the bore and requires less ammunition than shooting the BOX. We should all be shooting a quality scope who's turrets are 90 degrees apart and have taken the time to do our best in optically zeroing the reticle ( when setting up the scope mounts) liminating the dreaded erector tube windage/elevation movement when we make an adjustment with our target knobs.
Having done so, we can now move to testing our rifle and scope. Precisely zero the rifle at 100 yds. Staple a fresh sheet of cardboard or butcher's paper to the target backer. Using a 4 foot contractors level scribe a plumb line on our paper with a "Sharpie felt pen". Make this line 20-30 inches long and at the bottom of the line, scribe a horizontal line that will act as our aiming reference. For those of you who are artistically inclined we've created an inverted capital "T".
From the bench, align the reticle's vertical wire with the plumb line on the paper and aim at the intersection of our lines. Fire a single round and note its location. Dial 15-20 MOA of "UP" elevation in our scope and aim at the same reference line. Be sure the reticle is aligned with our plumb line on the paper and fire a second round. If all is well, our bullet should be within a bullet diameter of striking our line, indicating our reticle is indeed perpendicular to the bore. We have now confirmed that our elevation knob is tracking true to the centerline of our bore. Any extreme elevation correction will now launch the bullet inline with our intended target given a dead calm condition.
[floatright]
You've now successfully confirmed that your reticle is perpendicular to your rifles bore. Slip the windage/ elevation knobs and set them to "0". Grab the bino's, Data Card and start searching for a distant target to shoot. You'll be confident that reticle perpendicularity is no longer a concern when you need to stretch the barrel on your next long shot!
If we take the time to be confident in our equipment by periodic testing and evaluating. We will eliminate our "equipment related" shooting slumps and can isolate areas that require our focused attention. Position, sight alignment, breathing, trigger squeeze and follow thru are area's we can ALL improve upon.
All too often shooters blame errant shots on equipment, ammunition, imperfect zero's and a host of other excuses. Often times we find that by retracting our eye from the ocular lens we can see the reflection of who is indeed responsible for the missed shot? You will never make any real progress in your shooting if you do not take responsibility for your actions...
Thanks again for the opportunity to share my experiences regarding practical long range shooting.
Darrell Holland is a Custom Riflesmith and designer of Advanced Reticle Technology in Leupold, Schmidt & Bender and NIGHTFORCE rifle scopes. Darrell offers an intense 4 day shooting school that is ideal for long range hunters and tactical enthusiasts.
Join the discussion of this article with the author HERE at the Article Discussion Forum.