Determining Correct Scope Base Angle
By Robert H. Thompson
During a recent rifle project I wanted to know exactly how much angle correction I needed in my scope base to center the elevation settings that I would be using, within the scope's adjustment range. This was an economy long range rifle build and I was going to use shims under the rear scope base to get the angle correction needed. I was using Burris 30mm Signature Zee rings, which allow some adjustment with their offset inserts, but I had already used some of that feature to center the windage adjustment, and the 30mm inserts didn't offer as much correction as I wanted.

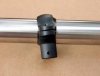
This picture shows how the Burris Signature Zee Rings with their synthetic inserts allow for considerable angle changes. I like these rings for several reasons, they don't mar the scope, they don't induce any forces into the scope from miss aligned bases, and they allow for angle correction using the offset inserts.
To work out how much correction I needed for this rifle, I created a simple drawing which helps to graphically illustrate the relationship of elevation settings with and without an angled scope base. This drawing can be easily duplicated for any rifle/scope ballistics combo.
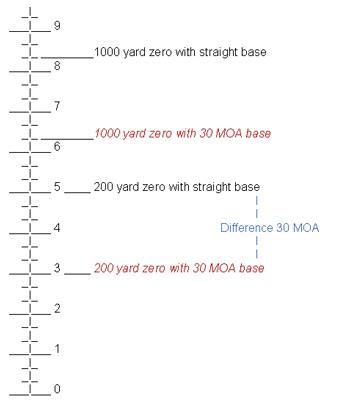
In the above example I'm using my SWFA Super Sniper scope on a 308 rifle shooting a 168 grain bullet. My Super Sniper has 144 MOA of elevation adjustment, represented in the drawing by the vertical line with horizontal lines laid out similar to the scope's turret, minus a lot of the hash marks for simplicity. The numbers represent revolutions of the vertical turret with 15 MOA per turn.
The three variables in this illustration are the scope's range of vertical adjustment, the minimum and maximum shooting distances and the ballistics of the round being used.
After zeroing at 200 yards with standard bases, the elevation adjustment was at 75 MOA from the lowest setting, close to center of the elevation adjustment. Zeroed at 1000 yards (from the ballistic charts) would equal roughly 50 MOA of come up or 125 MOA total. Both of these settings are noted on the drawing. I have also shown where the 200 and 1000 yards zero settings would be if they were centered in the elevation adjustment range. Simple math gives us the difference between the two settings, which in this case is 30 MOA.
At this stage I could have gone out and purchased a base with 30 MOA correction and be done. What I wanted to know was exactly how much I needed to shim under the rear base to get my elevation centered.
Now I needed to convert the MOA to a dimension that I could use at the scope base. While doing the math I realized this was another opportunity to explain MOA for those who might have trouble with it.
To better understand how this MOA thing works let's go over some of the basic facts: the dimension of an angle can be defined as the length of an arc connecting two straight lines emanating from the same point.
A full circle has 360 degrees of angle. If we drew out all 360 degrees of a circle it would look like a pie with 360 pieces. Each one of these pieces would equal one degree. Or said another way… The angle formed by the two sides of one of these pieces would equal one degree.
One degree can be further divided into minutes of angle or MOA. There are 60 minutes of angle or MOA per degree. So if we take a one degree slice of this circle and divide it into 60 smaller slices, one of those slices would equal one minute of angle or one MOA.
So let's look at the math for one MOA at 100 yards. 100 yards is the radius of our circle. And now we need the circumference of the circle so we can then divide it up into degrees and minutes of angle. The math formula for circumference is…radius x 2 x PI = circumference. PI equals 3.1416
So before we set up our equation let's first convert our 100 yards into inches.
100 x 36 = 3600 inches
3600 x 2 x 3.1416 = 22619.52 inches
22619.52 inches is the circumference of a circle with a 100 yard radius. Now if we divide that number by 360 we get
22619.52 / 360 = 62.832 inches
So we can now say that a one degree slice of a circle with a 100 yard radius measures 62.832 inches at the curved out edge. If we now divide that slice into 60 more pieces, (remember there are 60 MOA per degree) we get
62.832 / 60 = 1.047 inches.
1.047 inches is the size of one MOA (minute of angle) at 100 yards. It is pure coincidence that one MOA almost equals one inch at 100 yards.
Returning to my earlier question of how thick of a shim do I need under my rear scope base to get the desired MOA correction? First we need to measure the distance center to center of our scope bases. On my example gun the dimension is 4.75 inches. 4.75 inches is the radius we use to work out the same problem that we worked above.
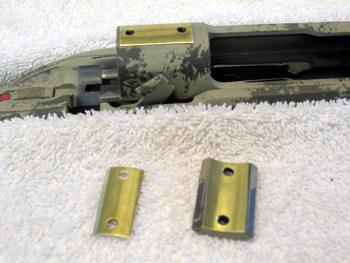
This picture shows the three .010" thick brass shims I used.
4.75 x 2 x 3.1416 = 29.85
29.85 / 360 = .083
.083 / 60 = .0014 which equals one MOA at 4.75 inches, but I need 30 MOA.
.0014 x 30 = .042 inches or 42 thousands of an inch.
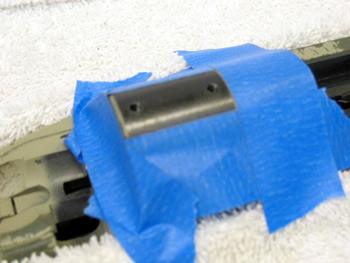
This picture shows the receiver masked off ready to epoxy everything together.
So a shim .042 thousands of and inch under the rear base will give me 30 MOA of correction and get my elevation adjustments for shooting out to 1000 yards centered in my scope's adjustment range.
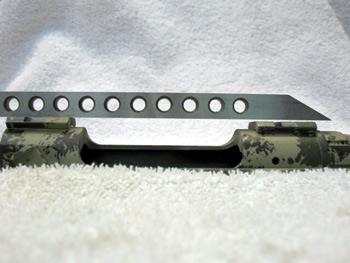
This picture shows the height difference of the bases after shimming.
In the end I only used .030" of shim because some of my correction was being done by the Burris offset inserts. With everything cleaned and JB welded together I'm confident nothing will move and I can easily crank in all the elevation I will need without being near the end of my adjustments.
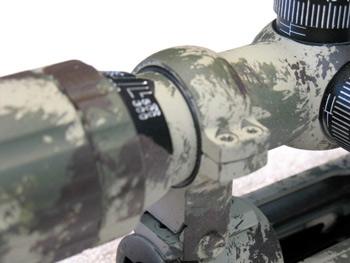
This picture shows the Burris Signature Zee rings assembled.
By Robert H. Thompson
During a recent rifle project I wanted to know exactly how much angle correction I needed in my scope base to center the elevation settings that I would be using, within the scope's adjustment range. This was an economy long range rifle build and I was going to use shims under the rear scope base to get the angle correction needed. I was using Burris 30mm Signature Zee rings, which allow some adjustment with their offset inserts, but I had already used some of that feature to center the windage adjustment, and the 30mm inserts didn't offer as much correction as I wanted.
This picture shows how the Burris Signature Zee Rings with their synthetic inserts allow for considerable angle changes. I like these rings for several reasons, they don't mar the scope, they don't induce any forces into the scope from miss aligned bases, and they allow for angle correction using the offset inserts.
To work out how much correction I needed for this rifle, I created a simple drawing which helps to graphically illustrate the relationship of elevation settings with and without an angled scope base. This drawing can be easily duplicated for any rifle/scope ballistics combo.
In the above example I'm using my SWFA Super Sniper scope on a 308 rifle shooting a 168 grain bullet. My Super Sniper has 144 MOA of elevation adjustment, represented in the drawing by the vertical line with horizontal lines laid out similar to the scope's turret, minus a lot of the hash marks for simplicity. The numbers represent revolutions of the vertical turret with 15 MOA per turn.
The three variables in this illustration are the scope's range of vertical adjustment, the minimum and maximum shooting distances and the ballistics of the round being used.
After zeroing at 200 yards with standard bases, the elevation adjustment was at 75 MOA from the lowest setting, close to center of the elevation adjustment. Zeroed at 1000 yards (from the ballistic charts) would equal roughly 50 MOA of come up or 125 MOA total. Both of these settings are noted on the drawing. I have also shown where the 200 and 1000 yards zero settings would be if they were centered in the elevation adjustment range. Simple math gives us the difference between the two settings, which in this case is 30 MOA.
At this stage I could have gone out and purchased a base with 30 MOA correction and be done. What I wanted to know was exactly how much I needed to shim under the rear base to get my elevation centered.
Now I needed to convert the MOA to a dimension that I could use at the scope base. While doing the math I realized this was another opportunity to explain MOA for those who might have trouble with it.
To better understand how this MOA thing works let's go over some of the basic facts: the dimension of an angle can be defined as the length of an arc connecting two straight lines emanating from the same point.
A full circle has 360 degrees of angle. If we drew out all 360 degrees of a circle it would look like a pie with 360 pieces. Each one of these pieces would equal one degree. Or said another way… The angle formed by the two sides of one of these pieces would equal one degree.
One degree can be further divided into minutes of angle or MOA. There are 60 minutes of angle or MOA per degree. So if we take a one degree slice of this circle and divide it into 60 smaller slices, one of those slices would equal one minute of angle or one MOA.
So let's look at the math for one MOA at 100 yards. 100 yards is the radius of our circle. And now we need the circumference of the circle so we can then divide it up into degrees and minutes of angle. The math formula for circumference is…radius x 2 x PI = circumference. PI equals 3.1416
So before we set up our equation let's first convert our 100 yards into inches.
100 x 36 = 3600 inches
3600 x 2 x 3.1416 = 22619.52 inches
22619.52 inches is the circumference of a circle with a 100 yard radius. Now if we divide that number by 360 we get
22619.52 / 360 = 62.832 inches
So we can now say that a one degree slice of a circle with a 100 yard radius measures 62.832 inches at the curved out edge. If we now divide that slice into 60 more pieces, (remember there are 60 MOA per degree) we get
62.832 / 60 = 1.047 inches.
1.047 inches is the size of one MOA (minute of angle) at 100 yards. It is pure coincidence that one MOA almost equals one inch at 100 yards.
Returning to my earlier question of how thick of a shim do I need under my rear scope base to get the desired MOA correction? First we need to measure the distance center to center of our scope bases. On my example gun the dimension is 4.75 inches. 4.75 inches is the radius we use to work out the same problem that we worked above.
This picture shows the three .010" thick brass shims I used.
4.75 x 2 x 3.1416 = 29.85
29.85 / 360 = .083
.083 / 60 = .0014 which equals one MOA at 4.75 inches, but I need 30 MOA.
.0014 x 30 = .042 inches or 42 thousands of an inch.
This picture shows the receiver masked off ready to epoxy everything together.
So a shim .042 thousands of and inch under the rear base will give me 30 MOA of correction and get my elevation adjustments for shooting out to 1000 yards centered in my scope's adjustment range.
This picture shows the height difference of the bases after shimming.
In the end I only used .030" of shim because some of my correction was being done by the Burris offset inserts. With everything cleaned and JB welded together I'm confident nothing will move and I can easily crank in all the elevation I will need without being near the end of my adjustments.
This picture shows the Burris Signature Zee rings assembled.