Brass Preparation And Management
By John W. Lewis
©Copyright 2009, Precision Shooting
I have to believe that brass preparation and management is important to most, if not all, of the readers of this magazine. High quality brass that has been well prepared is considered vital by competitors to achieve small groups and high scores.
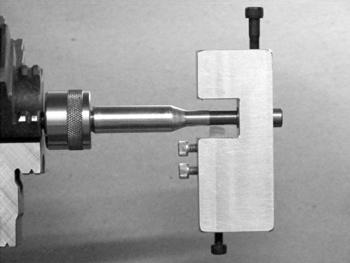
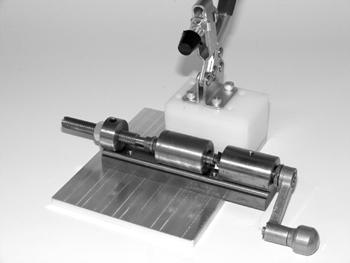
Hand turning tool set up ready to cut. The hand that would hold the cutting tool is out of the view for photographic clarity.
Most of the time and effort spent on cartridge case preparation is in neck turning. Achieving concentricity with exact desired neck wall thickness requires high quality tooling, knowledge, and time. It is a very good bet that most competitors today do that job with hand tools perhaps assisted with some sort of drive mechanism like a rechargeable power screwdriver. Case necks can also be turned with a lathe.
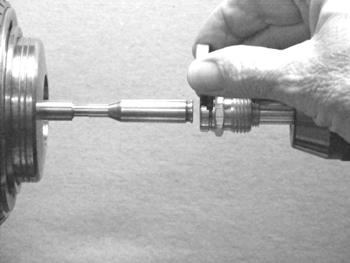
Case has been pressed on to the spud by the tailstock ram and the case holder is being removed. The reverse of this sequence is used to remove the case from the spud. Lathe toolpost is out of the way for photographic clarity.
I have used both methods over the past fifteen years with good results. This preparation is fussy work, so batches were usually held to twenty, occasionally up to forty pieces, as I needed them. That number of cases would usually take me through a benchrest season, as I was lucky to get to three matches and the Super Shoot in one year.
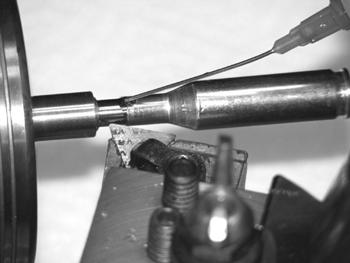
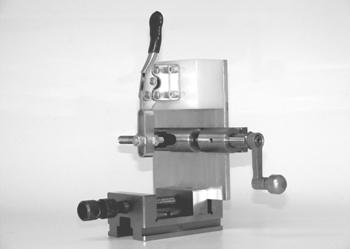
Cutter set up for neck turning. The leading edge of the cutter is aligned to the case shoulder. Needle oiler is shown in position for lubricating the cut.
I have recently finished neck turning just under five hundred cases using both methods. As a retiree I had the time and was interested in a comparison of the results of the two techniques with regard to time spent and accuracy achieved. Two different cartridge cases were prepared: 6PPC and a .243 long neck wildcat. The 6PPC cases (190 each) were cut using a hand tool and the .243 cases (298 each) were turned in the lathe.
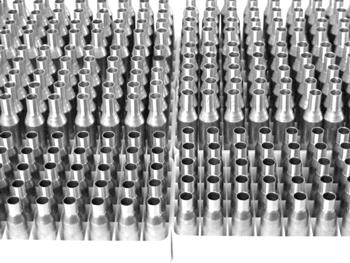
300 of the slightly less than 500 cases turned.
The hand turning technique will be briefly touched upon. Most bench shooters are familiar with this method and Dick Wright some years back wrote in Precision Shooting what I consider to be the definitive article on that subject.
As a case drive mechanism I used Sinclair (PS advertiser) case holding chuck which would normally be used in a power screwdriver or drill. The Sinclair tool was held in the lathe chuck and used with a spindle speed of 140 RPM. There is always some wobble in the case with this setup and the low spindle speed allowed the hand holding the cutter to oscillate with the case. The hand tool shown in the photograph is one of a batch I made some years ago for myself, my son, and some friends. It is just a basic copy of the Marquart style of tool with a few small changes in the set and adjusting screws – nothing fancy. The cutter is a one quarter inch cobalt lathe bit ground with a radius on the actual cutting surface and a short angle on the leading edge to match the case shoulder. The arbor, that the case rotates on, is carbide ground to .242" by my friend Larry Egan. Carbide seems to resist picking up brass much better than hardened steel.
The 220 Russian Lapua case necks were expanded up in a Hornady 6PPC full-length size die. The expander plug in this die is elliptical and does a nice smooth job on the neck. The cases were then forced on and off a .243" arbor (lathe turned) to correctly fit the .242" carbide arbor on the hand cutting tool. This last step gives a close fit on the hand tool arbor while allowing the case to rotate with a light drag. Imperial die wax was applied inside the case neck with a Q-Tip during forming. Marine Pal oil was used on the arbor and outside neck surface during cutting. Marine Pal oil is very much like Kroil but has a very low odor. Much as I like Kroil, I cannot abide the smell. At the above-mentioned RPM the hand tool cutter was run slowly up to the shoulder (just marking the shoulder junction) and fed slowly back off of the neck. A nice smooth curled chip is produced going in to the shoulder and very fine fuzz is produced coming off of the neck. The radius on the cutter very closely matches the shoulder junction on the case. If there is a small doughnut left in the case I don't care. No load combination I use has the base of the bullet anywhere near the shoulder junction. If the tool radius is too small, the neck-shoulder junction could be seriously weakened. That situation could leave the weakened cartridge neck stuck in the rifle during a match (a situation such as this will do amazing things to a shooter's blood pressure). Some competitors do this neck turning in two steps, taking a very fine pass with a second tool. So far, a one step procedure has worked satisfactorily for me. In fact, one step turning with a hand tool is boring. Doing this twice would probably wig me completely out.
To turn necks on a lathe, a sacrificial spud must be turned. I turn this spud to match the largest (in diameter) bullet that I may use for the case being turned. Typical match bullets from different form dies (bullet maker to bullet maker) rarely vary more than .0005" in diameter. If necks are turned for .0015" clearance to match a fat bullet, the neck clearance will not exceed .002" on a skinny bullet. I have used tighter clearances in the past but for now have settled out on the above mentioned dimensions. The spud should be turned from free-cutting steel capable of giving a smooth finish with a lathe cutting tool. The spud also should have a strongly tapered point to guide the case. I used some 1141 screw machine stock (cuts smoothly) to make this spud because I have that material in the shop. A good steel for this purpose is 12L14. This leaded bar stock produces a beautiful finish with almost any sort of cutter. I always turn the spud a few "tenths" oversize and bring it to final size with a soft mold-maker stone of fine grit. These stones (with oil) quickly take on the shape of the work and produce a very smooth finish. The stones are available from MSC and Gesswein (they can both be found on the Internet). The spud should be frequently measured during this operation. These measurements will indicate the area and amount to stone. Final finish was with crocus cloth.
Wilson trimming fixture shown in the open position.
The best way to press the case (lubricated inside with Imperial Die Wax) on and pull the case off of the spud is with a loading press case holder. The slotted tailstock adapter was made from a Lee autoprime head. The backside of the head was bored and threaded for a one half-inch shank. This piece could be made from solid material but buying and modifying the Lee part was more time effective.
With the appropriate case holder dropped into the tailstock adapter, the case is run onto the spud using the tailstock handwheel. The cases in this batch were full length sized in a die with the expander rod removed. The progress of the spud in the case neck can be easily observed as the case is pressed on. It looks somewhat like a snake swallowing an egg. A tight fit on the spud insures that the case will stay put during the cut. With this tight fit there is also less chance of any possible inside neck irregularities causing a faulty turning operation. Once the case is fully on the spud, the case holder is removed by rotating it 180 degrees and lifting it up out of the adapter slot. A little wiggling of the tailstock wheel may be necessary to relieve binding on the holder.
To make the cut I used a TPG (triangle positive ground) carbide cutting insert. This cutter insert has a radius that matches the shoulder-neck junction radius of the case being turned. On all inserts I have used, the third digit on the insert description indicates the radius dimension. I use indexable carbide inserts for almost all turning operations in the shop. Carbide can be run at three or four times the surface speed of high-speed steel. The speed advantage saves a great deal of time. Also, if the cutter goes away during a cut, the insert can be indexed to a fresh edge without losing setup by much. Note that the leading edge of the cutter is aligned to slightly more than the shoulder angle of the case. The cutter will contact the shoulder at the junction first. I stop the cut as soon as shoulder contact is observed.
By John W. Lewis
©Copyright 2009, Precision Shooting
I have to believe that brass preparation and management is important to most, if not all, of the readers of this magazine. High quality brass that has been well prepared is considered vital by competitors to achieve small groups and high scores.
Hand turning tool set up ready to cut. The hand that would hold the cutting tool is out of the view for photographic clarity.
Most of the time and effort spent on cartridge case preparation is in neck turning. Achieving concentricity with exact desired neck wall thickness requires high quality tooling, knowledge, and time. It is a very good bet that most competitors today do that job with hand tools perhaps assisted with some sort of drive mechanism like a rechargeable power screwdriver. Case necks can also be turned with a lathe.
Case has been pressed on to the spud by the tailstock ram and the case holder is being removed. The reverse of this sequence is used to remove the case from the spud. Lathe toolpost is out of the way for photographic clarity.
I have used both methods over the past fifteen years with good results. This preparation is fussy work, so batches were usually held to twenty, occasionally up to forty pieces, as I needed them. That number of cases would usually take me through a benchrest season, as I was lucky to get to three matches and the Super Shoot in one year.
Cutter set up for neck turning. The leading edge of the cutter is aligned to the case shoulder. Needle oiler is shown in position for lubricating the cut.
I have recently finished neck turning just under five hundred cases using both methods. As a retiree I had the time and was interested in a comparison of the results of the two techniques with regard to time spent and accuracy achieved. Two different cartridge cases were prepared: 6PPC and a .243 long neck wildcat. The 6PPC cases (190 each) were cut using a hand tool and the .243 cases (298 each) were turned in the lathe.
300 of the slightly less than 500 cases turned.
The hand turning technique will be briefly touched upon. Most bench shooters are familiar with this method and Dick Wright some years back wrote in Precision Shooting what I consider to be the definitive article on that subject.
As a case drive mechanism I used Sinclair (PS advertiser) case holding chuck which would normally be used in a power screwdriver or drill. The Sinclair tool was held in the lathe chuck and used with a spindle speed of 140 RPM. There is always some wobble in the case with this setup and the low spindle speed allowed the hand holding the cutter to oscillate with the case. The hand tool shown in the photograph is one of a batch I made some years ago for myself, my son, and some friends. It is just a basic copy of the Marquart style of tool with a few small changes in the set and adjusting screws – nothing fancy. The cutter is a one quarter inch cobalt lathe bit ground with a radius on the actual cutting surface and a short angle on the leading edge to match the case shoulder. The arbor, that the case rotates on, is carbide ground to .242" by my friend Larry Egan. Carbide seems to resist picking up brass much better than hardened steel.
The 220 Russian Lapua case necks were expanded up in a Hornady 6PPC full-length size die. The expander plug in this die is elliptical and does a nice smooth job on the neck. The cases were then forced on and off a .243" arbor (lathe turned) to correctly fit the .242" carbide arbor on the hand cutting tool. This last step gives a close fit on the hand tool arbor while allowing the case to rotate with a light drag. Imperial die wax was applied inside the case neck with a Q-Tip during forming. Marine Pal oil was used on the arbor and outside neck surface during cutting. Marine Pal oil is very much like Kroil but has a very low odor. Much as I like Kroil, I cannot abide the smell. At the above-mentioned RPM the hand tool cutter was run slowly up to the shoulder (just marking the shoulder junction) and fed slowly back off of the neck. A nice smooth curled chip is produced going in to the shoulder and very fine fuzz is produced coming off of the neck. The radius on the cutter very closely matches the shoulder junction on the case. If there is a small doughnut left in the case I don't care. No load combination I use has the base of the bullet anywhere near the shoulder junction. If the tool radius is too small, the neck-shoulder junction could be seriously weakened. That situation could leave the weakened cartridge neck stuck in the rifle during a match (a situation such as this will do amazing things to a shooter's blood pressure). Some competitors do this neck turning in two steps, taking a very fine pass with a second tool. So far, a one step procedure has worked satisfactorily for me. In fact, one step turning with a hand tool is boring. Doing this twice would probably wig me completely out.
To turn necks on a lathe, a sacrificial spud must be turned. I turn this spud to match the largest (in diameter) bullet that I may use for the case being turned. Typical match bullets from different form dies (bullet maker to bullet maker) rarely vary more than .0005" in diameter. If necks are turned for .0015" clearance to match a fat bullet, the neck clearance will not exceed .002" on a skinny bullet. I have used tighter clearances in the past but for now have settled out on the above mentioned dimensions. The spud should be turned from free-cutting steel capable of giving a smooth finish with a lathe cutting tool. The spud also should have a strongly tapered point to guide the case. I used some 1141 screw machine stock (cuts smoothly) to make this spud because I have that material in the shop. A good steel for this purpose is 12L14. This leaded bar stock produces a beautiful finish with almost any sort of cutter. I always turn the spud a few "tenths" oversize and bring it to final size with a soft mold-maker stone of fine grit. These stones (with oil) quickly take on the shape of the work and produce a very smooth finish. The stones are available from MSC and Gesswein (they can both be found on the Internet). The spud should be frequently measured during this operation. These measurements will indicate the area and amount to stone. Final finish was with crocus cloth.
Wilson trimming fixture shown in the open position.
The best way to press the case (lubricated inside with Imperial Die Wax) on and pull the case off of the spud is with a loading press case holder. The slotted tailstock adapter was made from a Lee autoprime head. The backside of the head was bored and threaded for a one half-inch shank. This piece could be made from solid material but buying and modifying the Lee part was more time effective.
With the appropriate case holder dropped into the tailstock adapter, the case is run onto the spud using the tailstock handwheel. The cases in this batch were full length sized in a die with the expander rod removed. The progress of the spud in the case neck can be easily observed as the case is pressed on. It looks somewhat like a snake swallowing an egg. A tight fit on the spud insures that the case will stay put during the cut. With this tight fit there is also less chance of any possible inside neck irregularities causing a faulty turning operation. Once the case is fully on the spud, the case holder is removed by rotating it 180 degrees and lifting it up out of the adapter slot. A little wiggling of the tailstock wheel may be necessary to relieve binding on the holder.
To make the cut I used a TPG (triangle positive ground) carbide cutting insert. This cutter insert has a radius that matches the shoulder-neck junction radius of the case being turned. On all inserts I have used, the third digit on the insert description indicates the radius dimension. I use indexable carbide inserts for almost all turning operations in the shop. Carbide can be run at three or four times the surface speed of high-speed steel. The speed advantage saves a great deal of time. Also, if the cutter goes away during a cut, the insert can be indexed to a fresh edge without losing setup by much. Note that the leading edge of the cutter is aligned to slightly more than the shoulder angle of the case. The cutter will contact the shoulder at the junction first. I stop the cut as soon as shoulder contact is observed.
Brass Preparation And Management
Resized .243 range brass was used in trial cuts to get the proper dimension on the case neck. Using a spud the size of the selected bullet allows a direct measurement of the neck with no need to use a ball micrometer and math. At this point, I stopped cutting and ran the lathe at 1000 RPM for one hour to temperature stabilize the machine. When the lathe was up to temperature, the trial cut was repeated and measured. When I was satisfied with the neck diameter, the cross slide was locked. One more scrap case was cut to make sure that nothing had moved. All turning was done at 1000 RPM. When making this cut a small oil bottle with a 1.5" syringe needle was used to apply oil to the neck during the cut. These polyethylene bottles hold two ounces of fluid and are dandy for oil application in tight areas. The bottle cap has a Luer spout that accepts syringe needles. The bottles and needles are available from MSC (Mscdirect.com) and Small Parts (Smallparts.com). Small Parts carries a large variety of needles. There is not a doubt in my mind that I will someday stab the crap (this is a high level medical term) out of myself with one of these oil bottles. With this type of oil application I used less than one ounce of oil on the full number of cases. Running the lathe coolant would have made a big mess.
In operation the cutter is fed slowly over the case neck to the shoulder-neck junction and then fed slowly back off of the neck. The oil bottle was held in my right hand resting on the toolpost and the carriage was moved with my left hand. Before stopping the spindle the case neck and shoulder was wiped off with a Q-Tip. With the spindle stopped the case holder is dropped onto the case head and into the tailstock adapter. As previously mentioned the tailstock wheel may need a jiggle to accomplish this task. The case is then withdrawn from the spud. I checked every case with a ball micrometer in three different places as they came off the lathe. This did not take long and was a 100 percent QC check. I am sure that this was overkill but I wanted to know that nothing was changing (with a fully warmed up machine change was unlikely).
I turned just under three hundred cases on the lathe over two evenings. My average time was forty to forty five cases per hour (checking every case with the micrometer) with no rejects. The best time I could make on the cases done with a hand tool (also checking with a micrometer) was twenty cases per hour. The difference in time was caused by the spindle speed. I should say here that my lathe has a clutch and brake system for the spindle. This ability to avoid powering the motor up and down between cuts gives this machine a little time edge compared to a smaller shop lathe. The run-out accuracy was the same with both methods of neck turning.
For small batches, a preset hand tool would probably be the way to go. The above time results indicate that I would be better off using the lathe for turning any large amount of case necks.
Wilson trimming fixture shown in the desired position for trimming. This vertical position allows the chips to fall to the floor. When actually cutting, the fixture would be held in a bench vise.
A further aid in case preparation efficiency (at least for me) is a simple modification to the Wilson case trimmer. I like this trimmer better than any other that I have used to date. The only two things I didn't like about the trimmer was having to press the case holder against the ways while turning the cutter handle and having the brass chips fall all over the ways. These two problems turned out to be easy to fix. To keep the case holder pinned to the ways; the Wilson trimmer was screwed to a plate together with a hold-down toggle clamp. The clamp has a rubber nose that contacts the Wilson case holder and keeps it firmly in place. In use the fixture plate is held vertically in a bench vise allowing the brass chips to fall to the floor. This fixture was made of aluminum and plastic because my shop is full of those materials. Two by four lumber would work just as well as the fixture block needs about 1.5" of height to position the clamp correctly. The clamp is MSC part number 66759010 and is low cost. At a shoot, this fixture can be used in the horizontal position on some rubber shelf liner to keep it from scooting around while cranking the handle.
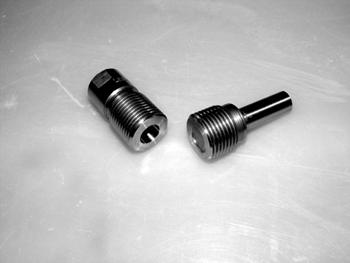
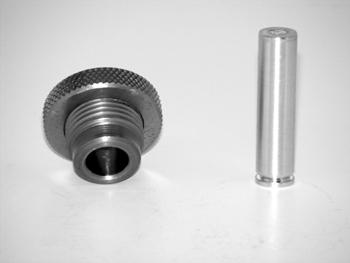
Lee full-length 22/250 sizing die cut apart to make a ring die. .006" undersize gage pin is shown inserted to find the cut off point.
The last item in this article is a ring die. The late Phil Sauer (who was a really smart man) described this tool some years back in Precision Shooting. I don't recall reading any mention of the ring die since. The ring die is more of a salvage tool than a preparation tool. The tool is tapered inside down to a dimension that will swage the case web area back to original (or desired) diameter. No full length-sizing die I have used to date will effectively size the web area of the case. I have two 6PPC reamers that are of a slightly different diameter in that case web area. I now use only one of these reamers (both reamers are excellent) to allow case interchange between barrels. Having over sixty good cases fired in the larger chamber started me thinking of an easy way to make a ring die so those cases could be swaged back to a useable size.
Ring die is shown on the left. A piece of 7075 hard aluminum was turned down to make a rod for driving the lubricated 6PPC case completely through the sizing die.
For whatever reason, I have an almost obsessive interest in case design. I noticed while perusing the case dimensions in various loading manuals that the 22/250 case has a good deal of body taper - enough taper to function as a ring die. I purchased a Lee RGB die set for the full-length size die. I guessed that a constriction of at least .003" would be necessary to swage down the base area of the case. Pin gages were used to find the place in the die interior where the diameter was .006" under case web size. The size die was then cut off at that place in the lathe using a carbide cut off tool. The cut off die base was then held in the lathe chuck with the base toward the tailstock and the interior of the die lapped out at low RPM. This operation was done with the lap held in the tailstock chuck using the handwheel to run the lap in and out. I used a seven-sixteenths adjustable barrel lap (MSC #05060280) with 240-grit silicon carbide abrasive paste. As lapping proceeds, it is a good idea to take the ring die out, clean out the abrasive, and run a test case through the die. The web area of the case springs back after sizing and the amount of spring back is affected by the hardness of the brass. The measurement of the test case is a good indicator of how much more lapping is necessary. A light polish with crocus cloth (wrapped around a wooden dowel) will slick up the inside of the die without changing dimensions very much.
This work was an interesting exercise for me. Until I did this large amount of cases I had no real idea what time was needed per piece and which turning method was best. Turns out that both methods work pretty good.
In operation the cutter is fed slowly over the case neck to the shoulder-neck junction and then fed slowly back off of the neck. The oil bottle was held in my right hand resting on the toolpost and the carriage was moved with my left hand. Before stopping the spindle the case neck and shoulder was wiped off with a Q-Tip. With the spindle stopped the case holder is dropped onto the case head and into the tailstock adapter. As previously mentioned the tailstock wheel may need a jiggle to accomplish this task. The case is then withdrawn from the spud. I checked every case with a ball micrometer in three different places as they came off the lathe. This did not take long and was a 100 percent QC check. I am sure that this was overkill but I wanted to know that nothing was changing (with a fully warmed up machine change was unlikely).
I turned just under three hundred cases on the lathe over two evenings. My average time was forty to forty five cases per hour (checking every case with the micrometer) with no rejects. The best time I could make on the cases done with a hand tool (also checking with a micrometer) was twenty cases per hour. The difference in time was caused by the spindle speed. I should say here that my lathe has a clutch and brake system for the spindle. This ability to avoid powering the motor up and down between cuts gives this machine a little time edge compared to a smaller shop lathe. The run-out accuracy was the same with both methods of neck turning.
For small batches, a preset hand tool would probably be the way to go. The above time results indicate that I would be better off using the lathe for turning any large amount of case necks.
Wilson trimming fixture shown in the desired position for trimming. This vertical position allows the chips to fall to the floor. When actually cutting, the fixture would be held in a bench vise.
A further aid in case preparation efficiency (at least for me) is a simple modification to the Wilson case trimmer. I like this trimmer better than any other that I have used to date. The only two things I didn't like about the trimmer was having to press the case holder against the ways while turning the cutter handle and having the brass chips fall all over the ways. These two problems turned out to be easy to fix. To keep the case holder pinned to the ways; the Wilson trimmer was screwed to a plate together with a hold-down toggle clamp. The clamp has a rubber nose that contacts the Wilson case holder and keeps it firmly in place. In use the fixture plate is held vertically in a bench vise allowing the brass chips to fall to the floor. This fixture was made of aluminum and plastic because my shop is full of those materials. Two by four lumber would work just as well as the fixture block needs about 1.5" of height to position the clamp correctly. The clamp is MSC part number 66759010 and is low cost. At a shoot, this fixture can be used in the horizontal position on some rubber shelf liner to keep it from scooting around while cranking the handle.
Lee full-length 22/250 sizing die cut apart to make a ring die. .006" undersize gage pin is shown inserted to find the cut off point.
The last item in this article is a ring die. The late Phil Sauer (who was a really smart man) described this tool some years back in Precision Shooting. I don't recall reading any mention of the ring die since. The ring die is more of a salvage tool than a preparation tool. The tool is tapered inside down to a dimension that will swage the case web area back to original (or desired) diameter. No full length-sizing die I have used to date will effectively size the web area of the case. I have two 6PPC reamers that are of a slightly different diameter in that case web area. I now use only one of these reamers (both reamers are excellent) to allow case interchange between barrels. Having over sixty good cases fired in the larger chamber started me thinking of an easy way to make a ring die so those cases could be swaged back to a useable size.
Ring die is shown on the left. A piece of 7075 hard aluminum was turned down to make a rod for driving the lubricated 6PPC case completely through the sizing die.
For whatever reason, I have an almost obsessive interest in case design. I noticed while perusing the case dimensions in various loading manuals that the 22/250 case has a good deal of body taper - enough taper to function as a ring die. I purchased a Lee RGB die set for the full-length size die. I guessed that a constriction of at least .003" would be necessary to swage down the base area of the case. Pin gages were used to find the place in the die interior where the diameter was .006" under case web size. The size die was then cut off at that place in the lathe using a carbide cut off tool. The cut off die base was then held in the lathe chuck with the base toward the tailstock and the interior of the die lapped out at low RPM. This operation was done with the lap held in the tailstock chuck using the handwheel to run the lap in and out. I used a seven-sixteenths adjustable barrel lap (MSC #05060280) with 240-grit silicon carbide abrasive paste. As lapping proceeds, it is a good idea to take the ring die out, clean out the abrasive, and run a test case through the die. The web area of the case springs back after sizing and the amount of spring back is affected by the hardness of the brass. The measurement of the test case is a good indicator of how much more lapping is necessary. A light polish with crocus cloth (wrapped around a wooden dowel) will slick up the inside of the die without changing dimensions very much.
This work was an interesting exercise for me. Until I did this large amount of cases I had no real idea what time was needed per piece and which turning method was best. Turns out that both methods work pretty good.