jon.henry755
Well-Known Member
- Joined
- Dec 16, 2010
- Messages
- 391
Hi Everybody,
This information is long overdue, since I promised to have something out on this back in December when RMBeach had published his Step-by-Step Instructions for converting a TAC15 / 15i Whisker Biscuit Arrow Rest over to a QAD Ultra Drop Away Arrow Rest.
My apology for the slow response. I have a picture in the article that shows this conversion completed on my TAC15i, but I'll need to see if Len or Andy think it's worth posting the picture with the instructions.
PSE TAC15/15i Weaver Rail Modification Process (Step-by-Steps)
The following process outlines the simple steps to modify the Weaver Scope Rail on the PSE TAC series crossbows.
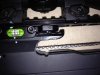
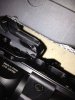
Included below is a photograph of my PSE TAC15i Crossbow with the modification completed. It shows the crossbow in a fully loaded position, using a three vane arrow with the cock vane positioned at 12:00.
This modification was designed to prevent vane clearance problems caused by the arrows vanes from coming in contact with the underneath side of the crossbows Weaver Style Upper Rail during the launch process. This interference can be clearly observed during the cranking or load operation, if you watch carefully. Generally, one or more of the TAC15 arrows vanes will come in contact with the underneath side of the Weaver Rail and sometimes the arrows nocks will hit against this same rail as the crossbow is being brought into a fully loaded position. This contact is also taking place during the launch once the trigger is pulled, but then it takes place so fast that it can't be tracked with the human eye. This causes a disruption to obtaining a clean launch of the arrows shaft. It has been identified as a one of the causes for grouping variations due to inconsistent launch performance.
I can now shoot either PSE TAC15 Arrows in a four fletch (60 x 120 degree position), 3" vanes, straight with no offset or a standard three fletch configuration (3 x 120 degrees), 3" vanes, 2 degree left straight offset, with excellent performance results from either.
This does not mean that one can shoot either arrow type with no changes to your crossbow. Any type of arrow change will alter your paper tuning results. The crossbow must be re-tuned to the particular arrows you are using in order to achieve optimal flight performance. Elevation changes are not required, but windage tuning is usually necessary as you change from a three fletch to a four fletch arrow.

Look carefully at the angle of the cut rail and the smooth edge created.
Modification Step-by-Steps:
Step 1. Turn the PSE TAC15/15i crossbow upside down and place on a soft towel or padded surface so it can be worked on without scratching or bumping your scope or other top end parts. Observe closely the underneath side of the Upper Weaver Rail. Pay particular attention to the front edge bevel on the underside of the front edge of this rail. Also, make note of the tapered angle from the front edge to the underneath rear for about an inch in depth, of the rail. This bevel and the tapered angle are so that your arrows nocks do not catch on the edge of the rail during the cocking and loading of the crossbow.
Step 2. Turn the crossbow back to its normal upright position on a safe work surface. I would still recommend the use of a towel or soft material to prevent any scratches while working. Remove any scope or HHA Optimizer Speed Dial from the Upper Weaver Rail. Put it aside until all work is finished.
Step 3. Using a very fine toothed hacksaw you will need to measure and remove exactly 2.75" (2 ¾" inches) from the forward edge of your upper Weaver Rail. Make sure you angle (miter) your cut, so that it's at a rearward 45 degrees angle or better, to emulate the factory bevel that was on the forward edge that you just examined in step 1. You can also use a fine toothed metal cutting blade on a Sawzall or other metal cutting tools, if you have them.
Step 4. Once you have the initial cut completed, next you must file down and remove any excess metal from the underneath side of the front edge of the Weaver Rail. This is to smooth the front edge underneath surface and create a smooth beveled edge and the correct taper to match the factory one that you just removed. To perform this work, turn the crossbow upside down so the bottom is now facing up. I used a Dremel tool with a small grinding wheel and was able to easily smooth the front edge and also create the same type of taper as provided by the manufacturer. If a Dremel Tool is not available, a medium to fine metal file should work, but it will take a bit more filing work to achieve the same results.
Step 5. Once all filing or grinding work has been completed and you're satisfied with the results, turn the crossbow over and load an arrow in the same manner as you normally would. As you move through the cranking process pay particularly close attention to the arrows nock as it passes under your new Weaver Rails underneath side leading edge. Make sure that your edge has been beveled (rounded) and smoothed so the nock cannot grab this edge and it's forced underneath. Make sure that you've tapered your underneath side of the rail to support a smooth transition to the fully loaded position. In the event anything is not smooth go back to step 4 and finish grinding or smoothing the cut edge or the underneath side taper.
Step 6. Once all grinding or filing work has been completed and you're comfortable with the load operation, you will need to mask off all areas of your crossbows rail that were not cut or grinded, with some masking tape or newspaper and tape. This is so you can paint or touch up the areas that you just cut or ground down. Using a Rusto-leum or similar "Flat Black" metal spray paint, spray the areas carefully that need to be touched back up. This will provide a good protective finish on the parts that were just exposed during the above work. I used two light coats on my TAC15i and can't tell the difference from the rest of my stock.
I know that one or two other members who've performed this modification mentioned they had taken their crossbow in and had somebody replace the factory original powder coat. I haven't found it necessary, but the choice is yours.
[FONT="]Step 7. Replace your HHA Optimizer Speed Dial and / or Scope and resume shooting as usual. Remember, if shooting a 3 fletch configuration your nock orientation must be changed to support "cock feather up".[/FONT]
Regards,
Jon Henry
This information is long overdue, since I promised to have something out on this back in December when RMBeach had published his Step-by-Step Instructions for converting a TAC15 / 15i Whisker Biscuit Arrow Rest over to a QAD Ultra Drop Away Arrow Rest.
My apology for the slow response. I have a picture in the article that shows this conversion completed on my TAC15i, but I'll need to see if Len or Andy think it's worth posting the picture with the instructions.
PSE TAC15/15i Weaver Rail Modification Process (Step-by-Steps)
The following process outlines the simple steps to modify the Weaver Scope Rail on the PSE TAC series crossbows.
Included below is a photograph of my PSE TAC15i Crossbow with the modification completed. It shows the crossbow in a fully loaded position, using a three vane arrow with the cock vane positioned at 12:00.
This modification was designed to prevent vane clearance problems caused by the arrows vanes from coming in contact with the underneath side of the crossbows Weaver Style Upper Rail during the launch process. This interference can be clearly observed during the cranking or load operation, if you watch carefully. Generally, one or more of the TAC15 arrows vanes will come in contact with the underneath side of the Weaver Rail and sometimes the arrows nocks will hit against this same rail as the crossbow is being brought into a fully loaded position. This contact is also taking place during the launch once the trigger is pulled, but then it takes place so fast that it can't be tracked with the human eye. This causes a disruption to obtaining a clean launch of the arrows shaft. It has been identified as a one of the causes for grouping variations due to inconsistent launch performance.
I can now shoot either PSE TAC15 Arrows in a four fletch (60 x 120 degree position), 3" vanes, straight with no offset or a standard three fletch configuration (3 x 120 degrees), 3" vanes, 2 degree left straight offset, with excellent performance results from either.
This does not mean that one can shoot either arrow type with no changes to your crossbow. Any type of arrow change will alter your paper tuning results. The crossbow must be re-tuned to the particular arrows you are using in order to achieve optimal flight performance. Elevation changes are not required, but windage tuning is usually necessary as you change from a three fletch to a four fletch arrow.
Look carefully at the angle of the cut rail and the smooth edge created.
Modification Step-by-Steps:
Step 1. Turn the PSE TAC15/15i crossbow upside down and place on a soft towel or padded surface so it can be worked on without scratching or bumping your scope or other top end parts. Observe closely the underneath side of the Upper Weaver Rail. Pay particular attention to the front edge bevel on the underside of the front edge of this rail. Also, make note of the tapered angle from the front edge to the underneath rear for about an inch in depth, of the rail. This bevel and the tapered angle are so that your arrows nocks do not catch on the edge of the rail during the cocking and loading of the crossbow.
Step 2. Turn the crossbow back to its normal upright position on a safe work surface. I would still recommend the use of a towel or soft material to prevent any scratches while working. Remove any scope or HHA Optimizer Speed Dial from the Upper Weaver Rail. Put it aside until all work is finished.
Step 3. Using a very fine toothed hacksaw you will need to measure and remove exactly 2.75" (2 ¾" inches) from the forward edge of your upper Weaver Rail. Make sure you angle (miter) your cut, so that it's at a rearward 45 degrees angle or better, to emulate the factory bevel that was on the forward edge that you just examined in step 1. You can also use a fine toothed metal cutting blade on a Sawzall or other metal cutting tools, if you have them.
Step 4. Once you have the initial cut completed, next you must file down and remove any excess metal from the underneath side of the front edge of the Weaver Rail. This is to smooth the front edge underneath surface and create a smooth beveled edge and the correct taper to match the factory one that you just removed. To perform this work, turn the crossbow upside down so the bottom is now facing up. I used a Dremel tool with a small grinding wheel and was able to easily smooth the front edge and also create the same type of taper as provided by the manufacturer. If a Dremel Tool is not available, a medium to fine metal file should work, but it will take a bit more filing work to achieve the same results.
Step 5. Once all filing or grinding work has been completed and you're satisfied with the results, turn the crossbow over and load an arrow in the same manner as you normally would. As you move through the cranking process pay particularly close attention to the arrows nock as it passes under your new Weaver Rails underneath side leading edge. Make sure that your edge has been beveled (rounded) and smoothed so the nock cannot grab this edge and it's forced underneath. Make sure that you've tapered your underneath side of the rail to support a smooth transition to the fully loaded position. In the event anything is not smooth go back to step 4 and finish grinding or smoothing the cut edge or the underneath side taper.
Step 6. Once all grinding or filing work has been completed and you're comfortable with the load operation, you will need to mask off all areas of your crossbows rail that were not cut or grinded, with some masking tape or newspaper and tape. This is so you can paint or touch up the areas that you just cut or ground down. Using a Rusto-leum or similar "Flat Black" metal spray paint, spray the areas carefully that need to be touched back up. This will provide a good protective finish on the parts that were just exposed during the above work. I used two light coats on my TAC15i and can't tell the difference from the rest of my stock.
I know that one or two other members who've performed this modification mentioned they had taken their crossbow in and had somebody replace the factory original powder coat. I haven't found it necessary, but the choice is yours.
[FONT="]Step 7. Replace your HHA Optimizer Speed Dial and / or Scope and resume shooting as usual. Remember, if shooting a 3 fletch configuration your nock orientation must be changed to support "cock feather up".[/FONT]
Regards,
Jon Henry