Firearrow
Well-Known Member
Had a math question for everyone. If I wanted to figure out how to compensate for angle by hand is this the correct formula. COS(angle of shot) x distance to target= Actual shooting distance?????
")
I think you are pretty close.
However, I someone telling me that the calculation you show will get you off by the cos of gravity.
Dude speak English!!!!! Ha ha just kidding. I really appreciate the time and effort you took to write that.Drop (inch, mil, MOA etc...) * COS is much more accurate than line of sight distance * COS. LOS * COS illustrates the principal but is not reality.
That said neither are perfect. There are two other angles at play here. Not just the angle of the ground or other platform. Granted only one of these matters. That angle is the rifle barrel. Yes it makes a difference.
The correct way to compensate for the angle is to take the 'baseline reference' (this will be defined shortly) bullet drop and multiply by 1 minus the cosine of the angle. Then that value gets deducted from the bullet drop value at the desired range from your rifle's zero. If the range to your animal happens to be your zero range, then you deduct the calculated value from 0. You will get a negative number. This will be the inch value that you will want to dial. Instead of dialing up as usual, you would dial down.
The baseline reference is the bullet drop at the desired range from your rifle when fired from a perfectly level bore or 0 degrees. For example your 200 yard zero = +/- 0" at 200 where the drop from a level bore (using an average load) at 200 yards = 9.5". It is this 'baseline' that ALL other trajectory corrections are based upon, including angle compensation.
Compensation value = ((bullet drop from zero at the desired range) – (baseline bullet drop * 1- cosine of the angle)). Example: 1- COS 30 degrees (.866) = .134.
For example using your 200 yard zero when setting up for a 400 yard shot at 30 degrees of angle, you will need to know 3 things. 1: baseline bullet drop at 400 yards (41.75"). 2: Corrected bullet drop at 400 yards from your 200 yard zero (21.5"). 3: Cosine value of 30 degrees (.134).
The calculation is as follows:
((21.5)" – (41.75 * .134)) or (21.5 – 5.55) = 15.45". You will dial your scope for 15.5" instead of 21.5".
This is quite different from the advanced rifleman method. The advanced rifleman method calculations are as follows:
21.5" * .866 (cosine) = 18.6" While it would be close enough for a clean kill, 400 yards at 30 degrees angle would be near the threshold for most rifle/load combinations. Any further than that or at steeper angles, the advanced rifleman method will shoot high every time. In this case it is about 3" high because you are compensating for 18.6" where only 15.5" are needed.
It sounds complicated but with a drop chart that includes the baseline bullet drop and a list of cosine values and even just a little practice, it is accomplished easily and fairly quickly. Another thing you can do to speed things up is to print a drop chart that includes bullet drops on a level surface and in 5 degree increments.
2: Print your own drop charts using your favorite ballistic calculator which will need to include a baseline bullet drop as well as a corrected path for your zero along with a list of cosine values. This baseline and path will be referred to as something else for other software.
Now if you would like to know the why, scroll down. If all you want to know is the how to, then stop reading.
************************************************************************
Now the why:
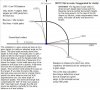
Most shooters understand the principal of the right angle triangle and it's hypotenuse. For example if you have a triangle with a 6" line at a 60 degree angle, the line at 90 degrees is half the length which is 3". This can be found by taking 6" * the cosine value of 60 degrees which is 0.5. (6" * 0.5) = 3.0". Basically, 600 yards line of sight at 60 degrees, is 300 yards on a level plane. Gravity affects objects straight down. A bullet's 'baseline' drop when fired at an angle other than 0 degrees is based on gravity's effects 90 degrees straight down. The reason that we don't correct using our drop chart is because of the fact that we have introduced other angles to compensate for the baseline bullet drop. The rifle barrel has to be aimed up above the target to get the bullet to come up past the line of sight to be able to drop into the target due to gravity. The closer you launch a bullet to 90 degrees up, the longer the bullet follows the line of departure. When fired at 90 degrees up, it will follow the line of departure until it stops due to velocity loss which is due to air density and gravity's influence. When shooting up or down a hill, the principal of gravity affecting the bullet's path is always straight down. When you launch a bullet while aiming at 60 degrees up a hill, the rifle barrel is NOT 60 degrees. This is why bullets will ALWAYS strike high when using the rifleman method. You must use to baseline bullet drop as a reference because this drop is based on gravity affecting the perfect horizontal line of the bullet. This reference does NOT include to angle of the bore in relation to the target. You always take the baseline drop and multiply it by the cosine value before you incorporate the bullet drop from zero. We can use basic math to validate this theory.
Let's use the worst case scenario. A 90 degree uphill shot at 1000 yards using the rifleman method. 1000 * 0 = 0 yards where the rifle is zeroed at 1000 yards. If you aim for zero yards by compensation, the bullet will never even be close to the target. To get a rifle zeroed at 0 yards the angle of the barrel would have to be so steep to get the bullet to cross the line of sight at zero yards that the bullet would be so high over the target it isn't even funny. You can argue and use the reverse cosine or 'sine' (1) which is what we should be using, where 0 is at 0 degrees and .5 is at 60 degrees and 1 is at 90 degrees, 1000 yards * 1 = 1000 yards. If you aim for 1000 yards which is where your rifle is zeroed, your bullet will be 'high' because while the scope is lined up with the target, the barrel is…….you guessed it, angled away from the target. Mathematically, it would be 'high' by the same amount as it would be low at 1000 yards at 0 degrees when fired level. In other words, the baseline bullet drop and the amount you would be high would be equal. Using the average baseline drop at 1000 yards it would be 375" high Now if you apply the correct calculation of ((bullet drop at target * cosine of angle) – bullet drop at zero), the math works out perfectly. In this case, our rifle is zeroed at 1000 yards so you take (0" – 375" * 1.0 cosine = -375"). Now you see that if you come down 375", your bullet will depart at 90 degrees straight up and hit the target. No matter the angle between 0 and 90 degrees, point blank to as far as your bullets stay stable and have forward motion, the calculation of (bullet drop at target – baseline bullet drop at that range * cosine value = true inches of drop every time.
Below is a picture that illustrates the 'why'.
I hope that helps!!
M
You can also take your cosign x MOA for a little easier math!
Ex.
Target range - 500 yds (500 yds = 9 MOA)
Known angle - 20 degrees (20 degrees = .9397 cos (a)
(.9397 x 9 MOA = 8.45 MOA)
So instead of dialing 9 MOA for your shot you would dial 8.45!
If you're using an iPhone just get a shooting app and enter your line of sight angle. The program will do the calcs and give you am exact drop.
Ok don't want to sound dumb, but how do you convert yards to MOA. I thought there was one MOA at 100 yards. So how did ya 9 MOA at 500 yards.
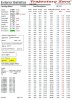
Only my love of geometry saved me from melt down, thanks for the time you put into explaining all that. Seriously, much appreciated.Attached is an example of the drop charts I use in the field in case my iPhone crashes or gets damaged. With a rangefinder and a pocket calculator I can quickly do some simple math to get it done. Notice on my drop chart there is bore line drop and drop from my zero. On the lower left there are the multipliers needed and the equation in case I forget it. I carry a couple charts to cover a few different elevations and temps.