Savage Bedding Tricks

J E Custom

Well-Known Member
Joined
Jul 29, 2004
Messages
10,718
Location
Texas
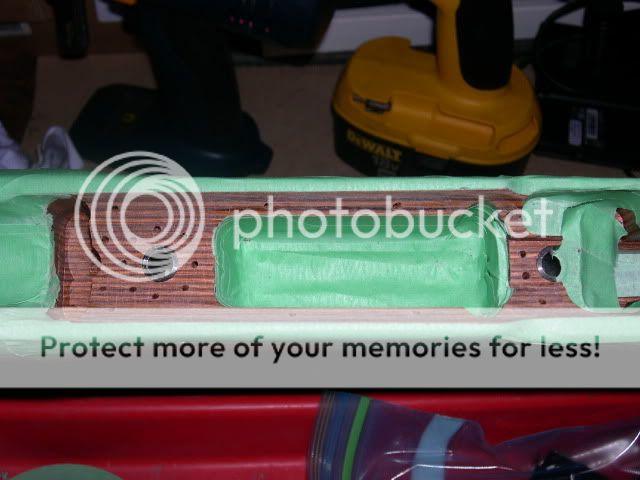
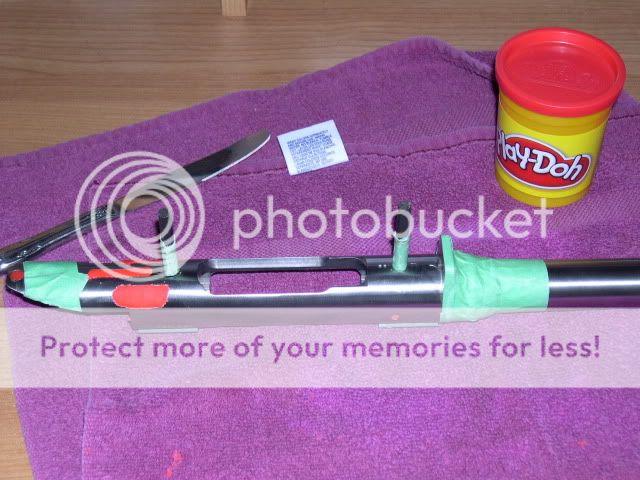
I am interested in learning different ways to bed Savages.

I have bedded a few that turned out good but I am not convinced that the way I did
them was best.

I have a re barrel and bed job about ready to start and though I would ask about
the methods used by others.

I had to make new pillars because these were not long enough.(They were not bearing
against the reciever Just the bottom of the stock).

Any advice or tricks would be appreciated.

Thanks in advance.

J E CUSTOM
 
The back pillar is tricky because it needs to be notched for the sear.

You need to float the rear tang. I stop bedding at the rear pillar.

I also don't bed anything beyond the recoil lug.

Other than that it's pretty straightforward.
 
Same as geargrinder! All I've done is blind center feeds and I just cut the tang of the retaining bracket and make it fit tight then bed it, that way you have some meat for the bedding around the back hole. I set the box depth with a little devcon in the corners and I jam what is left of the box retainer in to hold it down.

I saw a guy on Sniper Hide cut a notch in the sear so he could run a solid pillar all the way up.
 
Thanks Geargrinder and Bigngreen.

That's pretty much what I was doing but I did not free float the tang,
I just didn't bed it.

I normally build new pillars for the Savages (Most of the time they are too short
allowing the action to press against the stock not the pillar.

One other question = Are the existing pillars supposed to be epoxied in place ?
They all come out with a little tap.

I have been epoxying the new ones in place before bedding.

Thanks for the response.

J E CUSTOM
 
One other question = Are the existing pillars supposed to be epoxied in place ?
They all come out with a little tap.

The only time I tried to take the pillars out of a Savage stock(syn.) I wound up having to cut up the stock and grind the pieces off the pillars, couldn't have "tapped" them out with a hand grenade.

That was an older model, since that experience I've decided its easier to order new.

Chris
 
Most of the Savages I have dealt with have been going into a new stock so I haven't really paid attention to the pillars in the OEM stocks. What kinda stocks have you experience loose pillars in, I'll have to make sure I check that out!

Having the tang free floated seems to be very important with the Savages I have bedded. I had a little piece of bedding chip out on the back right corner one day and my rifle went crazy, so I started looking at it and found the tang had pressure on the back right hand side. So back home I watched as I loosened the action screws and you could see the twist come out of the action. I chipped out all the bedding and started over and things came back into alignment.
The thin spot of bedding area between the box mag and the cut out for the sear is hard to get to take good, I ended up drilling little holed so there we're pillars of bedding to support the thin areas.
 
the factory pillars are pressed into place, atleast on the laminate stocks.

I actually had a brand new VLP laminate stock that they undersized the rear pillar hole, then split the stock when they pressed in the pillar. You could push it out with 1 finger. I had my local smith repair the crack by milling a slot across the stock and installing a metal brace into it, then epoxy it into place. He also installed a new pillar(epoxied into place this time).

DSCN4461.jpg


I also drill small holes at different angles around the pillars to give the bedding compound some extra places to lock into. Like this:

DSCN4142.jpg


Another good tip is to go to the hardware store and get some 2.5-3" long 1/4x28 bolts. Cut the head off them and screw them into the action before you bed to use them as a guide. It makes it alot easier to line up the holes. I also tape around the screws so it is a snug fit into the pillar, that way no compound gets into the inside of the pillar. Just remember to use your release agent on these also.

Oh, and Play-Doh works good for filling in the gaps in the action, but dont let it sit too long before you bed it cause the Play-Doh dries and cracks.

DSCN4146.jpg


If you do a bedding job and it doesnt come out smooth when you pull it out (or there are areas that could use more bedding), just clean the releasing agent off the existing bedding and apply another layer, giving it a skim bed to fill in all the low spots. These low spots will also occur if you go overboard and use too much Pam cooking spray as the release agent.
 
Last edited:
The only time I tried to take the pillars out of a Savage stock(syn.) I wound up having to cut up the stock and grind the pieces off the pillars, couldn't have "tapped" them out with a hand grenade.

That was an older model, since that experience I've decided its easier to order new.

Chris

The few that I have dealt with all had the rear pillar loose enough to push it out with my
finger,the front pillar has grooves and is/was pressed in but all have come out with a
little tap from the inside of the stock.

I have been epoxying the new ones in and was just wondering if this was bad ?

Thanks

J E CUSTOM
 
the factory pillars are pressed into place, atleast on the laminate stocks.

I actually had a brand new VLP laminate stock that they undersized the rear pillar hole, then split the stock when they pressed in the pillar. You could push it out with 1 finger. I had my local smith repair the crack by milling a slot across the stock and installing a metal brace into it, then epoxy it into place. He also installed a new pillar(epoxied into place this time).

DSCN4461.jpg


I also drill small holes at different angles around the pillars to give the bedding compound some extra places to lock into. Like this:

DSCN4142.jpg


Another good tip is to go to the hardware store and get some 2.5-3" long 1/4x28 bolts. Cut the head off them and screw them into the action before you bed to use them as a guide. It makes it alot easier to line up the holes. I also tape around the screws so it is a snug fit into the pillar, that way no compound gets into the inside of the pillar. Just remember to use your release agent on these also.

Oh, and Play-Doh works good for filling in the gaps in the action, but dont let it sit too long before you bed it cause the Play-Doh dries and cracks.

DSCN4146.jpg


If you do a bedding job and it doesnt come out smooth when you pull it out (or there are areas that could use more bedding), just clean the releasing agent off the existing bedding and apply another layer, giving it a skim bed to fill in all the low spots. These low spots will also occur if you go overboard and use too much Pam cooking spray as the release agent.

your post is interesting! I did three Savages a few years back that were not pillar bedded from the factory, but were the laminated varmit stock. I made a step drill with a long pilot to use as a guide for drill the hole in the stock for the pillars. I made my pillars out of 4150 pretreat steel that had .06" grooves machine in the O.D. It seems that we're doing the pillars in a very similar way. I do my forends vastly different than most anybody else I've seen (especially in the recoil lug area).

One problem a few folks in the past have had with porosity in the bedding is actually caused by their release agent. When you completely degrease the action you need to let it set under a lamp for a day or so. This gets rid of any retained solvents left in the metal surface. I finally started using Johnson's Pledge per one of the manufacturers info. I use three coats sprayed at alternating 90 degree angles (90, 180, and 270 degrees). I use Super Belzonia for the recoil lug area that has steel shot mixed in with it, but for the rest I use nothing but Hardemans low shrinkage epoxy. Everything comes out very tight, and in a couple case I had to actually rub it slightly with some 400 grit paper. But the real trick with a Savage is to free float the tang area and get the recoil lug very tight (throw away the factory recoil lug before you even start). Lastly if your doing a plastic stock; you really need to beef up the forend with bedded steel rods or at least fill in all the voids with Super Belzonia.
gary
 
Thanks to all that responded to this post !!!!!

There were a lot of good ideas and I intend to incorporate them in my next Savage
build.

Now if I can just figure out that **** M77 Ruger with the slanted recoil lug well enough
to make it consistant from one to the next.

Thanks again.

J E CUSTOM
 
Thanks to all that responded to this post !!!!!

There were a lot of good ideas and I intend to incorporate them in my next Savage
build.

Now if I can just figure out that **** M77 Ruger with the slanted recoil lug well enough
to make it consistant from one to the next.

Thanks again.

J E CUSTOM

probably my favorite caliber is a 6mm Remington, and I've owned more than one thru the years. Years back I found a used Ruger with a standard weight barrel on it. Snatched it up, and took it home only to find the guy who owned it before had a bedding problem, and actually used part of a matchbook cover as a spacer inside. The gun still shot 1.38" groups! (HOW?). I studied the action and the way it was bedded for a couple weeks, and said that I'd either get to buy a new stock or fix it.
I actually bedded their stupid recoil lug and the front of the reciever with epoxy putty (the stuff I used had a 20 minute work time, and cures hard as a rock). The next morning I was shooting 3/4" groups with it. Then I did some work with the reciever in stages, but only picked up another 1/8th inch. I know I didn't do the bedding job right, but at that stage I just wanted to experiment a little bit. THe epoxy putty never let go, and oil would not damage it
gary
 
Warning! This thread is more than 14 years ago old.
It's likely that no further discussion is required, in which case we recommend starting a new thread. If however you feel your response is required you can still do so.
Top