The Savage Models 12 And 112 Enter The Switch Barrel Arena
Norman E. Johnson
For the past few decades switch-barrel rifles have become mainstays among my test rifles and hunting rifles. Having some of these rifles limited to one barrel and one cartridge didn't really make much sense. Tying up a major amount of money in a rifle with a mounted scope and a single barrel simply didn't prove the logical thing to do.
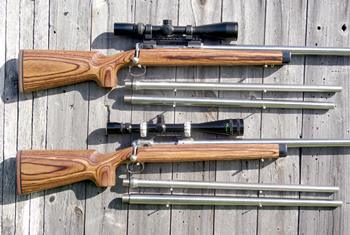
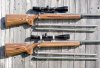
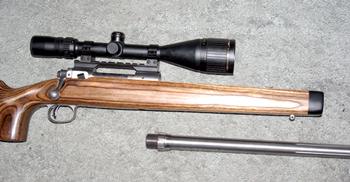
Shown here are the Savage Models 112 and 12 single-shot rifles with six barrels, prepared by author as switch-barrel rifles.
Back in the formative stages of my switch-barrel plan, I had, thus far, not heard of the method that I later adapted to several different action types. These included the complete Remington 700 line along with the Model 40-X and the XP-100, Winchester Model 70, Ruger Model 77, Weatherby MK V single-shot, Thompson/Center TCR '83, and a few others. The interchangeable barrels eventually would number upwards of 115 in a wide range of cartridges. While I may not be the forerunner of this sort of switch barrel origination, there are distinguishing traits unique to all of the rifle types in the methods that I use. The leading requirements that made sense to me were being able to switch the barrel of each style of gun without removing or disturbing the action from the stock or removing the scope from the action. This allows pre-headspaced barrels to be conveniently removed or re-installed beneath the scope with absolute precision.
A CLOSER LOOK AT THE SAVAGE MODEL 12-112 SINGLE-SHOT RIFLE
For a time I resisted using this unique feature on the fine line of Savage bolt-action rifles … namely the Models 112 and 12 single-shots. These rifles utilize a special barrel locking nut to retain the barrel and set cartridge headspace. Working this barrel-to-action lock nut requires a special wrench that made it necessary to remove the action from the stock and the scope from the action. A removable style recoil lug similar to that used on the Remington 700 is sandwiched between the receiver face and the barrel lock nut. I will cover later, in more detail, the significant changes I make in the Savage barrel lock nut and recoil lug.
With my system of switching barrels, the stock barrel channel must be enlarged sufficiently to slide the barrel out beneath the mounted scope objective lens. This often requires a medium to high scope mount where a larger than 42mm scope objective lens is used. A bolt-hole style action wrench also is required, which is available for all the actions I use. If not readily available, I make such wrenches, as was the case for the Weatherby Mark V triangularly positioned locking lugs. A good, padded barrel vise also is a necessary item. Anyway, these Savage rifles were next in line for me as viable candidates, particularly the single-shot versions.
I had a good working knowledge of the Savage Models 112 and 12 dating back quite a few years. Then, in 2003 I got to know the Savage Model 12 even better. I attended a Colorado prairie dog hunt sponsored by Savage Arms. I was provided a Model 12 in caliber .223 Remington with the new Savage Accu-Trigger. I ended up owning this rifle, and following testing, wrote an article on it and Savage Arms for the April 2004 VARMINT HUNTER Magazine®.
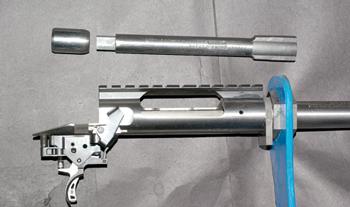
Pictured here is a Savage Model 12 short action receiver with AccuTrigger as used in switch barrel project. A special action wrench is shown fitted to the Savage barrel lock nut as used to remove the barrel the first time.
PREPARING THE SAVAGE RIFLE
FOR SWITCH BARRELING
If you are not qualified as a gunsmith, you can have much of the initial work done by someone who is qualified in converting the Savage rifle to the switch-barrel method. Later you can change your own barrels fitted and headspaced to that specific cartridge. To start the operation, removing the Savage 110 Series barrels is best performed using a special wrench that fits the barrel lock nut. This is accomplished by holding either the barrel or action in a suitable barrel vise or action wrench. Breaking the initial bond between barrel and action on any rifle will require upwards of 100 foot pounds of torque – sometimes much over 200 foot pounds. This would be similar to removing a very stubborn lug nut from an automobile wheel when changing a tire. Removing and installing barrels thereafter will require only about 40-80 foot pounds of torque … seldom more than 100 foot pounds. Where the barrel shoulder-to-receiver is fit with precision, some shooters claim to get decent accuracy with barrels screwed on hand tight. While such low torque may work for some, tests that I have performed don't bear this out. Proper cartridge headspace is best achieved with at least a moderate amount of torque. Under 25 foot-pounds is definitely on the low side and may not assure consistent cartridge headspace.
Once the barrel is removed from the Savage 110 Series action, the separate parts should be thoroughly cleaned, including all threads, receiver face, and the lock nut. Some gun manufacturers use a form of thread bonding material to keep the action together under all conditions. However, some form of lubricant is used on the barrel threads and shoulder later to facilitate removal and re-installation. In working with scores of barrels, I never have had one loosen during use, even while using special barrel thread lubricant, which I will cover later (See "Proper Use of Barrel Vise" article in April/June 2010 TVHM® for further information).
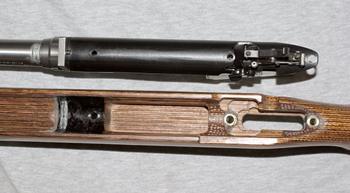
The Model 12 Savage shows three-point pillar bedding with added pillar at rear tang. This photo also shows position of new tang screw at rear of safety tab. This new pillar helped to strengthen the bedding system.
ENLARGING THE
STOCK BARREL CHANNEL
To facilitate barrel removal from beneath the scope with the action bolted in the stock, the barrel channel must be enlarged. The basic approach here varies little among rifles. This means the barrel channel must be enlarged to the greater diameter of the barrel at least for a length beneath the scope objective lens housing. A higher set of scope rings or high scope base may be needed here. In the case of the Savage 110 Series rifle, the barrel lock nut will remain in place, as an integral part of the barrel, as barrels are removed and re-installed. This barrel lock nut is 1.3" in diameter whereas most bolt-action rifle barrels measure 1.2" to 1.25" over the chamber requiring further need for an enlarged barrel channel. The remaining barrel of the Savage rifle over the chamber measures 1.030", a significantly smaller diameter. Most other barrels as received from the barrel maker measure 1.2" through the chamber area for a length of 3 to 4 inches. The majority of the switch barrels I work with are varmint or target weight and the barrel channel on the Savage rifles does not appear overly large. It appears that most barrels are adequately free-floating in the stock channel anyway these days.
Removing the wood from the barrel channel does require a bit of work and can be done with rough sandpaper on a dowel or with a suitable ball-end-mill in a milling machine. Either way, you'll have to try the barrel in the stock channel at intervals and finally finish and re-seal the wood in the channel. Keep in mind the type of scope and mount you'll be using as you re-work the channel and try sliding the barrel under the scope objective lens housing. I like to see a minimal 1/16" gap here. I never have enjoyed enlarging barrel channels, but it's part of the job as you convert to a switch barrel rifle where the barrel is removed, leaving the scoped action undisturbed in the stock. Being able to change barrels in well under 10 minutes sure beats removing the scope from the action, and the action from the stock, involving considerable time and disrupting the scope mounting and action bedding. Such disturbances often require many shots for a rifle to settle down to normal shooting. With the switch barrel method I use, I have regularly shot under minute-of-angle five-shot groups while removing and replacing the barrel for each shot. The Savage Models 12 and 112 are no exception. The accuracy of these rifles will amaze even the most demanding riflemen.
INSTALLING A NEW RECOIL LUG
While I'm into the barrel channel, I will discuss the merits of replacing the factory recoil lug with a competition style recoil lug. The Savage factory recoil lug is stamped out with the lug-to-receiver retaining notch also stamped beneath the periphery of the barrel hole within the lug. This type of lug lends little to overall precision as it is sandwiched between the receiver and the barrel lock nut. A close look at Brownells gunsmithing catalog shows six competition style recoil lugs for the Model 700 Remington and Savage rifles. Holland's Recoil Lug, made for the Remington/Savage rifles, is the one I chose. This double-disk ground lug is 0.250" thick as compared with the Savage factory lug at 0.185" in thickness. This will not reduce the barrel-to-receiver thread purchase as the barrel lock nut or barrel shoulder is moved forward to compensate for the thicker recoil lug. The new barrel lug is a good replacement for those seeking the ultimate in receiver face precision.
We need to be sure the recoil lug mortise in the stock is large enough for the new recoil lug, if used. Either way, there should be ample space for either style lug used.
The recoil lug must be precisely bedded in place with bedding material surrounding it. The fully stabilized recoil lug is actually held in place as an action wrench is used to separate the barrel from the action! This is partly the result of the alignment lug on the recoil lug that fits into the notch at the lower, front edge of the receiver ring. Here I made and fitted a lug that precisely fit the receiver ring slot as an integral part of the recoil lug.
Of course, the barrel is held in a padded barrel vise or whatever means of holding the barrel is used to remove it from the action. Then, as the barrel is removed from the action the recoil lug is essentially free-floating in its precisely bedded pocket. There it remains in place as the barrel is removed or replaced.
ADJUSTING BARREL/CARTRIDGE HEADSPACE
The Savage 110 Series rifles are equipped with a unique method of adjusting and locking in cartridge headspace — quite clever, to say the least. But I simplified things here in the switch-barrel process to make changing barrels faster and easier with perfect cartridge headspace.
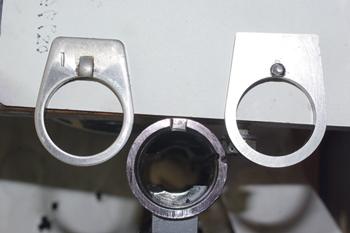
Stamped recoil lug on left, used by Savage on the Models 12 and 112 rifles. The Holland recoil lug shown on right is used as a replacement for the Savage lug. This is a high precision double-disk-ground lug. The receiver face is shown at center with alignment notch used to align the recoil lug.
The Savage barrel lock nut is 0.875" in length with 11 internal threads over the back two thirds of this length. The remaining tapered portion of the lock nut is not threaded and serves to cover the otherwise exposed threads of the installed barrel. The unthreaded front part of the shroud has a 0.02" gap between it and the barrel, per se, which I put to good use and will describe later. But first, on to cartridge headspace using the barrel lock nut.
With the barrel securely held in a padded barrel vise, and a lock-nut wrench all ready to go, screw the barrel lock nut onto the barrel, as far as it will go, with your fingers. The recoil lug is then put in place against the barrel lock nut with the receiver engaging lug or pin toward the receiver. At this time the receiver engages the recoil lug and is turned onto the barrel with the bolt in place and carefully screwed farther onto the barrel until the bolt face makes contact with the barrel. You'll have to back things up until the bolt can be closed freely. At this time try the headspace gauge and back off the barrel lock nut until bolt can be closed down on the GO headspace gauge with some feel. The lock nut wrench is now tightened to the desired foot pounds of torque and the headspace gauge is again tried. This maneuver is applied until such time the correct cartridge headspace is attained.
At this stage I put witness marks on the barrel lock nut and the barrel to refer back to as I remove the receiver from the barrel with an action wrench inserted into the bolt hole. The receiver should loosen at the juncture of the back part of the recoil lug as you look for movement at the witness marks. This is precisely how the barrel will later be removed from the action as it is bolted into the stock. The barrel lock nut is then bonded in place so headspace is permanently maintained without referring back to the witness marks each time a barrel is installed. The barrel lock nut could be fixed in place with Loc-Tite, a thread locking agent, but I have discovered a better way. I simply slide a thin, metal shim between the non-threaded barrel and barrel lock nut shroud coated on both sides with J-B Cold Weld. This does the trick. As the bonding agent is setting I install the barrel in the action and torque it to about 25-foot pounds with the witness marks in alignment. This assures coaxial alignment at the barrel-to-receiver thread juncture.
Then, should you later want to move the barrel lock nut or further adjust headspace, simply apply heat over the J-B Cold Weld tab and the lock nut can be turned. Re-apply the Cold-Weld tab as needed. I've never had a barrel lock nut loosen in changing dozens of barrels with my system of switching barrels on these Savage rifles.
Stamped recoil lug on left, used by Savage on the Models 12 and 112 rifles. The Holland recoil lug shown on right is used as a replacement for the Savage lug. This is a high precision double-disk-ground lug. The receiver face is shown at center with alignment notch used to align the recoil lug.
FITTING AN AFTER-MARKET BARREL TO THE SAVAGE 110 SERIES RECEIVER
As I get into fitting custom after-market barrels on the Savage Model 110 series, a conventional barrel-to-receiver shoulder is put to use. There is little point in reducing the larger barrel diameter to the smaller Savage barrel diameter and extending the threads for a barrel lock nut. Savage Model 110 Series barrels have a 1.030" breech diameter over the chamber compared to 1.2" to 1.250" diameter common to most other barrels. In this situation larger barrels would tend to withstand greater chamber pressures as well.
As aforementioned, the Savage Model 112 long action was factory chambered for the .220 Swift in a fluted 26" stainless factory barrel and the short action was chambered for the .223 Remington. As converted to switch-barrel, both rifles maintained and delivered superb performance. It's really encouraging to see factory barrels producing sub-half-minute accuracy as these two rifles now do, particularly the high intensity .220 Swift cartridge.
My original plan was initially to add a .22 PPC, a 5mm/35 SMc, and a .257 Improved cartridge to the switch-barrel pair of fine shooting Savage rifles. Each of these new-addition cartridges used the larger .308 Winchester-size bolt face, and the short-action Savage Model 12 was chambered for the .223 Remington. This prompted me to go to Savage Arms and get an additional new .308-size bolt assembly for the short-action rifle. Bill Dermot and Effie at Savage Arms were courteous and prompt in arranging to send the new bolt assembly. As it turned out, I used the short-action switch-barrel, along with the new bolt, to chamber for the .22 PPC Shilen barrel, and the Krieger barrel was chambered for the 5mm/35 SMc. The .257 Improved cartridge was chambered to a Douglas premium 1:12" twist barrel for the longer 112 action.
Threading these three barrels for the 20" pitch Savage thread with a full 1.250" shoulder resulted in a most precision barrel-to-action fit. Conventional chamber reaming was quite routine, using a Pacific Tool & Gauge, Inc. reamer for the 5mm/35 SMc cartridge, and a Clymer reamer for the .22 PPC cartridge, and the .257 Improved 40-degree Ackley.
Processing a barrel for the Savage action while not using their customary barrel lock nut is a basic gunsmithing procedure. I did, however, have to lengthen the cross-slide style extractor in the .308-size bolt head to fit the smaller Lapua .22 PPC cases. Another plus with this pair of Savage rifles is the interchangeability of barrels from one rifle to the other. As an example, I can put the Douglas .257 Improved barrel on either the long action Model 112 or the short action Model 12 and cartridge headspacing is right on the money.
Most of my 40-X and 700 series Remingtons enable this barrel exchange to be performed as well. This opens a lot of doors. I designed a tool I call a bolt face comparator, which accurately measures the space between the posterior surface of the locking lugs and the bolt face. The new bolt that I got from Savage for the Model 12 measures out within a thousandth of an inch of the Model 112 bolt. Bolt or action length make no difference.
SAVAGE SWITCH-BARREL PERFORMANCE
Having experience with an array of switch barrel rifle types, I fully expected the Savage Model 12 short action single-shot and the long action Model 112 single-shot to be top performers. I did my best to obviate any bugs in the gunsmithing department that can certainly lurk around if strict attention to precision isn't carefully performed.
These two actions have very rigid receivers equal in strength to the much praised Model 40-X Remington or several of the other stiff receiver actions. I had thoroughly gone over the stock bedding on these two rifles, leaving nothing to chance. The heavy, laminated stocks were used, adding additional bedding pillars where I could. This, in itself, got very involved.
In the scope mounting department, I used the Picatinny-style bases with Brownells 8-40 mount screw conversion kit to replace the 6-48 standard mount screws for added strength on both rifles. The Model 12 wore a Ferrel Picatinny-style base, topped with Leupold's tactical style scope rings. On the long action Model 112 I used one of Brownells Picatinny-style bases, also topped with Leupold's tactical-style rings. I vacillated between scopes, ending up with a 6.5-20x SII Sightron scope on the long action Model 112. The short action Model 12 now wears one of the older Redfield 8-32x Target scopes.
The entire scope mounting system was thoroughly checked with Brownell's scope alignment rods as a means of identifying any stresses in the scope mounting. These 30mm/1 inch, sleeved alignment rods totally remove all guesswork in co-axial alignment of the scope rings.
Barrels could be removed and re-installed in well under 10 minutes while repeating perfect bullet impact and grouping on target. With proper gunsmithing, the Savage 12 and 112 have the inherent accuracy capable of being wrung out along with the best of them, including the famous Model 40-X Remington. In my experience, that is saying quite a bit for a non-custom, factory action.
At the time of this writing, the two Savage switch-barrel rifles were chambered for the .220 Swift and .223 Remington as factory barrels and .257 Improved 40-degree in a Douglas barrel, .22 PPC in a Shilen barrel, and 5mm/35 SMc in a Krieger barrel. Then, after no small amount of contemplation, I chambered the Model 12 to .308 Winchester. I had in mind here to put together a super-accurate .308. The extra bolt for the Model 12 helped in making this decision. I talked with Tim North, president of Broughton Barrels, and there was a barrel in the works. A 1:12" twist Broughton barrel later was installed.
Manson Precision Reamers made up a special reamer with a 0.342" neck diameter and 0.3085" x 0 x 11/2 degree throat. I would be testing some of the Lapua cases with small-size primer pockets and the Hornady Competition cases as well. I fitted the new barrel to the Savage Model 12 action with an integral shoulder in lieu of the Savage-style lock nut. Actually, the barrel fitted in this way headspaced perfectly in both the Savage Model 12 and Savage Model 112 single-shot rifles. The barrel was stamped accordingly.
With all the work I had done in preparing these rifles, my expectations for accuracy ran pretty high. My first testing involved the two Savage factory barrels in .220 Swift and .223 Remington. With all my rifles I keep very detailed performance records, along with targets representative of the accuracy on each and every rifle and/or barrel. I was not surprised when noticeably improved accuracy emerged from each of these two factory barrels in their much-worked-on actions and stocks. The convincing results were right there before me.
As I got into testing the other barrels, it was evident these two Savage rifles were delivering accuracy every bit as good as I had come to expect from my best target and varmint rifles, including the more than a dozen Model 40-X Remington rifles. Each of these Model 40-X rifles have been converted to switch-barrel use with more than a score of premium barrels in a good variety of cartridges, so I had many rifles to compare the two Savage rifles to in my evaluation.
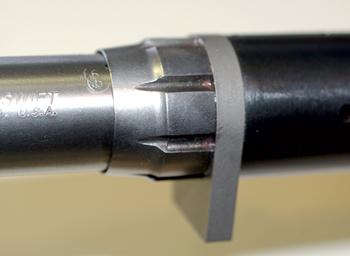
The Savage rifle pictured here is a perfect example of efficient switch-barrel design as the barrel is removed beneath the mounted scope with action remaining in the stock. The rifle shown here is a Savage Model 12 with 50mm Bausch & Lomb scope and Picatinny mounts. Shown here is a pre-headspaced Savage barrel with barrel lock nut in fixed position.
While I have other Savage single-shot actions in use, it was the Model 12 in caliber .223 that I used at the 2003 writers' conference that inspired me to pursue the Savage rifles as switch-barrel candidates. As mentioned earlier, the Savage barrel lock nut system really didn't fit into my scheme of switch barreling until I locked the barrel nut into position at proper headspace. This was a necessary move. It would be hard for the average rifleman/hunter to imagine two rifles, each with three barrels, delivering the level of accuracy I would later get from these two Savage rifles.
What I had in mind for these two switch-barrel rifles was delivery of both target and varmint shooting performance. I knew the inherent accuracy was within these rifles — all they needed was a little coaxing. With all the fine components we have today for reloading, it was easy to find loads for these rifles to fit both needs. It would be impossible here to include all the fine loads. I did, however, photograph targets from each of the six carefully fitted barrels. One of the series of targets includes the initial group shot with the .223 Remington Model 12 from the factory. This shows a near half-inch group using 69-grain Federal Gold Medal ammo. My starting groups with this barrel, before the total accurizing process, were pretty much like this factory target. But things really changed. One photograph shows typical examples of pure accuracy from a factory rifle with a factory barrel. Four groups using 52-grain Berger bullets measure 0.175", 0.125", 0.195", and 0.240" for a 0.184" average.
In my long search for a super-grouper .308 Winchester rifle, I came upon a few that hovered around 0.5" to 0.6", give or take a few tenths. Then, as I worked with the Model 12 Savage with the smaller .223 Remington bolt face, I decided to add a .308 Winchester-size bolt. What a good move this was! I contacted Tim North and he made me a 1:12" twist barrel for the .308 Winchester. Dave Manson put the finishing touches on a reamer, and following about eight hours of careful gunsmithing, the barrel was ready for testing. I also had some special Lapua Palma cases with small rifle primer pockets and smaller flash holes to use along with the Hornady match cases. I always thought there was a "quarter minute" .308 Winchester rifle out there for me, but I didn't think it would end up being a Savage rifle.
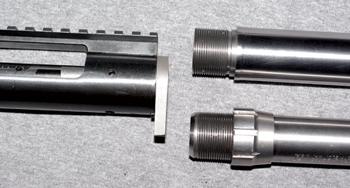
Shown here is the basic premise combining two different types of pre-headspaced barrels used in switch-barrel application. Here the Savage barrel, with fixed lock nut, is shown along with the use of a conventional barrel shoulder as changed by author. The Holland recoil lug is shown here on a Savage M112 action with Picatinny scope base. Barrel fitting doesn't get more solid and precise than this.
From the onset, the .308 Winchester rifle handled most any of the loads I offered it with a good share of high twos and threes in the mix. Then I struck on a load that set 'em all back. This was the 168-grain Berger with the Lapua small-rifle-primer cases using 41 grains of Reloder 15 powder and CCI 200 small rifle primers. One target showed a 0.231 minute of angle 300-yard group and two five-shot 100-yard groups measuring 0.195" and one 0.009" (and yes, the decimal points are in the correct place).
These three groups translate to 0.145" minute of angle average.
The Savage stock barrel in .220 Swift shot four groups using Hornady 52-grain bullets into 0.473", 0.435", 0.279", and 0.233" for a respectable 0.355" average.
One of my favorite .25 caliber wildcats, the .257 Ackley Improved, fared well with six straight five-shot groups with none outside of 0.650". Here I used Sierra's 100-grain bullets and IMR 4350 powder.
In my planning, I chose to chamber a Krieger 1:12" twist barrel to the 112 action for the 5mm/35 SMc. The more I use this cartridge the better I like it. It is a worthy addition to the .20 caliber family. Six groups using a few of the bullets stayed well under 0.400" average at 100 yards. At 300 yards it also grouped very well.
Last, I'll reflect on the .22 PPC as used in the Savage Model 12 short action with a Shilen 1:14" twist barrel. Though this entry may be thought of as a bench rest cartridge, along with its rather pricey cases, it also is a very capable varmint cartridge. I shot seven groups shortly after barrel break-in using the 52-grain Sierra bullet along with 26 grains of N133 powder. These seven groups averaged a ho-hum 0.160". I then switched to the 300-yard range and shot three five-shot groups which measured 0.795", 0.850", and 0.940", which translates to 0.862" MOA average in a mild crosswind. Whenever my varmint rifles group inside two inches at 300 yards, I don't complain, but inside an inch at this range is above and beyond!
To summarize, the many hours devoted to planning and building switch-barrel rifles has been worth every minute of it. Had I known how effective the Savage rifles would be, I would not have waited so long to work with them.
CONTACTS
(Savage 12 & 112 Switch-Barrels)
Savage Arms, Inc.
118 Mountain Road
Suffield, CT 06078
(413) 568-7001
www.savagearms.com
Holland's Shooters Supply Inc.
P.O. Box 69
Powers, OR 97466
(541) 439-5155
www.hollandguns.com
Brownells
200 South Front Street
Montezuma, IA 50171
(800) 741-0015
www.brownells.com
Lapua
123 Winchester Drive
Sedalia, MO 65301
(660) 826-3232
www.lapua.com
NEAR Mfg.
P.O. Box 1677
Camrose, Alberta T4V1X6 Canada
(866) 608-2441
www.scopebases.com
Douglas Barrels Inc.
5504 Big Tyler Road
Charleston, WV 25313
(304) 776-1341
www.douglasbarrels.net
Shilen Rifles, Inc.
205 Metro Park Blvd.
Ennis, TX 75120
(972) 875-5318
www.shilen.com
Krieger Barrels, Inc.
2024 Mayfield Road
Richfield, WI 53076
(262) 628-8558
www.kriegerbarrels.com
Broughton Barrels
P.O. Box 1010
Campbellsport, WI 53010
(920) 922-4882
www.rifle-barrels.net
Clymer Precision
1605 West Hamlin Road
Rochester Hills, MI 48309
(248) 853-5555
www.clymertool.com
Dave Manson Precision Reamers
8200 Embury Road
Grand Blanc, MI 48439
(810) 953-0732
www.mansonreamers.com
Leupold & Stevens
P.O. Box 688
Beaverton, OR 97006
(503) 526-1422
www.leupold.com
Norman E. Johnson
For the past few decades switch-barrel rifles have become mainstays among my test rifles and hunting rifles. Having some of these rifles limited to one barrel and one cartridge didn't really make much sense. Tying up a major amount of money in a rifle with a mounted scope and a single barrel simply didn't prove the logical thing to do.
Shown here are the Savage Models 112 and 12 single-shot rifles with six barrels, prepared by author as switch-barrel rifles.
Back in the formative stages of my switch-barrel plan, I had, thus far, not heard of the method that I later adapted to several different action types. These included the complete Remington 700 line along with the Model 40-X and the XP-100, Winchester Model 70, Ruger Model 77, Weatherby MK V single-shot, Thompson/Center TCR '83, and a few others. The interchangeable barrels eventually would number upwards of 115 in a wide range of cartridges. While I may not be the forerunner of this sort of switch barrel origination, there are distinguishing traits unique to all of the rifle types in the methods that I use. The leading requirements that made sense to me were being able to switch the barrel of each style of gun without removing or disturbing the action from the stock or removing the scope from the action. This allows pre-headspaced barrels to be conveniently removed or re-installed beneath the scope with absolute precision.
A CLOSER LOOK AT THE SAVAGE MODEL 12-112 SINGLE-SHOT RIFLE
For a time I resisted using this unique feature on the fine line of Savage bolt-action rifles … namely the Models 112 and 12 single-shots. These rifles utilize a special barrel locking nut to retain the barrel and set cartridge headspace. Working this barrel-to-action lock nut requires a special wrench that made it necessary to remove the action from the stock and the scope from the action. A removable style recoil lug similar to that used on the Remington 700 is sandwiched between the receiver face and the barrel lock nut. I will cover later, in more detail, the significant changes I make in the Savage barrel lock nut and recoil lug.
With my system of switching barrels, the stock barrel channel must be enlarged sufficiently to slide the barrel out beneath the mounted scope objective lens. This often requires a medium to high scope mount where a larger than 42mm scope objective lens is used. A bolt-hole style action wrench also is required, which is available for all the actions I use. If not readily available, I make such wrenches, as was the case for the Weatherby Mark V triangularly positioned locking lugs. A good, padded barrel vise also is a necessary item. Anyway, these Savage rifles were next in line for me as viable candidates, particularly the single-shot versions.
I had a good working knowledge of the Savage Models 112 and 12 dating back quite a few years. Then, in 2003 I got to know the Savage Model 12 even better. I attended a Colorado prairie dog hunt sponsored by Savage Arms. I was provided a Model 12 in caliber .223 Remington with the new Savage Accu-Trigger. I ended up owning this rifle, and following testing, wrote an article on it and Savage Arms for the April 2004 VARMINT HUNTER Magazine®.
Pictured here is a Savage Model 12 short action receiver with AccuTrigger as used in switch barrel project. A special action wrench is shown fitted to the Savage barrel lock nut as used to remove the barrel the first time.
PREPARING THE SAVAGE RIFLE
FOR SWITCH BARRELING
If you are not qualified as a gunsmith, you can have much of the initial work done by someone who is qualified in converting the Savage rifle to the switch-barrel method. Later you can change your own barrels fitted and headspaced to that specific cartridge. To start the operation, removing the Savage 110 Series barrels is best performed using a special wrench that fits the barrel lock nut. This is accomplished by holding either the barrel or action in a suitable barrel vise or action wrench. Breaking the initial bond between barrel and action on any rifle will require upwards of 100 foot pounds of torque – sometimes much over 200 foot pounds. This would be similar to removing a very stubborn lug nut from an automobile wheel when changing a tire. Removing and installing barrels thereafter will require only about 40-80 foot pounds of torque … seldom more than 100 foot pounds. Where the barrel shoulder-to-receiver is fit with precision, some shooters claim to get decent accuracy with barrels screwed on hand tight. While such low torque may work for some, tests that I have performed don't bear this out. Proper cartridge headspace is best achieved with at least a moderate amount of torque. Under 25 foot-pounds is definitely on the low side and may not assure consistent cartridge headspace.
Once the barrel is removed from the Savage 110 Series action, the separate parts should be thoroughly cleaned, including all threads, receiver face, and the lock nut. Some gun manufacturers use a form of thread bonding material to keep the action together under all conditions. However, some form of lubricant is used on the barrel threads and shoulder later to facilitate removal and re-installation. In working with scores of barrels, I never have had one loosen during use, even while using special barrel thread lubricant, which I will cover later (See "Proper Use of Barrel Vise" article in April/June 2010 TVHM® for further information).
The Model 12 Savage shows three-point pillar bedding with added pillar at rear tang. This photo also shows position of new tang screw at rear of safety tab. This new pillar helped to strengthen the bedding system.
ENLARGING THE
STOCK BARREL CHANNEL
To facilitate barrel removal from beneath the scope with the action bolted in the stock, the barrel channel must be enlarged. The basic approach here varies little among rifles. This means the barrel channel must be enlarged to the greater diameter of the barrel at least for a length beneath the scope objective lens housing. A higher set of scope rings or high scope base may be needed here. In the case of the Savage 110 Series rifle, the barrel lock nut will remain in place, as an integral part of the barrel, as barrels are removed and re-installed. This barrel lock nut is 1.3" in diameter whereas most bolt-action rifle barrels measure 1.2" to 1.25" over the chamber requiring further need for an enlarged barrel channel. The remaining barrel of the Savage rifle over the chamber measures 1.030", a significantly smaller diameter. Most other barrels as received from the barrel maker measure 1.2" through the chamber area for a length of 3 to 4 inches. The majority of the switch barrels I work with are varmint or target weight and the barrel channel on the Savage rifles does not appear overly large. It appears that most barrels are adequately free-floating in the stock channel anyway these days.
Removing the wood from the barrel channel does require a bit of work and can be done with rough sandpaper on a dowel or with a suitable ball-end-mill in a milling machine. Either way, you'll have to try the barrel in the stock channel at intervals and finally finish and re-seal the wood in the channel. Keep in mind the type of scope and mount you'll be using as you re-work the channel and try sliding the barrel under the scope objective lens housing. I like to see a minimal 1/16" gap here. I never have enjoyed enlarging barrel channels, but it's part of the job as you convert to a switch barrel rifle where the barrel is removed, leaving the scoped action undisturbed in the stock. Being able to change barrels in well under 10 minutes sure beats removing the scope from the action, and the action from the stock, involving considerable time and disrupting the scope mounting and action bedding. Such disturbances often require many shots for a rifle to settle down to normal shooting. With the switch barrel method I use, I have regularly shot under minute-of-angle five-shot groups while removing and replacing the barrel for each shot. The Savage Models 12 and 112 are no exception. The accuracy of these rifles will amaze even the most demanding riflemen.
INSTALLING A NEW RECOIL LUG
While I'm into the barrel channel, I will discuss the merits of replacing the factory recoil lug with a competition style recoil lug. The Savage factory recoil lug is stamped out with the lug-to-receiver retaining notch also stamped beneath the periphery of the barrel hole within the lug. This type of lug lends little to overall precision as it is sandwiched between the receiver and the barrel lock nut. A close look at Brownells gunsmithing catalog shows six competition style recoil lugs for the Model 700 Remington and Savage rifles. Holland's Recoil Lug, made for the Remington/Savage rifles, is the one I chose. This double-disk ground lug is 0.250" thick as compared with the Savage factory lug at 0.185" in thickness. This will not reduce the barrel-to-receiver thread purchase as the barrel lock nut or barrel shoulder is moved forward to compensate for the thicker recoil lug. The new barrel lug is a good replacement for those seeking the ultimate in receiver face precision.
We need to be sure the recoil lug mortise in the stock is large enough for the new recoil lug, if used. Either way, there should be ample space for either style lug used.
The recoil lug must be precisely bedded in place with bedding material surrounding it. The fully stabilized recoil lug is actually held in place as an action wrench is used to separate the barrel from the action! This is partly the result of the alignment lug on the recoil lug that fits into the notch at the lower, front edge of the receiver ring. Here I made and fitted a lug that precisely fit the receiver ring slot as an integral part of the recoil lug.
Of course, the barrel is held in a padded barrel vise or whatever means of holding the barrel is used to remove it from the action. Then, as the barrel is removed from the action the recoil lug is essentially free-floating in its precisely bedded pocket. There it remains in place as the barrel is removed or replaced.
ADJUSTING BARREL/CARTRIDGE HEADSPACE
The Savage 110 Series rifles are equipped with a unique method of adjusting and locking in cartridge headspace — quite clever, to say the least. But I simplified things here in the switch-barrel process to make changing barrels faster and easier with perfect cartridge headspace.
Stamped recoil lug on left, used by Savage on the Models 12 and 112 rifles. The Holland recoil lug shown on right is used as a replacement for the Savage lug. This is a high precision double-disk-ground lug. The receiver face is shown at center with alignment notch used to align the recoil lug.
The Savage barrel lock nut is 0.875" in length with 11 internal threads over the back two thirds of this length. The remaining tapered portion of the lock nut is not threaded and serves to cover the otherwise exposed threads of the installed barrel. The unthreaded front part of the shroud has a 0.02" gap between it and the barrel, per se, which I put to good use and will describe later. But first, on to cartridge headspace using the barrel lock nut.
With the barrel securely held in a padded barrel vise, and a lock-nut wrench all ready to go, screw the barrel lock nut onto the barrel, as far as it will go, with your fingers. The recoil lug is then put in place against the barrel lock nut with the receiver engaging lug or pin toward the receiver. At this time the receiver engages the recoil lug and is turned onto the barrel with the bolt in place and carefully screwed farther onto the barrel until the bolt face makes contact with the barrel. You'll have to back things up until the bolt can be closed freely. At this time try the headspace gauge and back off the barrel lock nut until bolt can be closed down on the GO headspace gauge with some feel. The lock nut wrench is now tightened to the desired foot pounds of torque and the headspace gauge is again tried. This maneuver is applied until such time the correct cartridge headspace is attained.
At this stage I put witness marks on the barrel lock nut and the barrel to refer back to as I remove the receiver from the barrel with an action wrench inserted into the bolt hole. The receiver should loosen at the juncture of the back part of the recoil lug as you look for movement at the witness marks. This is precisely how the barrel will later be removed from the action as it is bolted into the stock. The barrel lock nut is then bonded in place so headspace is permanently maintained without referring back to the witness marks each time a barrel is installed. The barrel lock nut could be fixed in place with Loc-Tite, a thread locking agent, but I have discovered a better way. I simply slide a thin, metal shim between the non-threaded barrel and barrel lock nut shroud coated on both sides with J-B Cold Weld. This does the trick. As the bonding agent is setting I install the barrel in the action and torque it to about 25-foot pounds with the witness marks in alignment. This assures coaxial alignment at the barrel-to-receiver thread juncture.
Then, should you later want to move the barrel lock nut or further adjust headspace, simply apply heat over the J-B Cold Weld tab and the lock nut can be turned. Re-apply the Cold-Weld tab as needed. I've never had a barrel lock nut loosen in changing dozens of barrels with my system of switching barrels on these Savage rifles.
Stamped recoil lug on left, used by Savage on the Models 12 and 112 rifles. The Holland recoil lug shown on right is used as a replacement for the Savage lug. This is a high precision double-disk-ground lug. The receiver face is shown at center with alignment notch used to align the recoil lug.
FITTING AN AFTER-MARKET BARREL TO THE SAVAGE 110 SERIES RECEIVER
As I get into fitting custom after-market barrels on the Savage Model 110 series, a conventional barrel-to-receiver shoulder is put to use. There is little point in reducing the larger barrel diameter to the smaller Savage barrel diameter and extending the threads for a barrel lock nut. Savage Model 110 Series barrels have a 1.030" breech diameter over the chamber compared to 1.2" to 1.250" diameter common to most other barrels. In this situation larger barrels would tend to withstand greater chamber pressures as well.
As aforementioned, the Savage Model 112 long action was factory chambered for the .220 Swift in a fluted 26" stainless factory barrel and the short action was chambered for the .223 Remington. As converted to switch-barrel, both rifles maintained and delivered superb performance. It's really encouraging to see factory barrels producing sub-half-minute accuracy as these two rifles now do, particularly the high intensity .220 Swift cartridge.
My original plan was initially to add a .22 PPC, a 5mm/35 SMc, and a .257 Improved cartridge to the switch-barrel pair of fine shooting Savage rifles. Each of these new-addition cartridges used the larger .308 Winchester-size bolt face, and the short-action Savage Model 12 was chambered for the .223 Remington. This prompted me to go to Savage Arms and get an additional new .308-size bolt assembly for the short-action rifle. Bill Dermot and Effie at Savage Arms were courteous and prompt in arranging to send the new bolt assembly. As it turned out, I used the short-action switch-barrel, along with the new bolt, to chamber for the .22 PPC Shilen barrel, and the Krieger barrel was chambered for the 5mm/35 SMc. The .257 Improved cartridge was chambered to a Douglas premium 1:12" twist barrel for the longer 112 action.
Threading these three barrels for the 20" pitch Savage thread with a full 1.250" shoulder resulted in a most precision barrel-to-action fit. Conventional chamber reaming was quite routine, using a Pacific Tool & Gauge, Inc. reamer for the 5mm/35 SMc cartridge, and a Clymer reamer for the .22 PPC cartridge, and the .257 Improved 40-degree Ackley.
Processing a barrel for the Savage action while not using their customary barrel lock nut is a basic gunsmithing procedure. I did, however, have to lengthen the cross-slide style extractor in the .308-size bolt head to fit the smaller Lapua .22 PPC cases. Another plus with this pair of Savage rifles is the interchangeability of barrels from one rifle to the other. As an example, I can put the Douglas .257 Improved barrel on either the long action Model 112 or the short action Model 12 and cartridge headspacing is right on the money.
Most of my 40-X and 700 series Remingtons enable this barrel exchange to be performed as well. This opens a lot of doors. I designed a tool I call a bolt face comparator, which accurately measures the space between the posterior surface of the locking lugs and the bolt face. The new bolt that I got from Savage for the Model 12 measures out within a thousandth of an inch of the Model 112 bolt. Bolt or action length make no difference.
SAVAGE SWITCH-BARREL PERFORMANCE
Having experience with an array of switch barrel rifle types, I fully expected the Savage Model 12 short action single-shot and the long action Model 112 single-shot to be top performers. I did my best to obviate any bugs in the gunsmithing department that can certainly lurk around if strict attention to precision isn't carefully performed.
These two actions have very rigid receivers equal in strength to the much praised Model 40-X Remington or several of the other stiff receiver actions. I had thoroughly gone over the stock bedding on these two rifles, leaving nothing to chance. The heavy, laminated stocks were used, adding additional bedding pillars where I could. This, in itself, got very involved.
In the scope mounting department, I used the Picatinny-style bases with Brownells 8-40 mount screw conversion kit to replace the 6-48 standard mount screws for added strength on both rifles. The Model 12 wore a Ferrel Picatinny-style base, topped with Leupold's tactical style scope rings. On the long action Model 112 I used one of Brownells Picatinny-style bases, also topped with Leupold's tactical-style rings. I vacillated between scopes, ending up with a 6.5-20x SII Sightron scope on the long action Model 112. The short action Model 12 now wears one of the older Redfield 8-32x Target scopes.
The entire scope mounting system was thoroughly checked with Brownell's scope alignment rods as a means of identifying any stresses in the scope mounting. These 30mm/1 inch, sleeved alignment rods totally remove all guesswork in co-axial alignment of the scope rings.
Barrels could be removed and re-installed in well under 10 minutes while repeating perfect bullet impact and grouping on target. With proper gunsmithing, the Savage 12 and 112 have the inherent accuracy capable of being wrung out along with the best of them, including the famous Model 40-X Remington. In my experience, that is saying quite a bit for a non-custom, factory action.
At the time of this writing, the two Savage switch-barrel rifles were chambered for the .220 Swift and .223 Remington as factory barrels and .257 Improved 40-degree in a Douglas barrel, .22 PPC in a Shilen barrel, and 5mm/35 SMc in a Krieger barrel. Then, after no small amount of contemplation, I chambered the Model 12 to .308 Winchester. I had in mind here to put together a super-accurate .308. The extra bolt for the Model 12 helped in making this decision. I talked with Tim North, president of Broughton Barrels, and there was a barrel in the works. A 1:12" twist Broughton barrel later was installed.
Manson Precision Reamers made up a special reamer with a 0.342" neck diameter and 0.3085" x 0 x 11/2 degree throat. I would be testing some of the Lapua cases with small-size primer pockets and the Hornady Competition cases as well. I fitted the new barrel to the Savage Model 12 action with an integral shoulder in lieu of the Savage-style lock nut. Actually, the barrel fitted in this way headspaced perfectly in both the Savage Model 12 and Savage Model 112 single-shot rifles. The barrel was stamped accordingly.
With all the work I had done in preparing these rifles, my expectations for accuracy ran pretty high. My first testing involved the two Savage factory barrels in .220 Swift and .223 Remington. With all my rifles I keep very detailed performance records, along with targets representative of the accuracy on each and every rifle and/or barrel. I was not surprised when noticeably improved accuracy emerged from each of these two factory barrels in their much-worked-on actions and stocks. The convincing results were right there before me.
As I got into testing the other barrels, it was evident these two Savage rifles were delivering accuracy every bit as good as I had come to expect from my best target and varmint rifles, including the more than a dozen Model 40-X Remington rifles. Each of these Model 40-X rifles have been converted to switch-barrel use with more than a score of premium barrels in a good variety of cartridges, so I had many rifles to compare the two Savage rifles to in my evaluation.
The Savage rifle pictured here is a perfect example of efficient switch-barrel design as the barrel is removed beneath the mounted scope with action remaining in the stock. The rifle shown here is a Savage Model 12 with 50mm Bausch & Lomb scope and Picatinny mounts. Shown here is a pre-headspaced Savage barrel with barrel lock nut in fixed position.
While I have other Savage single-shot actions in use, it was the Model 12 in caliber .223 that I used at the 2003 writers' conference that inspired me to pursue the Savage rifles as switch-barrel candidates. As mentioned earlier, the Savage barrel lock nut system really didn't fit into my scheme of switch barreling until I locked the barrel nut into position at proper headspace. This was a necessary move. It would be hard for the average rifleman/hunter to imagine two rifles, each with three barrels, delivering the level of accuracy I would later get from these two Savage rifles.
What I had in mind for these two switch-barrel rifles was delivery of both target and varmint shooting performance. I knew the inherent accuracy was within these rifles — all they needed was a little coaxing. With all the fine components we have today for reloading, it was easy to find loads for these rifles to fit both needs. It would be impossible here to include all the fine loads. I did, however, photograph targets from each of the six carefully fitted barrels. One of the series of targets includes the initial group shot with the .223 Remington Model 12 from the factory. This shows a near half-inch group using 69-grain Federal Gold Medal ammo. My starting groups with this barrel, before the total accurizing process, were pretty much like this factory target. But things really changed. One photograph shows typical examples of pure accuracy from a factory rifle with a factory barrel. Four groups using 52-grain Berger bullets measure 0.175", 0.125", 0.195", and 0.240" for a 0.184" average.
In my long search for a super-grouper .308 Winchester rifle, I came upon a few that hovered around 0.5" to 0.6", give or take a few tenths. Then, as I worked with the Model 12 Savage with the smaller .223 Remington bolt face, I decided to add a .308 Winchester-size bolt. What a good move this was! I contacted Tim North and he made me a 1:12" twist barrel for the .308 Winchester. Dave Manson put the finishing touches on a reamer, and following about eight hours of careful gunsmithing, the barrel was ready for testing. I also had some special Lapua Palma cases with small rifle primer pockets and smaller flash holes to use along with the Hornady match cases. I always thought there was a "quarter minute" .308 Winchester rifle out there for me, but I didn't think it would end up being a Savage rifle.
Shown here is the basic premise combining two different types of pre-headspaced barrels used in switch-barrel application. Here the Savage barrel, with fixed lock nut, is shown along with the use of a conventional barrel shoulder as changed by author. The Holland recoil lug is shown here on a Savage M112 action with Picatinny scope base. Barrel fitting doesn't get more solid and precise than this.
From the onset, the .308 Winchester rifle handled most any of the loads I offered it with a good share of high twos and threes in the mix. Then I struck on a load that set 'em all back. This was the 168-grain Berger with the Lapua small-rifle-primer cases using 41 grains of Reloder 15 powder and CCI 200 small rifle primers. One target showed a 0.231 minute of angle 300-yard group and two five-shot 100-yard groups measuring 0.195" and one 0.009" (and yes, the decimal points are in the correct place).
These three groups translate to 0.145" minute of angle average.
The Savage stock barrel in .220 Swift shot four groups using Hornady 52-grain bullets into 0.473", 0.435", 0.279", and 0.233" for a respectable 0.355" average.
One of my favorite .25 caliber wildcats, the .257 Ackley Improved, fared well with six straight five-shot groups with none outside of 0.650". Here I used Sierra's 100-grain bullets and IMR 4350 powder.
In my planning, I chose to chamber a Krieger 1:12" twist barrel to the 112 action for the 5mm/35 SMc. The more I use this cartridge the better I like it. It is a worthy addition to the .20 caliber family. Six groups using a few of the bullets stayed well under 0.400" average at 100 yards. At 300 yards it also grouped very well.
Last, I'll reflect on the .22 PPC as used in the Savage Model 12 short action with a Shilen 1:14" twist barrel. Though this entry may be thought of as a bench rest cartridge, along with its rather pricey cases, it also is a very capable varmint cartridge. I shot seven groups shortly after barrel break-in using the 52-grain Sierra bullet along with 26 grains of N133 powder. These seven groups averaged a ho-hum 0.160". I then switched to the 300-yard range and shot three five-shot groups which measured 0.795", 0.850", and 0.940", which translates to 0.862" MOA average in a mild crosswind. Whenever my varmint rifles group inside two inches at 300 yards, I don't complain, but inside an inch at this range is above and beyond!
To summarize, the many hours devoted to planning and building switch-barrel rifles has been worth every minute of it. Had I known how effective the Savage rifles would be, I would not have waited so long to work with them.
CONTACTS
(Savage 12 & 112 Switch-Barrels)
Savage Arms, Inc.
118 Mountain Road
Suffield, CT 06078
(413) 568-7001
www.savagearms.com
Holland's Shooters Supply Inc.
P.O. Box 69
Powers, OR 97466
(541) 439-5155
www.hollandguns.com
Brownells
200 South Front Street
Montezuma, IA 50171
(800) 741-0015
www.brownells.com
Lapua
123 Winchester Drive
Sedalia, MO 65301
(660) 826-3232
www.lapua.com
NEAR Mfg.
P.O. Box 1677
Camrose, Alberta T4V1X6 Canada
(866) 608-2441
www.scopebases.com
Douglas Barrels Inc.
5504 Big Tyler Road
Charleston, WV 25313
(304) 776-1341
www.douglasbarrels.net
Shilen Rifles, Inc.
205 Metro Park Blvd.
Ennis, TX 75120
(972) 875-5318
www.shilen.com
Krieger Barrels, Inc.
2024 Mayfield Road
Richfield, WI 53076
(262) 628-8558
www.kriegerbarrels.com
Broughton Barrels
P.O. Box 1010
Campbellsport, WI 53010
(920) 922-4882
www.rifle-barrels.net
Clymer Precision
1605 West Hamlin Road
Rochester Hills, MI 48309
(248) 853-5555
www.clymertool.com
Dave Manson Precision Reamers
8200 Embury Road
Grand Blanc, MI 48439
(810) 953-0732
www.mansonreamers.com
Leupold & Stevens
P.O. Box 688
Beaverton, OR 97006
(503) 526-1422
www.leupold.com