How To Photograph Your Big Game Trophy
by Troy Adams
The hunting part of your quest is now over and your trophy is lying on the ground. After you have completed your "happy dance" and before you start to field dress the animal it is important to take time to capture the memory of the day on film. Some hunters give little thought to this important part of the hunt. I look at it this way, most avid hunters will have plenty of opportunities to shoot game and go on hunting adventures. The field dressing has got to take place sooner or later and isn't going to go away. However; a person only has "ONE" chance to take field photos at the location the animal was taken.
Looking at the photographs later that were taken on location will help to stir up all the great memories of that hunt, and memories are all we really have in the end. Well composed photographs make those memories more enjoyable and also more acceptable to show to friends, especially those that may not hunt. Poorly composed or offensive blood and guts type photographs cast an unpleasant mist over the moment. One may end up spending more time apologizing for the lousy photos than talking about the hunt. My goal is to help hunters avoid such a negative experiences while showing the success...photographs of their hunt.
Step One
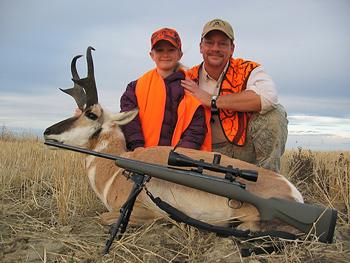
There is some preparation that should occur before ever pulling the camera out. The first thing to remember is that photography is all about "light" and what that light is doing in your photograph. You want your subjects placed in a way that they are well illuminated by either sunlight or the camera flash. The absolute best time for most photographs is during that first or last hour of sunlight, but that is not always an option. If you do have a choice, take advantage of those two prime hours. Try to avoid having the sun at your subject's back. Granted, with some animals such as moose, buffalo, or large African game this may be darn near impossible. They are so big you more or less have to take photographs of them where they fall, but most other animals can be maneuvered around to some degree. Try to angle the head of the hunter and animal towards the sun, but not necessarily directly at the sun. With antlered game it is usually better if you can find a way to use the sky or a contrasting background behind the horns or antlers. Again this may not always be possible due to the animal's size or the terrain, but if possible a sky backdrop looks very nice and puts the focus on the headgear.
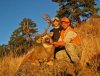
Although the hunter has a very nice buck in this example it is hard to tell where the antlers start and stop. They are lost in the busy background and the hunter's camouflaged jacket.
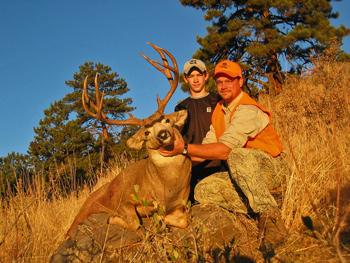
Use this photograph above as a comparison of what a difference it makes having a non-busy background against which the antlers stand out in contrast from the background. There is no question where the antlers start and stop and the main focus is on the buck.
Also take time to look around and decide if there are any environmental features you want included in the background of the photograph. For example perhaps the ruggedness, the steepness of the mountains, the openness of the prairie, or the denseness of the foliage may enhance the picture. Regardless of what you choose to add, be sure to keep the main focus on the animal. You can always take scenic or panoramic landscape photographs before, during, or after your hunt. Right now the main concern should be capturing your trophy and the moment on film.
Step Two
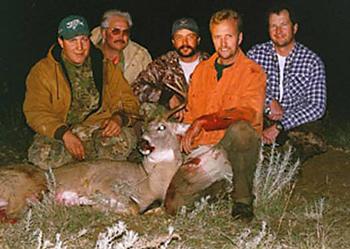
Now that you have the animal in place where you want to take the photograph look around and see if the area needs any cleaning up. If you killed a deer, antelope, or turkey in an area where cattle sometimes graze you may want to remove any cow pies that might want to make a cameo appearance in your photograph. Also look around to make sure there isn't excessive blood or guts on the ground around your subject.
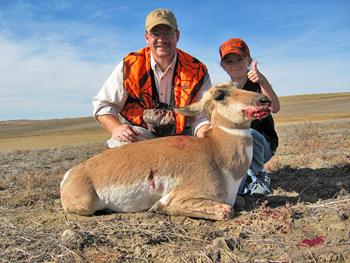
Here is an example of not taking the time to clean up the animal. Note how it really distracts from an otherwise good photograph.
Now here is another photograph taken on the same hunt with time taken to clean things up and compose the photograph.
A few other things to look for would be back packs, garbage, vehicles, or anything else in the area of the photograph that would take away from the picture. Once you have policed the area turn your attention to the animal. If it is bloody take a little extra time to clean it up. Use snow or water if it is available to clean up, in particular, the face. Spend a little extra time cleaning around the nose and mouth. Also make sure the animal's tongue is NOT sticking out. Some tongues just insist on falling out about the time the camera person is about to take the photograph. I remedied this long ago. I just pull the tongue out as far as possible and remove it with my knife. I figure the animal doesn't need it anymore anyway. Trust me...removing the tongue makes the picture taking less complicated and is one less thing to worry about.
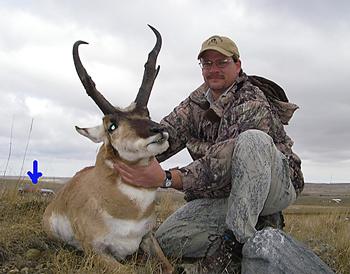
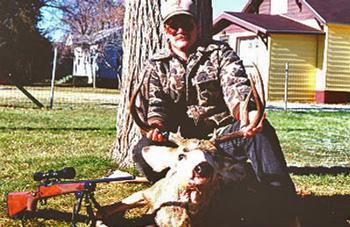
Oops, note the top of the red pick up truck.

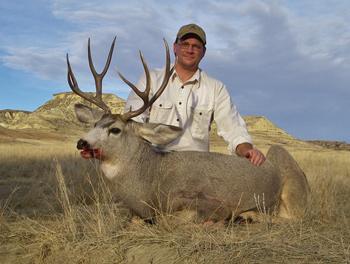
The same location, with a better angle, and more attention to the background lighting.
Step Three
Now place the hunter behind the animal. Make sure the hunter has the blood cleaned off their hands. Be sure to see if there is any blood on the hunter's clothes and try to hide blood stains with the animal, brush, rocks, logs, or whatever is available. Advise hunters to support the animal by some other way than holding the antlers or horns if possible. It sort of defeats the purpose of shooting a trophy if one covers up part of the antlers or horns with their hands. Look through your view finder and see if everything is how you would like it to be. See if the hunter's hat is casting a strong shadow on their face. If so, either have them tip their cap back a bit or use your flash to reduce the shadow.
Here in the two photographs above the clothes of both hunters are a mess. Time should have been taken to clean up or hide the mud and blood on their clothes.
Step Four
Now that everything is ready to go one must decide where the photographer is going to locate his or herself to take the pictures. Photographs of antlered or horned game and black bear tend to look better from a "worm's-eye" view. In other words get below the animal generally by lying on the ground downhill and/or in front of the animal. This also makes it much easier to skylight the animal's horns or antlers. Just be sure to check for cactus, snakes, sharp rocks, or water before you lay down! Generally it is not a good idea to photograph game animals from above as it makes them appear smaller than they really are. If you can't get below the subject, at least take the picture at eye level.
This photograph was taken at eye level.
Now, the same bear photographed from a "worms-eye" view. I think this example clearly shows what a difference getting closer and below the subject can make.
Once on the ground move as close to the subject as possible, but not too close. Do not use your zoom lens, move yourself closer instead. You want to be sure to keep the subject and the hunter in the photo-frame, but not cut off the top of the hunters head, part of antler, or the bottom half of the animal. You do not want to be so far away that both the animal and hunter appear small in the picture and get lost in the environment. Generally speaking a photograph taken closer to the subject without a lot of back ground noise is better than one taken farther away. Once you have decided on your location for shooting photos double check through the view finder to make sure there isn't any grass, weeds, or sticks in the way of the lens or between you and the subject. If there are, mash them down or remove them.
Step Five
Now the fun starts. Begin taking photos, but have the person turn the animal's head to different angles. Have the hunter move around a little to find that just perfect pose. The photographer should move side to side and forward and backward occasionally to try and capture different angles and light.
Here are two examples of changing the angle to best bring out the buck's features.
While the above photograph is acceptable I believe the photograph below taken from a different angle better enhances both the hunter and the deer. Also see that the photographer moved closer to the subject. This does sacrifice some background, but not to a major extent.

Include some pictures with the weapon and some without. If others were in on the hunt take some group photos and some of just the hunter. Don't be afraid of taking a few of just the animal or the animal with the weapon or other equipment used like binoculars, range finders, back packs, and spotting scopes. Remember it is the memory you are trying to recreate so use whatever props necessary to help relive that hunt. Film or digital images are likely the cheapest part of the hunt so don't scrimp on the opportunity to take a lot of pictures from many angles and distances.
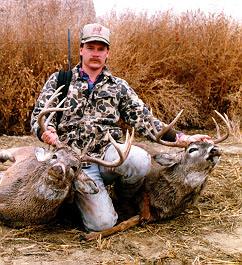
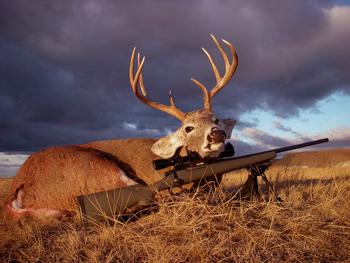
The following two photographs are without the hunter and experimenting with different angles.
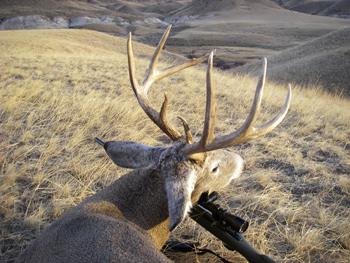
Same whitetail buck from a different angle and different light. It is still a great photo, but it sure changes the appearance of the buck's antlers.
Final Thought
Take full advantage of the moment. Try to make it fun for all those involved. If you have children along include them in the pictures. Remember you basically only have that one chance to take those pictures and try to make the most of it. If you do, you will be able to relive those memories for many years to come and have photographs that you can be proud to show your friends.
Join the discussion of this article with the author HERE at the Article Discussion Forum.An avid big game hunter, Troy Adams has been hunting big game for nearly 30 years. Combining hunting and photography has helped him preserve many great memories. When not hunting, photographing, writing, or spending time with his family, Troy is usually found working on his wildlife art drawings.
by Troy Adams
The hunting part of your quest is now over and your trophy is lying on the ground. After you have completed your "happy dance" and before you start to field dress the animal it is important to take time to capture the memory of the day on film. Some hunters give little thought to this important part of the hunt. I look at it this way, most avid hunters will have plenty of opportunities to shoot game and go on hunting adventures. The field dressing has got to take place sooner or later and isn't going to go away. However; a person only has "ONE" chance to take field photos at the location the animal was taken.
Looking at the photographs later that were taken on location will help to stir up all the great memories of that hunt, and memories are all we really have in the end. Well composed photographs make those memories more enjoyable and also more acceptable to show to friends, especially those that may not hunt. Poorly composed or offensive blood and guts type photographs cast an unpleasant mist over the moment. One may end up spending more time apologizing for the lousy photos than talking about the hunt. My goal is to help hunters avoid such a negative experiences while showing the success...photographs of their hunt.
Step One
There is some preparation that should occur before ever pulling the camera out. The first thing to remember is that photography is all about "light" and what that light is doing in your photograph. You want your subjects placed in a way that they are well illuminated by either sunlight or the camera flash. The absolute best time for most photographs is during that first or last hour of sunlight, but that is not always an option. If you do have a choice, take advantage of those two prime hours. Try to avoid having the sun at your subject's back. Granted, with some animals such as moose, buffalo, or large African game this may be darn near impossible. They are so big you more or less have to take photographs of them where they fall, but most other animals can be maneuvered around to some degree. Try to angle the head of the hunter and animal towards the sun, but not necessarily directly at the sun. With antlered game it is usually better if you can find a way to use the sky or a contrasting background behind the horns or antlers. Again this may not always be possible due to the animal's size or the terrain, but if possible a sky backdrop looks very nice and puts the focus on the headgear.
Although the hunter has a very nice buck in this example it is hard to tell where the antlers start and stop. They are lost in the busy background and the hunter's camouflaged jacket.
Use this photograph above as a comparison of what a difference it makes having a non-busy background against which the antlers stand out in contrast from the background. There is no question where the antlers start and stop and the main focus is on the buck.
Also take time to look around and decide if there are any environmental features you want included in the background of the photograph. For example perhaps the ruggedness, the steepness of the mountains, the openness of the prairie, or the denseness of the foliage may enhance the picture. Regardless of what you choose to add, be sure to keep the main focus on the animal. You can always take scenic or panoramic landscape photographs before, during, or after your hunt. Right now the main concern should be capturing your trophy and the moment on film.
Step Two
Now that you have the animal in place where you want to take the photograph look around and see if the area needs any cleaning up. If you killed a deer, antelope, or turkey in an area where cattle sometimes graze you may want to remove any cow pies that might want to make a cameo appearance in your photograph. Also look around to make sure there isn't excessive blood or guts on the ground around your subject.
Here is an example of not taking the time to clean up the animal. Note how it really distracts from an otherwise good photograph.
Now here is another photograph taken on the same hunt with time taken to clean things up and compose the photograph.
A few other things to look for would be back packs, garbage, vehicles, or anything else in the area of the photograph that would take away from the picture. Once you have policed the area turn your attention to the animal. If it is bloody take a little extra time to clean it up. Use snow or water if it is available to clean up, in particular, the face. Spend a little extra time cleaning around the nose and mouth. Also make sure the animal's tongue is NOT sticking out. Some tongues just insist on falling out about the time the camera person is about to take the photograph. I remedied this long ago. I just pull the tongue out as far as possible and remove it with my knife. I figure the animal doesn't need it anymore anyway. Trust me...removing the tongue makes the picture taking less complicated and is one less thing to worry about.
Oops, note the top of the red pick up truck.
The same location, with a better angle, and more attention to the background lighting.
Step Three
Now place the hunter behind the animal. Make sure the hunter has the blood cleaned off their hands. Be sure to see if there is any blood on the hunter's clothes and try to hide blood stains with the animal, brush, rocks, logs, or whatever is available. Advise hunters to support the animal by some other way than holding the antlers or horns if possible. It sort of defeats the purpose of shooting a trophy if one covers up part of the antlers or horns with their hands. Look through your view finder and see if everything is how you would like it to be. See if the hunter's hat is casting a strong shadow on their face. If so, either have them tip their cap back a bit or use your flash to reduce the shadow.
Here in the two photographs above the clothes of both hunters are a mess. Time should have been taken to clean up or hide the mud and blood on their clothes.
Step Four
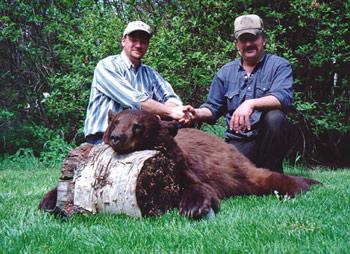
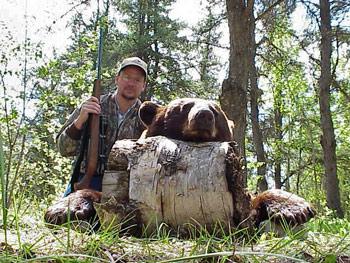
Now that everything is ready to go one must decide where the photographer is going to locate his or herself to take the pictures. Photographs of antlered or horned game and black bear tend to look better from a "worm's-eye" view. In other words get below the animal generally by lying on the ground downhill and/or in front of the animal. This also makes it much easier to skylight the animal's horns or antlers. Just be sure to check for cactus, snakes, sharp rocks, or water before you lay down! Generally it is not a good idea to photograph game animals from above as it makes them appear smaller than they really are. If you can't get below the subject, at least take the picture at eye level.
This photograph was taken at eye level.
Now, the same bear photographed from a "worms-eye" view. I think this example clearly shows what a difference getting closer and below the subject can make.
Once on the ground move as close to the subject as possible, but not too close. Do not use your zoom lens, move yourself closer instead. You want to be sure to keep the subject and the hunter in the photo-frame, but not cut off the top of the hunters head, part of antler, or the bottom half of the animal. You do not want to be so far away that both the animal and hunter appear small in the picture and get lost in the environment. Generally speaking a photograph taken closer to the subject without a lot of back ground noise is better than one taken farther away. Once you have decided on your location for shooting photos double check through the view finder to make sure there isn't any grass, weeds, or sticks in the way of the lens or between you and the subject. If there are, mash them down or remove them.
Step Five
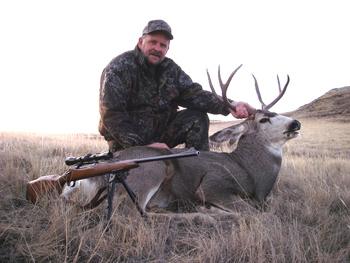
Now the fun starts. Begin taking photos, but have the person turn the animal's head to different angles. Have the hunter move around a little to find that just perfect pose. The photographer should move side to side and forward and backward occasionally to try and capture different angles and light.
Here are two examples of changing the angle to best bring out the buck's features.
While the above photograph is acceptable I believe the photograph below taken from a different angle better enhances both the hunter and the deer. Also see that the photographer moved closer to the subject. This does sacrifice some background, but not to a major extent.
Include some pictures with the weapon and some without. If others were in on the hunt take some group photos and some of just the hunter. Don't be afraid of taking a few of just the animal or the animal with the weapon or other equipment used like binoculars, range finders, back packs, and spotting scopes. Remember it is the memory you are trying to recreate so use whatever props necessary to help relive that hunt. Film or digital images are likely the cheapest part of the hunt so don't scrimp on the opportunity to take a lot of pictures from many angles and distances.
The following two photographs are without the hunter and experimenting with different angles.
Same whitetail buck from a different angle and different light. It is still a great photo, but it sure changes the appearance of the buck's antlers.
Final Thought
Take full advantage of the moment. Try to make it fun for all those involved. If you have children along include them in the pictures. Remember you basically only have that one chance to take those pictures and try to make the most of it. If you do, you will be able to relive those memories for many years to come and have photographs that you can be proud to show your friends.
Join the discussion of this article with the author HERE at the Article Discussion Forum.An avid big game hunter, Troy Adams has been hunting big game for nearly 30 years. Combining hunting and photography has helped him preserve many great memories. When not hunting, photographing, writing, or spending time with his family, Troy is usually found working on his wildlife art drawings.